This is the second part in a series of posts about on getting started with Kubernetes. In my previous post, I covered how to setup single node of Kubernetes Cluster locally using Minikube and discussed a few issues which I came across during its setup. Since Kubernetes comes with its own toolset, we can pretty much configure and run the software on multiple cloud providers, on-premise servers and even our local machine. This post is a step by step guide on setting up a highly available multi-zone Kubernetes cluster using Google Cloud Platform(GCP). Google Cloud Platform has excellent support for Kubernetes through the Google Container Engine(GKE) that provides a Container Engine service built on top of Kubernetes. This makes managing a Kubernetes cluster a breeze. In this post, I am going to detail on how to spin up multi-node Kubernetes cluster on GKE (Google Container Engine).
Kubernetes is a container orchestration software that started at Google. A cluster has a set of nodes (think computers) on which we have pods, where each pod is a unit that contains several containers. In simple terms, it’s about managing a cluster (a set of machines) on which we have containers running. To follow this post, you should have a minimal understanding of Kubernetes and Google Container Engine.
Setup And Configure Google Cloud Platform
In this section, I will be talking about pre-requisites to configure Google Cloud Platform and different ways to communicate to Google Cloud platform. Note:-Users of Google Cloud Platform are eligible for a $300 free trial.
Prerequisites – To follow this post,
- You should have a Google Cloud account
- Create a Google Cloud Project
- i) Go to Google Cloud Platform console
- ii) Create a project. My project is “kubernetes-project”. Every project has an id that you’re mostly working with. My PROJECT ID is “kubernetes-project-184510”. This is a unique name across all Google Cloud projects
Ways to communicate to Google Cloud platform.
Creating Kubernetes Cluster On GKE
GKE Cluster can be created in two ways: via the gcloud Interactive Shell or via the Cloud Platform Console. Both the methods use Google Container Engine (GKE) for creating clusters. In below sections, I will provide you with the steps for setting up a single and multi-zone Kubernetes cluster using both the methods.
Cluster creation via Google Cloud Shell
You can create GKE cluster by following simple commands on Google Shell.
my case ‘kubernetes-project’) created from the Google Cloud Platform dashboard. Then select the Activate Google Cloud Shell button in the top nav. Once connected, you are already authenticated and the PROJECT_ID environment variable is already set by default. Note: As mentioned earlier, Google Cloud Shell comes pre-installed with the Google Cloud SDK and built-in authorization for access to projects and resources hosted on Google Cloud Platform.
$ CLUSTER_NAME=kubernetes-lab1 $ gcloud config set container/cluster ${CLUSTER_NAME} $ MACHINE_TYPE=n1-standard-2 # By default this spins up a 3-node cluster. You can change the default with `--num-nodes VAL` $ gcloud container clusters create ${CLUSTER_NAME} --zone europe-west1-d --scopes storage-rw --machine-type ${MACHINE_TYPE} |
By default, if we do not specify the number of nodes and their types, then Container Engine will use three n1-standard-1 (1 vCPU, 3.75 GB memory) Compute Engine VMs for the cluster. In this example, I am creating a Kubernetes cluster in ‘europe-west1-d’ zone with three instances (nodes) per zone using machine type ‘n1-standard-2’. The actual command would look like the following.
$ gcloud container clusters create kubernetes-lab1 \
         --zone europe-west1-d \
         --scopes storage-rw \
--machine-type n1-standard-2 |
You can also create a multi-zone cluster using below command
gcloud container clusters create kubernetes-lab1 \
      --zone europe-west1-d \
      --additional-zones europe-west1-a,europe-west1-b \
      --scopes storage-rw
--machine-type n1-standard-2 |
Note that –scopes specifies scopes for the node instances. Multiple comma-delimited scopes can be specified. The scopes necessary for the cluster to function properly (compute-rw, storage-ro), are always added, even if not explicitly specified. I initially created the Kubernetes cluster without defining a permission scope. Hence I was getting “googleapi: Error 403: Insufficient Permission” error when I tried to access the node instances. If no scope is set when the cluster is created, the default scope is assigned and this only provides read permission for Cloud Storage. If you haven’t assigned your cluster with the correct scope, the nodes in the cluster would not have the required authorization/permission to write to Google Cloud Storage. Later I managed to create a cluster with ‘storage-rw’ scope and everything worked as expected.
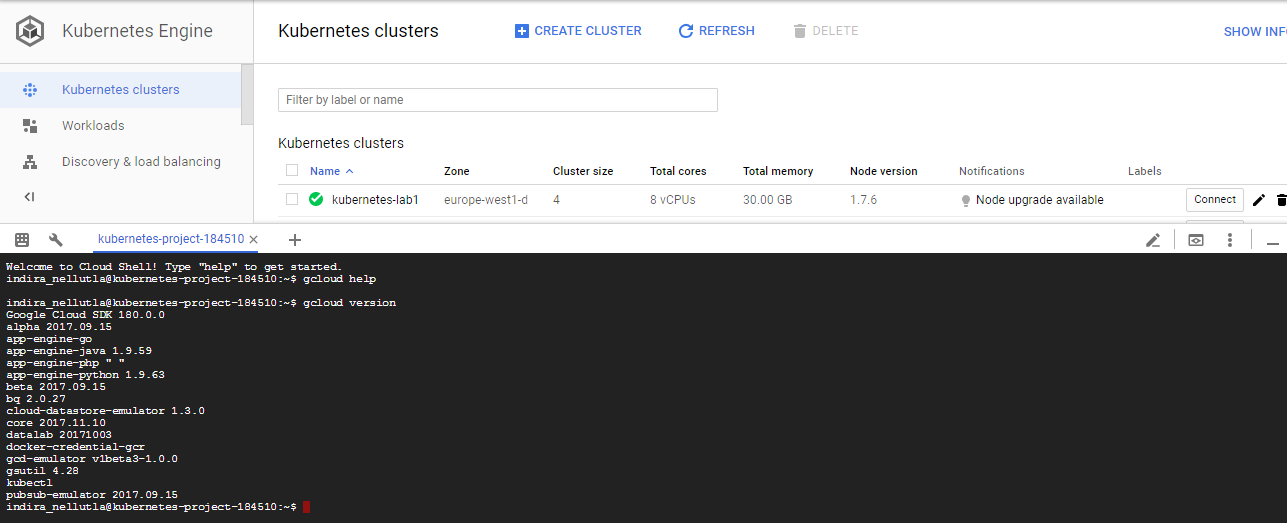
We can also check the status on the GCP Console. As a sanity check, to make sure the cluster is up and running via kubectl, use below command.
$ kubectl get all NAME CLUSTER-IP EXTERNAL-IP PORT(S) AGE svc/kubernetes 10.0.0.1 443/TCP 22s |
Since the cluster is fully setup with the Kubernetes platform we can start interacting with it by using the kubectl command as shown below
$ kubectl cluster-info |

As you can see, the details contain the Kubernetes Master URL and other URLs for various Kubernetes services, one of which is the Kubenetes-Dashboard which is the Web UI running on the Kubernetes Master.
The new cluster will also appear in the Container Engine -> Kubernetes cluster section within Google Cloud Platform:

Cluster creation via Cloud Platform Console
Creating a cluster using Google Cloud Console is pretty easy and straight forward.

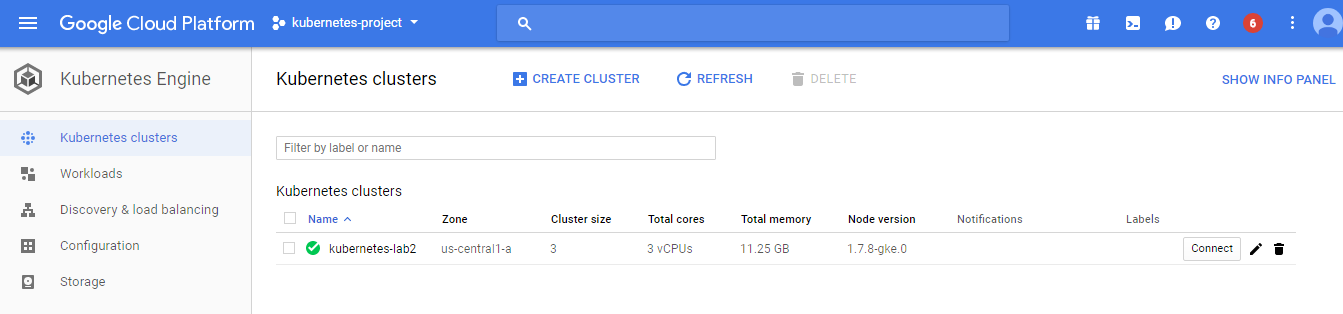
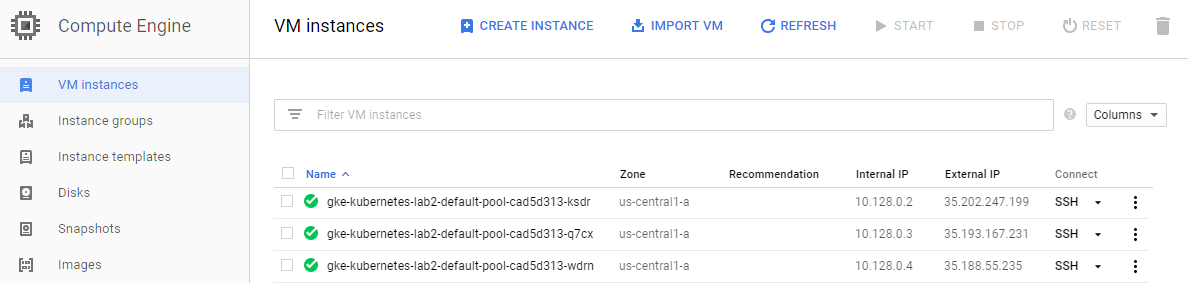
The nodes are managed by Compute Engine VMs and Kubernetes master is managed by Container Engine. Since the nodes are managed by Compute Engine VMs, we can also SSH into them. However, you cannot SSH into Kubernetes Master. Now you have a Kubernetes Cluster ready to use! Make sure that you turn off the VM’s after you finish your work.
$ gcloud container clusters get-credentials kubernetes-lab2 |
Note: If you are using an existing Kubernetes Engine cluster or if you have created a cluster through Google Cloud Platform Console, you need to run the above command to retrieve cluster credentials and configure kubectl command-line tool with them. If you have already created a cluster with the gcloud container clusters create command listed above, this step is not necessary.
In this post, we learned how to
1) Setup and configure Google Cloud Platform
2) Set up a kubernetes cluster using Google Cloud Shell and Google Cloud Console.
If you liked what you read, know more about Qxf2.
References
1) Get Started With Kubernetes
2) Spinning Up Your First Kubernetes Cluster on GKE
3) googleapi: Error 403: Insufficient Permission

I am an experienced engineer who has worked with top IT firms in India, gaining valuable expertise in software development and testing. My journey in QA began at Dell, where I focused on the manufacturing domain. This experience provided me with a strong foundation in quality assurance practices and processes.
I joined Qxf2 in 2016, where I continued to refine my skills, enhancing my proficiency in Python. I also expanded my skill set to include JavaScript, gaining hands-on experience and even build frameworks from scratch using TestCafe. Throughout my journey at Qxf2, I have had the opportunity to work on diverse technologies and platforms which includes working on powerful data validation framework like Great Expectations, AI tools like Whisper AI, and developed expertise in various web scraping techniques. I recently started exploring Rust. I enjoy working with variety of tools and sharing my experiences through blogging.
My interests are vegetable gardening using organic methods, listening to music and reading books.

