Maintaining infrastructure for automated Selenium cross-browser tests is time-consuming.
The cloud testing platforms like BrowserStack and Saucelabs help you. But in some cases, you want to have your own cloud testing environment. This is usually time-consuming and involves setting up and using Selenium Grid. This post helps testers to automate the setup process for cloud-based testing. We hope this post will make it easier for you to setup the cluster setup environment for distributing tests across a number of machines using Selenium Grid and Docker Swarm.
Selenium Grid enables testers to parallelize their testing pipeline. It can be used to automate the process of manually setting up a distributed test environment where you can expose the code to these environments. This helps speed up the cycle of Continuous Integration. This can be sped up even further by using the capabilities of Docker Swarm. This article will show you some scripts which we built to help to quickly create and configure a cluster rapidly.
Prerequisites
This post assumes prior knowledge of Docker and some experience working with Docker. You should also be familiar with the following AWS EC2 services.
Objective
By the end of this tutorial, you will be able to run some sample Selenium tests parallelly across AWS machine setup having Chrome and Firefox drivers. To achieve this you need to
1) Automate the provisioning of resources on AWS
2) Set up the swarm manager and workers
3) Create the Selenium Grid
4) Deploy the Selenium Grid to AWS via Docker Compose
5) Run automated tests on Selenium Grid
6) Automate de-provisioning of resources on AWS
Note:- This article will walk you through setting up a Grid on AWS using 3 machines (1 manager, 2 worker nodes). Before going into details lets have a brief about Selenium grid and Docker Swarm.
What is Selenium Grid?
Selenium-Grid allows you to run your tests on different machines against different browsers in parallel. The entry point of Selenium Grid is a Selenium Hub. Our test cases will hit the hub and spin up whatever browser is available within your Grid using the DesiredCapabilities function of Selenium. Next elements are nodes, which are machines that are registered to the hub which can execute the test cases. To run multiple tests in parallel, a grid is a must.
What is Docker Swarm?
Docker Swarm is a tool used to cluster and orchestrate Docker containers. There are two types of nodes: manager nodes (to define services), and worker nodes (instructed by manager nodes based on the service definition). You submit a service definition to a manager node. The service definition consists of one or more tasks and how many replicas of that service you want to run on the cluster.
About our automation scripts
We wrote two scripts, swarm.sh and swarmdown.sh.
The swarm.sh will
The swarmdown.sh will
Here is the complete swarmup.sh script. We will have a look at each section in detail below.
swarmup.sh
#!/bin/bash echo "Spinning up three aws instances..." for i in 1 2 3 ; do docker-machine create \ --driver amazonec2 \ --amazonec2-open-port 2377 \ --amazonec2-open-port 7946 \ --amazonec2-open-port 4789 \ --amazonec2-open-port 7946/udp \ --amazonec2-open-port 4789/udp \ --amazonec2-open-port 8080 \ --amazonec2-open-port 80 \ --amazonec2-open-port 22 \ --amazonec2-open-port 4444 \ swarmmode-$i done #update os for i in 1 2 3; do echo "updating swarmmode-$i" docker-machine ssh swarmmode-$i 'apt-get update && apt-get upgrade -y && reboot' done sleep 10 echo "Initializing Swarm mode..." for i in 1 2 3; do if [ "$i" == "1" ]; then manager_ip=$(docker-machine ip swarmmode-$i) eval $(docker-machine env swarmmode-$i) && \ docker swarm init --advertise-addr "$manager_ip" worker_token=$(docker swarm join-token worker -q) else eval $(docker-machine env swarmmode-$i) && \ docker swarm join --token "$worker_token" "$manager_ip:2377" fi done echo "Deploying Selenium Grid to http://$(docker-machine ip swarmmode-1):4444..." eval $(docker-machine env swarmmode-1) docker stack deploy --compose-file=docker-compose.yml selenium_test |
We have created 3 EC2 instances of t2.micro instance type using ubuntu image(By default, the Amazon EC2 driver will use a daily image of Ubuntu 15.10 LTS so that latest version of Docker can be installed)
Provisioning resources to EC2
The first step in the script starts with spinning 3 EC2 instances. Before continuing to creating the instances let’s first understand about credentials configuration and ports that we need to configure in the security group.
Credentials Configuration: First step is to configure credentials. This can either be specified from command line flags or put in an environment file. We used environment variables to set the credentials. You can set the environment variables using the exportcommand as shown below
$ export AWS_ACCESS_KEY_ID=MY-ACCESS-ID $ export AWS_SECRET_ACCESS_KEY=MY-SECRET-KEY |
You can find more details about configuring credentials here
Port Configuration: Docker Swarm requires few ports to be open for it to work.
Below is the command to spin up 3 EC2 instances
for i in 1 2 3 ; do docker-machine create \ --driver amazonec2 \ --amazonec2-open-port 2377 \ --amazonec2-open-port 7946 \ --amazonec2-open-port 4789 \ --amazonec2-open-port 7946/udp \ --amazonec2-open-port 4789/udp \ --amazonec2-open-port 8080 \ --amazonec2-open-port 80 \ --amazonec2-open-port 22 \ --amazonec2-open-port 4444 \ swarmmode-$i done |
Docker-machine has an EC2 driver for creating a Docker node out of AWS. Docker node in this context means an AWS VM instance with Docker pre-installed. With default options, docker-machine picks up a t2.micro EC2 node with Ubuntu 15.10 OS and installs latest Docker engine on the AWS instance. docker-machine also takes care of configuring appropriate certificates which allows us to access the AWS VM securely. You can refer to this link for more details.
Ssh into each instance and update the os
The below commands allows you to ssh into each instances and update and upgrade os.
for i in 1 2 3; do echo "updating swarmmode-$i" docker-machine ssh swarmmode-$i 'apt-get update && apt-get upgrade -y && reboot' done |
Setting up the swarm manager and workers
In our case, the swarm will be composed of, 1 node with the manager role and 2 nodes with the worker role. So we would be creating swarm cluster by making “swarmmode-1” node as master and “swarmmode-2” node as worker1 and “swarmmode-3” as worker2. For achieving this, we can initialize the swarm cluster on the manager node using “docker swarm init“. The command docker swarm join-token worker -q gives the worker_token which is needed to add node workers to the swarm.
for i in 1 2 3; do if [ "$i" == "1" ]; then manager_ip=$(docker-machine ip swarmmode-$i) eval $(docker-machine env swarmmode-$i) && \ docker swarm init --advertise-addr "$manager_ip" worker_token=$(docker swarm join-token worker -q) else eval $(docker-machine env swarmmode-$i) && \ docker swarm join --token "$worker_token" "$manager_ip:2377" fi done |
The above code will add the first node as manager node and remaining two nodes to the swarm as workers. When these commands are executed you should see something like this in the console. You can run the script with below command
$ sh swarmup.sh |
Swarm initialized: current node (deyp099wnn94lgauxp9ljil83) is now a manager. To add a worker to this swarm, run the following command: docker swarm join --token SWMTKN-1-5rm2sib935txv5k13j6leaqsfuuttalktt7jv4s55249izjf54-8ia31tagc4sbehqeqiqst4jfz 172.30.0.170:2377 To add a manager to this swarm, run 'docker swarm join-token manager' and follow the instructions. This node joined a swarm as a worker. This node joined a swarm as a worker. |
Creating the Selenium Grid
Next, create a Docker compose file and place in the same directory where your shell scripts are located. Our docker-compose.yml looks like this. Docker compose lets you deploy Selenium Grid in multiple containers. The .yml file describes the containers and how they interact with each other. We are using standard SeleniumHQ images with Chrome and Firefox browsers already installed for hub and nodes. In this article, we will be using below docker images:
selenium/hub : Image for running a Grid Hub. It will expose port 4444 on the AWS instance so we can connect to the Selenium Grid.
selenium/node-chrome : Grid Node with Chrome installed.
selenium/node-firefox : Grid Node with Firefox installed.
Using this .yml file, we will be configuring the services. In this case, we have a hub service with two node services(Chrome and Firefox). When you deploy this .yml file on the Docker Swarm, all the services will be running on nodes from this configuration.
docker-compose.yml
version: "3.5" networks: main: driver: overlay services: hub: image: selenium/hub ports: - "4444:4444" networks: - main deploy: mode: replicated replicas: 1 labels: selenium.grid.type: "hub" selenium.grid.hub: "true" restart_policy: condition: none placement: constraints: [node.role == manager ] chrome: image: selenium/node-chrome entrypoint: > bash -c ' export IP_ADDRESS=$$(ip addr show eth0 | grep "inet\b" | awk '"'"'{print $$2}'"'"' | awk -F/ '"'"'{print $$1}'"'"' | head -1) && SE_OPTS="-host $$IP_ADDRESS" /opt/bin/entry_point.sh' volumes: - /dev/urandom:/dev/random - /dev/shm:/dev/shm depends_on: - hub environment: HUB_PORT_4444_TCP_ADDR: hub HUB_PORT_4444_TCP_PORT: 4444 NODE_MAX_SESSION: 1 networks: - main deploy: mode: replicated replicas: 1 labels: selenium.grid.type: "node" selenium.grid.node: "true" restart_policy: condition: none placement: constraints: [node.role == worker] firefox: image: selenium/node-firefox entrypoint: > bash -c ' export IP_ADDRESS=$$HOSTNAME && SE_OPTS="-host $$IP_ADDRESS" /opt/bin/entry_point.sh' volumes: - /dev/shm:/dev/shm - /dev/urandom:/dev/random depends_on: - hub environment: HUB_PORT_4444_TCP_ADDR: hub HUB_PORT_4444_TCP_PORT: 4444 NODE_MAX_SESSION: 1 networks: - main deploy: mode: replicated replicas: 1 labels: selenium.grid.type: "node" selenium.grid.node: "true" restart_policy: condition: none placement: constraints: [node.role == worker] |
Before deploying the Selenium Grid on Docker Swarm, let’s look into small details which need attention.
Placement constraints: [node.role == worker] allows placing the workload on the worker node instead of the manager nodes. In case you want to run the hub on the manager node use [node.role == manager] as the value instead. But best practice is to keep manager nodes free from CPU and/or memory-intensive tasks.
Entrypoint: entry_point.sh gets the info to register the node to the hub. Hub also needs an address of the node to poll its status. We can use ‘SE_OPTS’ within the entry_point.sh script so nodes running on different hosts will be able to successfully link back to the hub.
Port mapping: We have exposed the ports as 4444:4444 which basically means one can connect to the grid on port 4444 on any node in the Swarm network.
Deploying the Selenium Grid to AWS via Docker Compose
The below command deploys the docker stack into the manager node:
$ docker stack deploy --compose-file docker-compose.yml selenium_test Deploying Selenium Grid to http://100.24.107.127:4444... Creating network selenium_test_main Creating service selenium_test_hub Creating service selenium_test_chrome Creating service selenium_test_firefox |
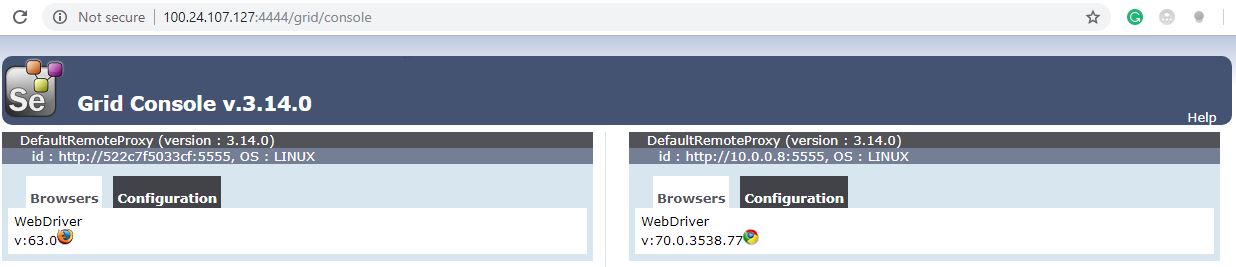
Here is the Grid console
Now ssh into the swarmmode-1 instance and run below command:
$docker-machine ssh swarmmode-1 |
And review the stack:
$docker stack ps selenium_test |

Run tests on Selenium Grid
For testing the grid setup, we wrote couple of test scripts. Both the scripts loads qxf2.com and prints the title of the page. In your local machine, from the directory where you have these scripts, run below command
$ pytest -k test |
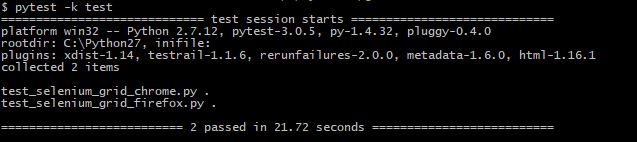
test_selenium_grid_chrome.py
'''Test for launching qxf2.com in AWS machine through grid''' from selenium import webdriver from selenium.webdriver.common.desired_capabilities import DesiredCapabilities def test_chrome(): #Set desired capabilities desired_capabilities = DesiredCapabilities.CHROME desired_capabilities['platform'] = 'LINUX' #Using Remote connection to connect to aws grid - Used manager ip url = "http://100.24.107.127:4444/wd/hub" driver = webdriver.Remote(url, desired_capabilities) #Checking the driver session print driver #Launch qxf2 and print title driver.get("http://www.qxf2.com") print driver.title driver.quit() |
test_selenium_grid_firefox.py
'''Test for launching qxf2.com in AWS machine through grid''' from selenium import webdriver from selenium.webdriver.common.desired_capabilities import DesiredCapabilities def test_firefox(): #Set desired capabilities desired_capabilities = DesiredCapabilities.FIREFOX desired_capabilities['platform'] = 'LINUX' #Using Remote connection to connect to aws grid - Used manager ip url = "http://100.24.107.127:4444/wd/hub" driver = webdriver.Remote(url, desired_capabilities) #Checking the driver session print driver #Launch qxf2 and print title driver.get("http://www.qxf2.com") print driver.title driver.quit() |
Review the service:

If you want to scale the grid nodes use the scalecommand on the Swarm manager:
$ docker service scale selenium_test_chrome=4 |
This command would scale selenium_test_chrome to 4. You can even apply Auto Scaling for adding new worker nodes based on the load.
Automate de-provisioning of resources on AWS
Since the resources used are all virtual, launching them as part of an experiment or to solve some short-term problem will often make lots of sense. When the work’s all done, the resource can be shut down. We wrote a script to achieve this.
swarmdown.sh
#!/bin/bash docker-machine rm swarmmode-1 swarmmode-2 swarmmode-3 -y |
From the directory where you saved this script, execute below command to run this script
sh swarmdown.sh |
To test the above scripts, from your local machine you can run below.
$ sh swarmup.sh $ pytest -k test $ sh swarmdown.sh |
The main objective of this article is to automatically provision the instances before test runs and then de-provision them after. You can configure to run tests in parallel using pytest in Jenkins (or some other CI tool) so that they are part of the continuous integration process.
So now you can have your own testing lab on the cloud. Happy testing!
References:
1) Distributed testing with selenium grid
2) Running selenium grid with docker
3) When to use Docker-Compose and when to use Docker-Swarm
4) Github – Docker swarm scripts

I am an experienced engineer who has worked with top IT firms in India, gaining valuable expertise in software development and testing. My journey in QA began at Dell, where I focused on the manufacturing domain. This experience provided me with a strong foundation in quality assurance practices and processes.
I joined Qxf2 in 2016, where I continued to refine my skills, enhancing my proficiency in Python. I also expanded my skill set to include JavaScript, gaining hands-on experience and even build frameworks from scratch using TestCafe. Throughout my journey at Qxf2, I have had the opportunity to work on diverse technologies and platforms which includes working on powerful data validation framework like Great Expectations, AI tools like Whisper AI, and developed expertise in various web scraping techniques. I recently started exploring Rust. I enjoy working with variety of tools and sharing my experiences through blogging.
My interests are vegetable gardening using organic methods, listening to music and reading books.


Hi Indira,
Thank you very much for this nice article.
I only tried to run each worker on t3.small with 2 CPUs. I tried to start 4 chrome nodes, 2 on each worker.
But when I run my tests, instead of running 4 tests in parallel, it only runs 2 tests in parallel.
It only runs one test per worker, although 2 nodes per worker are available. Also, I checked selenium hub and it can see 4 available chrome nodes.
Do you have any idea?
Hi Hossein,
Thanks for the feedback. Would it be possible for you to share more details such as code details, etc for us to have a quick look?
Meanwhile, you can also refer to some of the troubleshooting tips mentioned below:
https://www.bugsnag.com/blog/container-orchestration-with-docker-swarm-mode
Thanks and Regards,
Rahul
Hi,
Thank you for your fast reply.
These are steps that I did:
1 – Create a docker machine and name it as swarm-manager:
docker-machine create –driver amazonec2 –amazonec2-region eu-central-1 –amazonec2-instance-type “t3.medium” –amazonec2-vpc-id [id] –amazonec2-security-group docker-swarm swarm-manager
2 – Create two other docker machines and name them as swarm-node-1 and swarm-node-2
docker-machine create –driver amazonec2 –amazonec2-region eu-central-1 –amazonec2-instance-type “t3.small” –amazonec2-vpc-id [id] –amazonec2-security-group docker-swarm swarm-node-1 // same for the second one
3 – Starting swarm mode and joining two nodes:
docker-machine ip swarm-manager //gives you Public IP of the manager machine
docker-machine ssh swarm-manager “sudo docker swarm init –advertise-addr [public-ip-manager]” // start swarm manager
docker-machine ssh swarm-node-1 “sudo docker swarm join –token [token] [public-ip-manager]:2377”
4 – Starting selenium hub and nodes using docker-compose.yml file: (the yml file is already on manager machine)
docker-machine ssh swarm-manager “sudo docker stack deploy –compose-file=docker-compose.yml selenium”
This is the yml file that I used:
version: ‘3.7’
services:
hub:
image: selenium/hub:3.141.59-xenon
ports:
– 4444:4444
deploy:
mode: replicated
replicas: 1
placement:
constraints:
– node.role == manager
dns: 8.8.8.8
chrome:
image: selenium/node-chrome:3.141.59-xenon
volumes:
– /dev/shm:/dev/shm
– /dev/urandom:/dev/random
depends_on:
– hub
environment:
– HUB_PORT_4444_TCP_ADDR=hub
– HUB_PORT_4444_TCP_PORT=4444
– NODE_MAX_SESSION=1
entrypoint: bash -c ‘SE_OPTS=”-host $$HOSTNAME -port 5555″ /opt/bin/entry_point.sh’
ports:
– 5555:5555
deploy:
replicas: 4
placement:
constraints:
– node.role == worker
dns: 8.8.8.8
>>>>>>>>>>>>>>>>>
Then I tried to check nodes and hub on [ [public-ip-manager]:4444 and I can see the console and 4 available nodes. Also, docker stack ps selenium, shows that the hub and four nodes are running.
We wrote our tests using Geb, Groovy, Gradle, Spock. For running them in parallel, one can set
// set parallel forks
maxParallelForks = 4
for running 4 tests in parallel. Unfortunately, we are able only to run 2 tests in parallel.
Other variation that I tried:
I tried to join only one node as worker to the swarm: one “t2.xlarge” machine with the same yml file. So, we had 4 chrome nodes available. But we were able only to run two tests in parallel.
Also, I tried to join 4 nodes as worker, 4 “t3.small” machines and the same yml file. But again the result was running two tests in parallel.
In our traditional setup, we do not use any docker swarm mode, we use an “m4.xlarge” machine with this docker-compose.yml file:
version: “3”
services:
selenium-hub:
image: selenium/hub:3.141.59-xenon
container_name: selenium-hub
restart: on-failure:10
ports:
– “4444:4444”
environment:
– JAVA_OPTS=-Xms2g -Xmx6g
chrome:
image: selenium/node-chrome:3.141.59-xenon
shm_size: 2g
volumes:
– ./src/test/resources/photos/:/photos
depends_on:
– selenium-hub
environment:
– JAVA_OPTS=-Xmx4g
– HUB_HOST=selenium-hub
– HUB_PORT=4444
deploy:
replicas: 4
And we are able successfully to run 4 tests in parallel.
Our plan was to use docker swarm mode in order to be able to create a cluster and to be able to run 6-10 tests in parallel. But so far without any success.
I would really appreciate any help from you.
Hi Hossein,
Unfortunately, we couldn’t figure out why 4 tests are not running in parallel. Your setup looks fine as the stack shows four available nodes. I am not aware of running tests in parallel using maxParallelForks. I believe Replicas is the option to specify the number of containers that should be running at any given time. Maybe we can get some idea if we look at the tests you are running.
Thanks for the beautiful article.
I have a doubt and it would be great if you help to get it clarified.
Here, you are using the manager node as hub, so it’s always one IP.
But, if I want 4 copies of the hub and want to distribute the load among workers,
how do I point?
Note: I am using selenoid and want a similar setup.
So, selenoid should be running in 3/4 hosts and test containers should be running there; but not sure how do we provide the hostname(as it’s going to be multiple)
Hi You can provide the hostname within the docker-compose.yml file itself. In this file, under the section ‘services’, add ‘hostname:‘. This will differentiate the 3/4 hosts. I hope that helps.