I wrote (and open sourced) a Flask app with a GraphQL API that was implemented using Graphene. The application is similar to the official Graphene example but includes the following:
1. JWT authentication
2. An example of filtering
3. A minimal amount of data for people to tinker with the app
This article is suitable for:
a) Testers looking to get started with writing GraphQL queries, using GraphiQL and the mod-header plugin and (optionally) Python
b) Developers looking for an example of a Flask app that implements a GraphQL API along with authentication
Note to developers: I am not a developer! Treat the code I have shared as a beginner-level introduction to Flask + Graphene + GraphQL filtering + SQLAlchemy + JWT authentication. The only reason I am sharing my application code is because I did not find a full working example online that showed authentication, filtering along with the data for a Flask application.
Outline of the post
We will be covering the following steps in this post. Developers can stop at the end of step 1. QA folks can play along through the end. As you read through this post, commands and filenames will be in blue.
1. Environment setup
1a. Get code and install dependencies
1b. Setup the data
1c. Add credentials
1d. Start the application
2. GraphQL query using GraphiQL
2a. Install ModHeader plugin
2b. Authentication
2c. Query all employees
2d. Query based on a field
1. Environment setup
This section will let you run the Flask app with a simple GraphQL API. The instructions here are explicit to help beginners. I assume you have git setup along with Python 3.7 (or higher) and virtualenv.
1a. Get code and install dependencies
i. Clone the repo using the command: git clone https://github.com/qxf2/qxf2-employees.git.
ii. Once you have cloned the repo cd qxf2-employees/ to get into the root directory of the repository.
iii. Next, create a virtual environment for this project with the command virtualenv -p python3.8 venv-employee-database.
iv. Activate your virtual environment source venv-employee-database/Scripts/activate (Windows) or source venv-employee-database/bin/activate (*nix).
v. Install the dependencies using the command pip install -r requirements.txt.
At this stage, you have gotten the code and setup the dependencies.
1b. Setup the data
I have shipped some data with the repository. Let us set it up in a SQLite database. To do that, create a new database using the command sqlite3 data/employee_database.sqlite3. This will give you a sqlite prompt. In that prompt, enter the following commands
i. Get ready to import csv: .mode csv
ii. Import the data: .import data/dummy_data.csv employee
iii. Verify the data was imported right: select * from employee; … this step should show you two rows.
iv. Quit .quit
Carefully observe the output of step iii above. It will show you that the data has two rows and several columns. We will be querying this data via the GraphQL API.
Now, you should have a data/employee_database.sqlite3 file present with some data in it. The hardest parts of the setup are over.
1c. Add credentials
Let us add a couple of credentials. One for the app secret. Another to setup a user to query the GraphQL API.
i. Update the file employees/secret.py with any secret string you want to use.
ii. Next, create a file called employees/allowed_users.py
iii. Add one line to the file created in step ii (a Python dictionary) USERS = {“user1”: “password1”}.
1d. Start the application
Now, you are ready to start the application.
i. Run the command python run.py.
ii. You should see a console message letting you know that the application has started on localhost:5000.
iii. To verify, launch your browser and visit http://localhost:5000/graphql.
iv. If all goes well, you should see the GraphiQL editor.

2. GraphQL queries using GraphiQL
The tool you saw at the end of the setup (on /graphql) is called GraphiQL (pronounced graphical). It is a web interface that lets you query the GraphQL API. You can think of it as the equivalent of a primitive Postman for GraphQL APIs.
Note 1: Hey, testers – your developers will give you the API being exposed and the fields that can be queried. So as you go through these examples, do not worry if you do not know where some of the syntax comes from.
Note 2: For the really curious ones, the fields exposed comes from employees/model.py and the query names come from employees/schema.py. For both, you will need to get rid of the underscore and use camel case. E.g.: github_id becomes githubId.
2a. Install ModHeader plugin
Our application uses JWT authentication and the token is passed via the header. So before we dive into writing queries, let us add a browser plugin that lets us modify the header. I chose the ModHeader extension.
2b. Authentication
Once you have the ModHeader plugin, first authenticate with the server and receive a token. To do that, in your GraphiQL editor, paste the following:
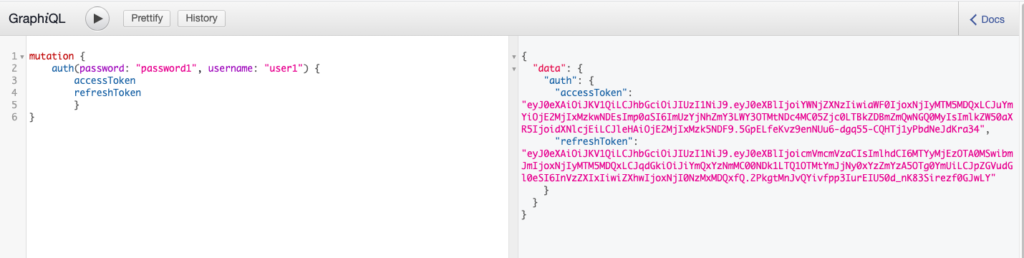
mutation { auth(username: "user1", password: "password1") { accessToken refreshToken } } |
This should return an access token as well as a refresh token. Your GraphiQL editor should look like the screenshot below.
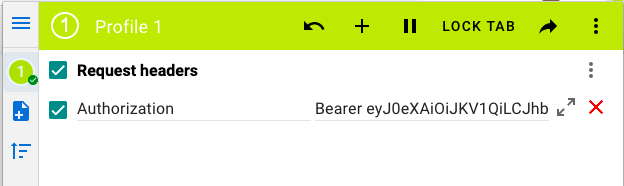
Copy the access token. Open your ModHeader extension, add a Authorization header and paste the strong Bearer access_token as the value where access_token is the value of your access token. Your ModHeader plugin should look something like the screenshot below:
Now you are set to make queries. Our application exposes just two queries. One to query all employees. Another to query employees based on a given email or Skype id.
2c. Query for all employees
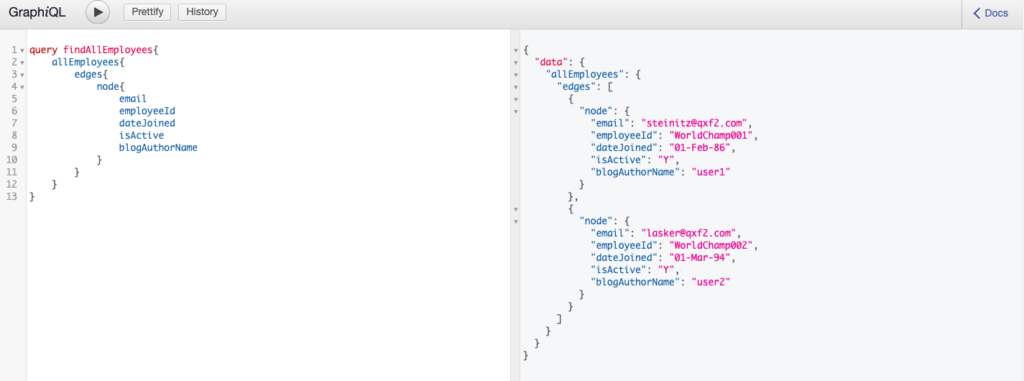
Let us query for all employees and get their email, id, join date, if they are active and their author name fields. To query all employees, use the following snippet in your GraphiQL editor
query findAllEmployees{ allEmployees{ edges{ node{ email employeeId dateJoined isActive blogAuthorName } } } } |
One way to understand this query is that allEmployees is the query exposed by the GraphQL API and will usually be given to you by the developer. You are creating a named query called findAllEmployees (you can use any name here) and then within it, calling allEmployees. You want only some properties of the employee node. To do that you add a node element and list the properties of employees that you want – email, employee id, join date, etc.
If you have setup ModHeader correctly, you should see an output similar to the screenshot below:
2d. Query based on a field
Finally, let us filter the employees table based on email and find that employee’s Skype id and GitHub id. To do that, execute the following snippet:
query FindEmployeeByEmail($email: String = "[email protected]") { findEmployee(email: $email) { githubId skypeId } } |
One way to understand this query is that findEmployee is the query exposed by the GraphQL API and will be usually given to you by the developer. This findEmployee takes one parameter called email. Since emails are unique, the API will return at most one node. You are creating a query called FindEmployeeByEmail (call it whatever you want!) that passes $email to the findEmployee query. You are also saying you just want the employee’s Skype and GitHub ids.
If all goes well, you should see the following output:

3. GraphQL query using Python
We can do the same things using Python and requests too. Accessing a GraphQL API using the requests module is very similar to accessing a REST API using the requests module. We just pass the query as part of the json argument to requests.some_http_method(). I will not explain the code here since this article is already pretty long. But this is an example Python script I wrote to query all employees. Hopefully, you notice that this is just an auth step plus a GET request that passes a query parameter that looks pretty much exactly like the query you would write on a GraphiQL editor.
File 1: sample_gql_query.py
""" Test to query the Employee GraphQL endpoint """ import requests import json import user_credentials as credentials BASE_URL = 'http://localhost:5000/graphql' def authenticate(): "Return an authenticate code" query = f"""mutation {{ auth(password: "{credentials.PASSWORD}", username: "{credentials.USERNAME}") {{ accessToken refreshToken }} }} """ response = requests.post(url = BASE_URL, json = {'query': query}) return response.json().get('data',{}).get('auth',{}).get('accessToken',None) def test_query_all(): "Query allEmployees" query = """query findAllEmployees{ allEmployees{ edges{ node{ email employeeId dateJoined isActive blogAuthorName } } } }""" access_token = authenticate() print(f'Access token: {access_token}') headers = {'Authorization': f'Bearer {access_token}'} response = requests.get(url = BASE_URL, json = {'query': query}, headers =\ headers) all_employees = response.json().get('data', {}).get('allEmployees', {}).get('edges', []) for employee in all_employees: print(employee) #---START OF SCRIPT if __name__=="__main__": test_query_all() |
File 2: user_credentials.py
Place this file in the same folder as File 1 (sample_gql_query.py).
USERNAME='user1' PASSWORD='password1' |
Note 1: You should not be authenticating with every request. Authenticate once and the token will be valid for 30-minutes.
Note 2: You will decide the data structure used in File 2 (user_credentials.py) depending upon the number of users that your tests need. For only one user, what is shown here is more than enough.
Hopefully you managed to follow along to the end. If you are very new to GraphQL, you are probably feeling like you did not understand head or tail of what just happened. That’s ok – what you just did now forms a solid base for you to start understanding the more theoretical introductions to GraphQL that are available on the Internet. There are also some excellent practical examples for larger datasets (e.g.: movies) that you are (hopefully!) now in a position to tackle better. Some possible next steps for you include Googling how to construct queries, understand mutations, figure out the GraphQL API by looking at code, etc.
If you got stuck in any of the steps, post a comment below and someone from Team Qxf2 will help you out!
I want to find out what conditions produce remarkable software. A few years ago, I chose to work as the first professional tester at a startup. I successfully won credibility for testers and established a world-class team. I have lead the testing for early versions of multiple products. Today, I run Qxf2 Services. Qxf2 provides software testing services for startups. If you are interested in what Qxf2 offers or simply want to talk about testing, you can contact me at: [email protected]. I like testing, math, chess and dogs.

