This post is meant for testers who have to work with Apache Kafka. In this blog, I will show how to build a real-time data streaming pipeline to capture data from Neo4j and stream it to a Flask app by using Kafka. The post has a lot of information so even folks with just superficial knowledge of Apache Kafka can follow along. However, as a tester, the primary focus should be on the concluding web application that offers enhanced visibility.
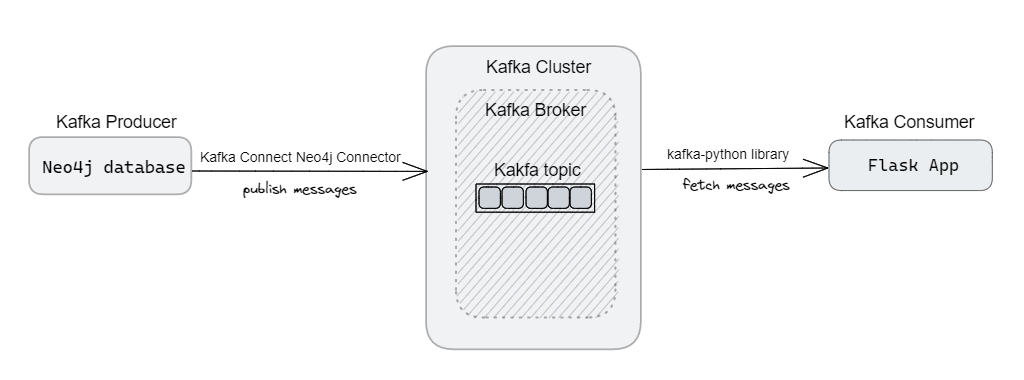
With the help of Kafka Connect Neo4j Connector, acting as a Kafka Producer, we will fetch data from Neo4j and publish it to a Kafka topic. Usually, the development teams do this part. I included it here just to give you a glimpse of what goes on behind the scenes. Thereupon, we will implement the Kafka consumer, responsible for retrieving messages from a Kafka topic, as a Flask app. For this, we take the help of kafka-python library for connecting to the Kafka cluster and consume messages from the specified topic. And finally, display the data on a web browser.
This blog assumes you have basic understanding of Apache Kafka and have the Kafka environment setup.
Context
Imagine you are among the more technical testers in your group. Other folks do test well but are probably not as technically inclined as you are. You can try developing tools tailored to the needs of the team, thereby enabling them to execute their jobs with greater reliability and efficiency. This could be as simple as streamlining intricate procedures to providing user-friendly interfaces. Qxf2 engineers often perform this role at clients.
In this post, I will show one such example. I added a web interface on top of a Kafka topic and filtered the data coming in so everyone in the team had real time visibility into what (relevant) messages were getting sent to the Kafka topic.
The application under test
At Qxf2, we have a survey system (a web app with Neo4j backend) where we record who has given/taken help from whom. This information is used in algorithms to see how teams and individuals are faring. By design, nowhere are the consolidated results or historical data exposed directly to the user. The normal way of testing such an application would be to submit a survey, connect to the Neo4j database and then run a query. As you can imagine, this is pretty inefficient. After a discussion among my colleagues, I realized that just showing responses from this week on a common platform would help everyone. I took up an initiative to show the relevant data. Furthermore, as I was just starting with Apache Kafka, I believed that I could utilize it to display the data in real-time as soon as someone submits the survey. With this intention, my goal was to retrieve the data from Neo4j and dynamically display it in a browser as soon as it becomes available. In this blog, I will go through the steps I took to accomplish that.
Overview
Firstly, we will explore the process of setting up the Kafka Connect Neo4j Connector to fetch data from a Neo4j database. This is usually done by the development teams. As testers, we will (usually) not be allowed to modify applications just to make testing easier. Following that, we will proceed to develop a simple Flask app that will stream the messages onto a browser.
1. Setup Kafka Producer – Kafka Connect Neo4j connector
1.1 Download and setup Kafka Connect Neo4j connector plugin
1.2 Construct connect-neo4j-source.properties file
1.3 Run the connector
2. Setup Kafka Consumer – Flask app
2.1 Develop Kafka Consumer using kafka-python library
2.2 Stream contents
2.3 Run the Flask app
3. Test the workflow – Submit survey (from the survey application) and observe its results on the browser (of the Flask app we have setup) with Kakfa working its magic behind the scenes to make everything seamless.
Detailed steps
Let us delve into each step in detail:
1. Setup Kafka Producer – Kafka Connect Neo4j connector
Before getting started, make sure that Kafka is up and running. In my case, I have Kafka running with a simple setup consisting of a single Kafka broker. For holding the messages, I created a topic called ‘survey-data’ which has a single partition. We will use Kafka Connect, a component of Apache Kafka for connecting Kafka with external systems. Specifically for Neo4j, we will use Kafka Connect Neo4j Connector. The data transfer between Neo4j and Kafka is handled by a connector instance (which starts when we run the connector). It launches set of tasks which perform the transfer. In essence, the scheduling and execution of connectors and tasks is done within process commonly known as workers. Kafka Connect provides two types of workers: standalone and distributed. In my case, I am going to use Standalone mode, where a single process is responsible for executing all connectors and tasks.
1.1) Download and setup Kafka Connect Neo4j connector plugin
There are several ways to install the connector plugin. I choose to download the zip file from GitHub releases.
https://github.com/neo4j-contrib/neo4j-streams/releases
At the time of writing, I used neo4j-kafka-connect-neo4j-5.0.2.zip. For this purpose, I created a directory called plugins and placed the zip file there.
wget https://github.com/neo4j-contrib/neo4j-streams/releases/download/5.0.2/neo4j-kafka-connect-neo4j-5.0.2.zip
Extract the contents:
unzip neo4j-kafka-connect-neo4j-5.0.2.zip
Subsequently, we must specify the plugin’s path in the connect-standalone.properties file. This enables the Connect worker to locate the plugin upon starting, ensuring its availability for use.
Navigate to kafka/config directory and open the connect-standalone.properties file. Update the plugin.path to include the path of the plugins directory.
plugin.path=/home/kafka/kafka/plugins
With the plugin in place, next we will require a properties file to define the configurations required to run the connector.
1.2) Create Neo4j source connector
To begin with, I will create a file called connect-neo4j-source.properties in the config directory. In this file, I am going to define some of the parameters as per my requirements. For a complete list, check the detailed guide – https://neo4j.com/docs/kafka/kafka-connect/configuration/
name=neo4j-source topic=qxf2-survey-data connector.class=streams.kafka.connect.source.Neo4jSourceConnector value.converter=org.apache.kafka.connect.json.JsonConverter value.converter.schemas.enable=false offset.storage.file.filename=/home/kafka/connect/connect-offsets.dat neo4j.streaming.poll.interval.msecs=20000 neo4j.server.uri=neo4j://x.x.x.x:7687 neo4j.authentication.basic.username=*** neo4j.authentication.basic.password=*** neo4j.source.query=MATCH (employee:Employee) RETURN employee |
Kafka related parameters
Firstly, the connector.class will be source since we are fetching data to Kafka. Note that I have not set keys for the messages. To emphasize, Kafka messages consists of a key and a value where the key, an optional field determines the partition to which a message is assigned within a Kafka topic. Since, I have not used any partitions, I have not used keys. The value contains the actual payload or content of the message. I am going to work with JSON format, so have specified the same using value.converter parameter. Also, I have set schemas.enable to false, which means, the value converter will not include schema information when serializing or deserializing the value data. The streaming.poll.interval specifies the wait time after which the connector will poll the database and run the Cypher query.
Neo4j related parameters
To supply the Neo4j database connection details, we use the parameters such as server.uri, username and password. The source.query parameter is used for providing the Cypher query we want to run against the database and publish to the provided Kafka topic. Note that every message will have a timestamp field added to it. This is assigned by the connector and represents the time at which the event or data was generated in the source system. We can use this to implement CDC functionality since the Neo4j connector does not provide it out of box. In my case, I have a date field which represents the date the survey was submitted. Consequently, I utilized it to enhance my query, ensuring that only the data from the current week is streamed to the topic.
Now that our configuration file is prepared, we will test it next and observe if we are able to successfully connect and run our query against the database.
1.3) Run Kafka Connect
As noted earlier, I am going to launch Kafka Connect worker in Standalone mode. The command to do that is:
./bin/connect-standalone.sh /home/kafka/config/connect-standalone.properties /home/kafka/config/connect-neo4j-source.properties
The first parameter is the worker configuration, containing common settings such as Kafka connection details. The second parameter is the neo4j-kakfa connect properties file we have created in the earlier section.
After the connector has initialized everything and been started, we can see something similar to the following lines on the console:
[2023-05-11 10:58:56,643] INFO [neo4j-source|task-0] Poll returns 2 result(s) (streams.kafka.connect.source.Neo4jSourceService:153)
Now that we have successfully launched the producer, which is responsible for publishing messages to the Kafka topic, our next step is to prepare the consumer for receiving and processing those messages.
2. Setup Kafka Consumer – Flask app
Like I mentioned earlier, this section of the post is most relevant to testers. In this section you will learn to consume messages from a Kafka topic, (possibly) filter them in a way you want and then put a simple web front-end on the messages.
2.1 Develop Kafka Consumer
2.2 Stream contents
2.3 Run the Flask app
To create a Kafka consumer, we will use kafka-python, a Python client for Apache Kafka.
2.1) Develop Kafka Consumer
By using the KafkaConsumer class, we can consume records from a Kafka cluster. To initialize the consumer, we need to provide the basic arguments that are essential:
* bootstrap_servers – host[:port] string or a list
* topic – the topic the consumer should fetch messages from
consumer = KafkaConsumer(TOPIC_NAME, bootstrap_servers=BOOTSTRAP_SERVERS) |
Next, we iterate over the messages consumed by the Kafka consumer, processing each message individually to extract the required data. To ensure that a message is processed only once, we utilize a set(a collection of unique elements). By employing the set, we can check if a message has already been processed before, effectively preventing duplicate processing.
existing_messages = set() consumer = None try: consumer = KafkaConsumer( TOPIC_NAME, bootstrap_servers=BOOTSTRAP_SERVERS) for message in consumer: processed_msg = process_message(message, existing_messages) except KafkaError as error: logging.error("KafkaError occurred while consuming messages: %s", error) finally: if consumer is not None: consumer.close() |
Note that in my case, for processing a message, I first decode it into a string using UTF-8 encoding. And then deserialize it to a dict (using json.loads). After which, I perform some checks to get only the data that has been submitted for the current week. I am not going into those specifics though, here is the snippet that does the decoding:
try: msg = message.value.decode("utf-8") data_dict = json.loads(msg) data = json.loads(data_dict) ... if data_dict not in existing_messages: existing_messages.add(data_dict) return data except (json.JSONDecodeError, ValueError) as error: logging.error("Error occured while processing messages: %s", error) |
2.2) Stream contents
To facilitate streaming of messages as they are received by consumer, I used generators. For every message that comes from the Kafka topic, after processing the message, I am using yield to directly send it to the browser. This enables continuous data transmission thereby allowing the browser to receive data in real-time as it becomes available.
for message in consumer: processed_msg = process_message(message, existing_messages) if processed_msg is None: continue yield processed_msg |
Next, we will look at how to perform streaming from templates. The Jinja2 template engine supports rendering templates piece by piece. We get the template object from the Jinja2 environment and call stream() method which returns a steam object. Since we are using the template object itself, we need to update the render context by calling update_template_context(). To fetch and load the template(we defined for our app), we use get_template() which returns a compiled template that can be rendered. And then using that invoke stream method which evaluates each statement after another and yield piece by piece. It returns a TemplateStream object. Which we pass to the client to begin streaming the rendered content.
app.update_template_context(context) template = app.jinja_env.get_template(template_name) streaming = template.stream(context) return streaming |
That should do. With the code prepared, we can now proceed to start the Flask app.
2.3) Run the Flask app
To ensure that the Kafka consumer is ready to read messages from the Kafka topic as soon as they are published, we will start the Flask app. This will activate the Kafka consumer within the app, enabling it to retrieve messages from the topic in real-time.
export FLASK_APP=app.py flask run |
You can find the complete code snippets of the Kafka consumer here.
3. Test the workflow
With both the Kafka producer and consumer in place, we are now ready to test the workflow. In my scenario, I will submit a survey using the local setup of the survey application and observe the results in real-time on the browser. The Kafka producer will publish the survey data to the Kafka topic, while the Flask app, acting as the Kafka consumer, will receive and display the data on the browser. This allows me to instantly see the survey results as they are submitted, providing a seamless experience.
Conclusion
And that’s that. If you followed along this post, you got a technical overview of some of the most important components in the Apache Kafka eco-system. You also got introduced to the idea that you can build web apps on top of topics to help your entire team. Obviously use this solution sparingly. The cost of building and maintaining a web application solely for testers should be debated within your team before you proceed. Further, where possible, try and get your developers to bake in testability into the product itself so that you, as a tester, will not have to spend time extending the product.
Hire Qxf2
As you can see from this post, the testing engineers at Qxf2 can go well beyond test automation. We can figure out the key pain points of a testing team and develop technical solutions to enable and empower an entire team of testers. You can hire us by filling out this simple form.
References:
https://kafka.apache.org/documentation/#connect
https://flask.palletsprojects.com/en/2.1.x/patterns/streaming/
https://jinja.palletsprojects.com/en/3.1.x/api/#jinja2.Template.stream
I have been in the IT industry from 9 years. I worked as a curriculum validation engineer at Oracle for the past 5 years validating various courses on products developed by them. Before Oracle, I worked at TCS as a Manual tester. I like testing – its diverse, challenging, and satisfying in the sense that we can help improve the quality of software and provide better user experience. I also wanted to try my hand at writing and got an opportunity at Qxf2 as a Content Writer before transitioning to a full time QA Engineer role. I love doing DIY crafts, reading books and spending time with my daughter.

