Why this post?
This post helps you to quickly setup and get started with Database schema Migration using Flask-Migrate.
For example if you already had created a database that contains some tables and now if you add a new column to one of the table and then if you want to revert it to the previous state, it’s difficult to do so. This is when the database migration comes in handy, as it keeps a track of database schema changes for you, and one can easily traverse back to an older or newer version of the database.
What is Database Schema migration?
Database schema migration refers to the managing of incremental, reversible changes and version control to the relational database schema. A schema migration is performed on a database whenever it is necessary to update or revert that database’s schema to some newer or older version.
What is Flask-Migrate?
Flask-Migrate is a wrapper around Alembic, which handles SQLAlchemy database migrations for Flask applications. To be explicit, the use of the Flask-Migrate module is intended for Flask applications that are using SQLAlchemy.
Alembic is a lightweight database migration tool for usage with the SQLAlchemy Database Toolkit for Python.
SQLAlchemy is the Python SQL toolkit and Object Relational Mapper that gives application developers the full power and flexibility of SQL.
Setup of Flask-Migrate
Install Flask withpip:
pip install Flask |
Install Flask-Migrate with pip:
pip install Flask-Migrate |
Install Flask-Script withpip:
pip install Flask-Script |
Install flask-sqlalchemy withpip:
pip install flask-sqlalchemy |
This is an example application that handles database migrations through Flask-Migrate:
from flask import Flask from flask_sqlalchemy import SQLAlchemy from flask_script import Manager from flask_migrate import Migrate, MigrateCommand app = Flask(__name__) app.config["SQLALCHEMY_DATABASE_URI"] = "sqlite:///data.db" db = SQLAlchemy(app) migrate=Migrate(app,db) #Initializing migrate. manager = Manager(app) manager.add_command('db',MigrateCommand) class Employee(db.Model): id = db.Column(db.Integer, primary_key=True) name = db.Column(db.String, unique=True, nullable=False) email = db.Column(db.String, unique=True, nullable=False) class Company(db.Model): cid = db.Column(db.Integer, primary_key=True) cname = db.Column(db.String, unique=True, nullable=False) clocation = db.Column(db.String, unique=False, nullable=False) if __name__ == "__main__": manager.run() |
Note:- Calling manager.run() prepares your Manager instance to receive input from the command line.
We need to run the code using python. The code has been saved as migrate_example.py file.
We will use some basic commands:-
- init
- migrate
- upgrade or downgrade
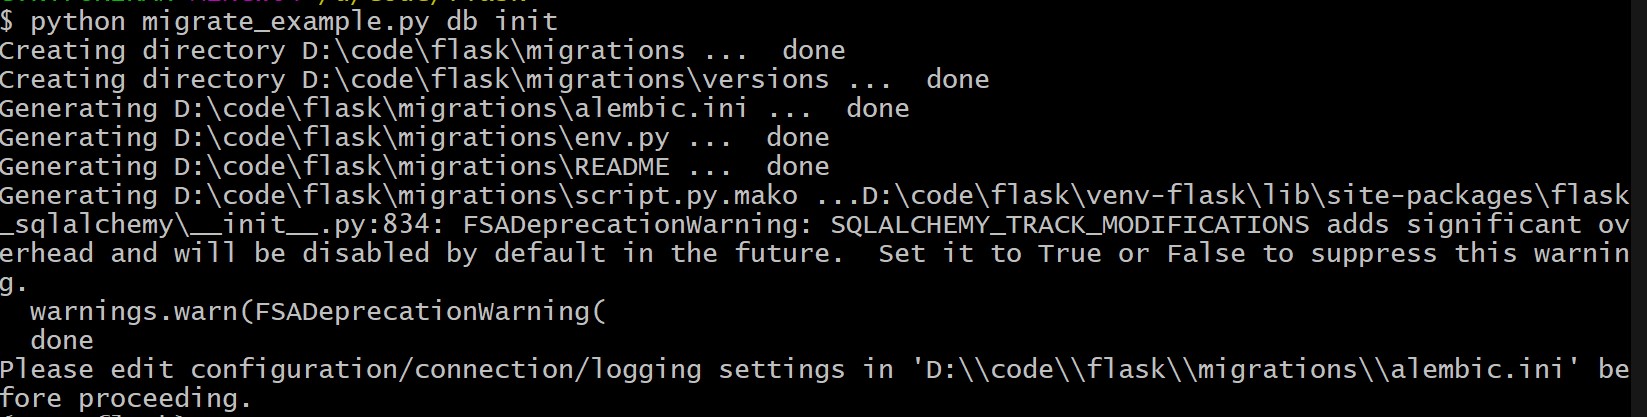
1. We need to use init command
python migrate_example.py db init |
- This creates a migration repository.
- This will add a migrations folder to your application. The contents of this folder need to be added to version control along with your other source files and see the Migrations folder in your project.
In the migrations folder, you will see versions folder, alembic.ini (configuration file) and some other files. - After running the command you should get something like this.
2. We need to use migrate command:
python migrate_example.py db migrate |
- This will create data.db file. But the tables will not be added yet into the database.
- Alembic currently cannot detect table name changes, column name changes, or anonymously named constraints.
- Alembic can detect newly added tables and columns only for now.

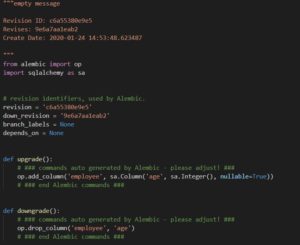
- After running the migrate command, it generates a version file, in migrations/versions/’some version name.py’ . It should look something like this.
- It’s good to check the changes match your needs.
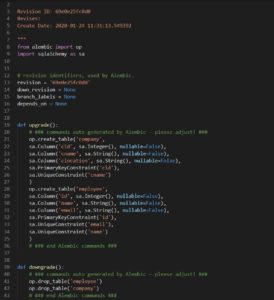

- In this, we can see that if we upgrade the script, it will add two tables(company and employee), and if we downgrade the script, it will drop the tables.
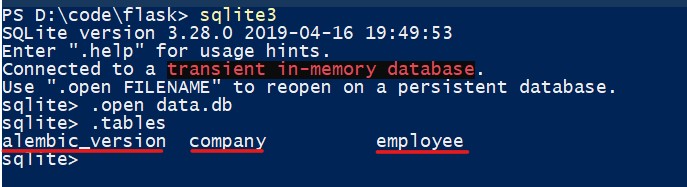
3. We need to use the upgrade command.
python migrate_example.py db upgrade |
- After using the upgrade command we can apply the migration to the database. It should look something like this.


- Then each time the database models change, repeat the migrate and upgrade commands.
- We can see that tables have been added into the Database.


NOTE:- To add or drop columns into a table after the first migration, there is a small workaround which one has to follow, since sqlite does not support DROP column.
1.To add a new column into a table.
- In this example we will add a new column called age in the employee table.
-
age= db.Column(db.Integer, unique=False, nullable=True)
- It should look something like this…


- After adding the code run the migrate command once, which will detect the change .


- Now open the recent version file from /Migrations/versions/’your_file.py’.

- Insert this code in the “def upgrade()”


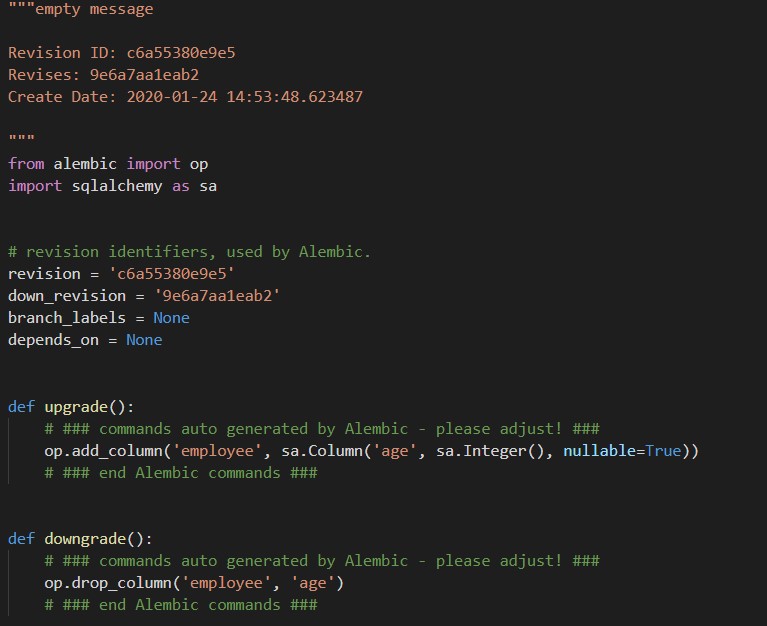
with op.batch_alter_table('employee') as batch_op: batch_op.add_column( sa.Column('age', sa.Integer(), nullable=True)) |
- Which should look something like this.


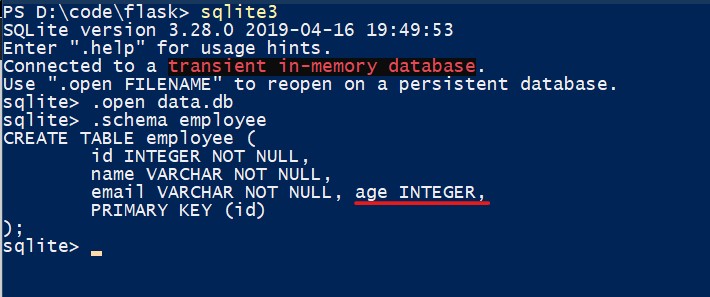
- Run the upgrade command, which should add the column (age) into the table (employee).


- If we look in the schema of the employee table, we can see that column (age) has been added.
2. To drop column from a table.
- In this example we will drop column (email) from the table (employee).
- Just delete this code
email = db.Column(db.String, unique=False, nullable=False)
- Save the file and run the migration command, It should detect the change.


- Now open the recent version file from /Migrations/versions/’your_file.py’.
- Insert this code in the “def upgrade()”

with op.batch_alter_table('employee') as batch_op: batch_op.drop_column('email') |
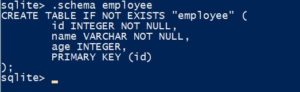
- Save the file and run the upgrade command , to DROP the column(email) in table(employee).


- If we look in the schema of the employee table, we can see that column (email) has been dropped.

I hope you have liked the blog. There are many more useful commands that can be used. This post captures the most commonly used commands in our experience.
Reference:-
Flask-Migrate:- https://flask-migrate.readthedocs.io/en/stable/
Alembic Documentation:- https://alembic.sqlalchemy.org/en/latest/


I have done my Masters in Computer Application. I joined the Qxf2 Services as a QA Intern and started to work with them as a full-time employee. During the internship learned a lot about testing and its practices, and about Qxf2’s work culture as well. Passionate about learning new technologies. My hobbies are watching movies, playing strategy games, reading books.

