There is plenty of information online about how to virtualize REST based microservices. At our clients, Qxf2 has implemented different techniques like using a Flask app, using wiremock, etc. But recently we found the need to for virtualizing a GraphQL microservice to expand the scope of our test automation on our CI environment. In this post, we will show one way to virtualize a GraphQL based microservice. In theory, the approach is very similar to mocking a REST API. However, there are enough implementation differences that we thought it was worth explaining at length in a blog post.
Why use service virtualization for testing?
At Qxf2, we are big fans of service virtualization as a testing technique. This is because it allows us to isolate the application under test from any third-party dependencies it may have. By doing so, we can enable developers to test the application on their local machines, and also ensure that most integration tests run smoothly with the CI setup.
Moreover, service virtualization can help reduce the costs associated with testing. This is because it means we need to use and maintain fewer third-party licenses in our test environments. Furthermore, it enables us to test a wider range of possibilities, such as how the application behaves when a third-party dependency is slow or (even worse) down.
In this post, we will demonstrate how to virtualize a GraphQL microservice. Specifically, we will show you how to create a sandbox GraphQL server that mocks the responses for the queries. To start, we will show you how to mock a single query and then extend the example to show how we mocked authentication. Once you have learned this, you can easily extend the example to mock all the queries you need.
Ways to Virtualize GraphQL Microservices
There are several options when it comes to virtualizing GraphQL microservices. There are many tools like mocki.io, mountebank, json-graphql-server etc, which allows us to easily mock GraphQL servers. These tools make it quick and easy to get started with mocking simple GraphQL interfaces. However, we needed more fine-grained control over the data that is needed to be returned. So, in our example we will be using Apollo server and @graphql-tools/mock node packages to setup our own sandbox GraphQL server that mocks the qxf2-employees microservices, which is used by the qxf2-survey app to retrieve the employee details.
Overview
Since this is going to be a long post, here is a quick overview of what we will cover:
A. Pre-requisites
B. Getting Started
C. Setting Up a Virtual GraphQL Server
D. Defining the Schema
E. Mocking the response for the queries
F. Mocking the Authentication
F1. Mocking the generation of tokens
F2. Validation of tokens in the header
G. Putting it all together
We will be mocking the response returned for the following query:
query findAllEmployees {
  allEmployees {
    edges {
      node {
        email
        employeeId
        dateJoined
        isActive
        blogAuthorName
        firstname
        lastname
      }
    }
  }
} |
In addition, we will demonstrate how to mock the authentication process, which includes generating an access token and validating the authorization headers.
A. Pre-requisites
You need to have at least Nodejs version 14 or above and npm installed on your machine. You can refer to the following link if needed.
B. Getting Started
1. To start off, we’ll initialize a new project by running the following command in the terminal:
npm init -y |
This creates a default package.json file for your project, which contains information about the project and its dependencies.
2. Next, we’ll install the necessary libraries to build our GraphQL server. Use the following command to install the dependencies:
npm install --save @apollo/server @graphql-tools/mock dotenv graphql graphql-tools |
3. Finally, create a new JavaScript file in your project. Let’s name it mock-graphql-server.js for this example.
You’re now ready to begin building your own virtual GraphQL server!
C. Setting Up a Virtual GraphQL Server
The first step in virtualizing a GraphQL microservice is to set up a virtual GraphQL server. This can be accomplished using the ApolloServer library in Node.js.
1. Let’s begin by importing the required libraries. The ApolloServer library is imported from the @apollo/server package, and the startStandaloneServer method is imported from the @apollo/server/standalone package.
const { ApolloServer } = require('@apollo/server'); const { startStandaloneServer } = require('@apollo/server/standalone'); |
2. Next, we declare our sample typeDefs and resolvers.
Let’s define a query “reslove_me” under typeDef which would be resolved to give response “Resolved”
const typeDefs = ` type Query { resolve_me: String }`; const resolvers = { Query: { resolve_me: () => 'Resolved', }, }; |
3. Now we will use the ApolloServer class to create a new instance of the virtual GraphQL server. The typeDefs and resolvers needs to be passed as options to the constructor.
const server = new ApolloServer({ typeDefs, resolvers, }); |
4. Finally, we can define the code to start our server by calling the startStandaloneServer() method. Here, you can also specify the port you want your server to run on, by default the port is set to 4000.
const server_port = 5000 const { url } = startStandaloneServer(server, {listen: { port: server_port }}); console.log(`? Server listening at Port: ${server_port}`); |
5. Your complete code should look similar to this:
const { ApolloServer } = require('@apollo/server'); const { startStandaloneServer } = require('@apollo/server/standalone'); const typeDefs = ` type Query { resolve_me: String }`; const resolvers = { Query: { resolve_me: () => 'Resolved', }, }; const server = new ApolloServer({ typeDefs, resolvers, }); const serverPort = 5000; const { url } = startStandaloneServer(server, { listen: { port: serverPort } }); console.log(`? Server listening at Port: ${serverPort}`); |
6. You can now run your code using node mock-graphql-server.
7. Open your browser and navigate to http://localhost:5000/. You should see a GraphQL web interface.
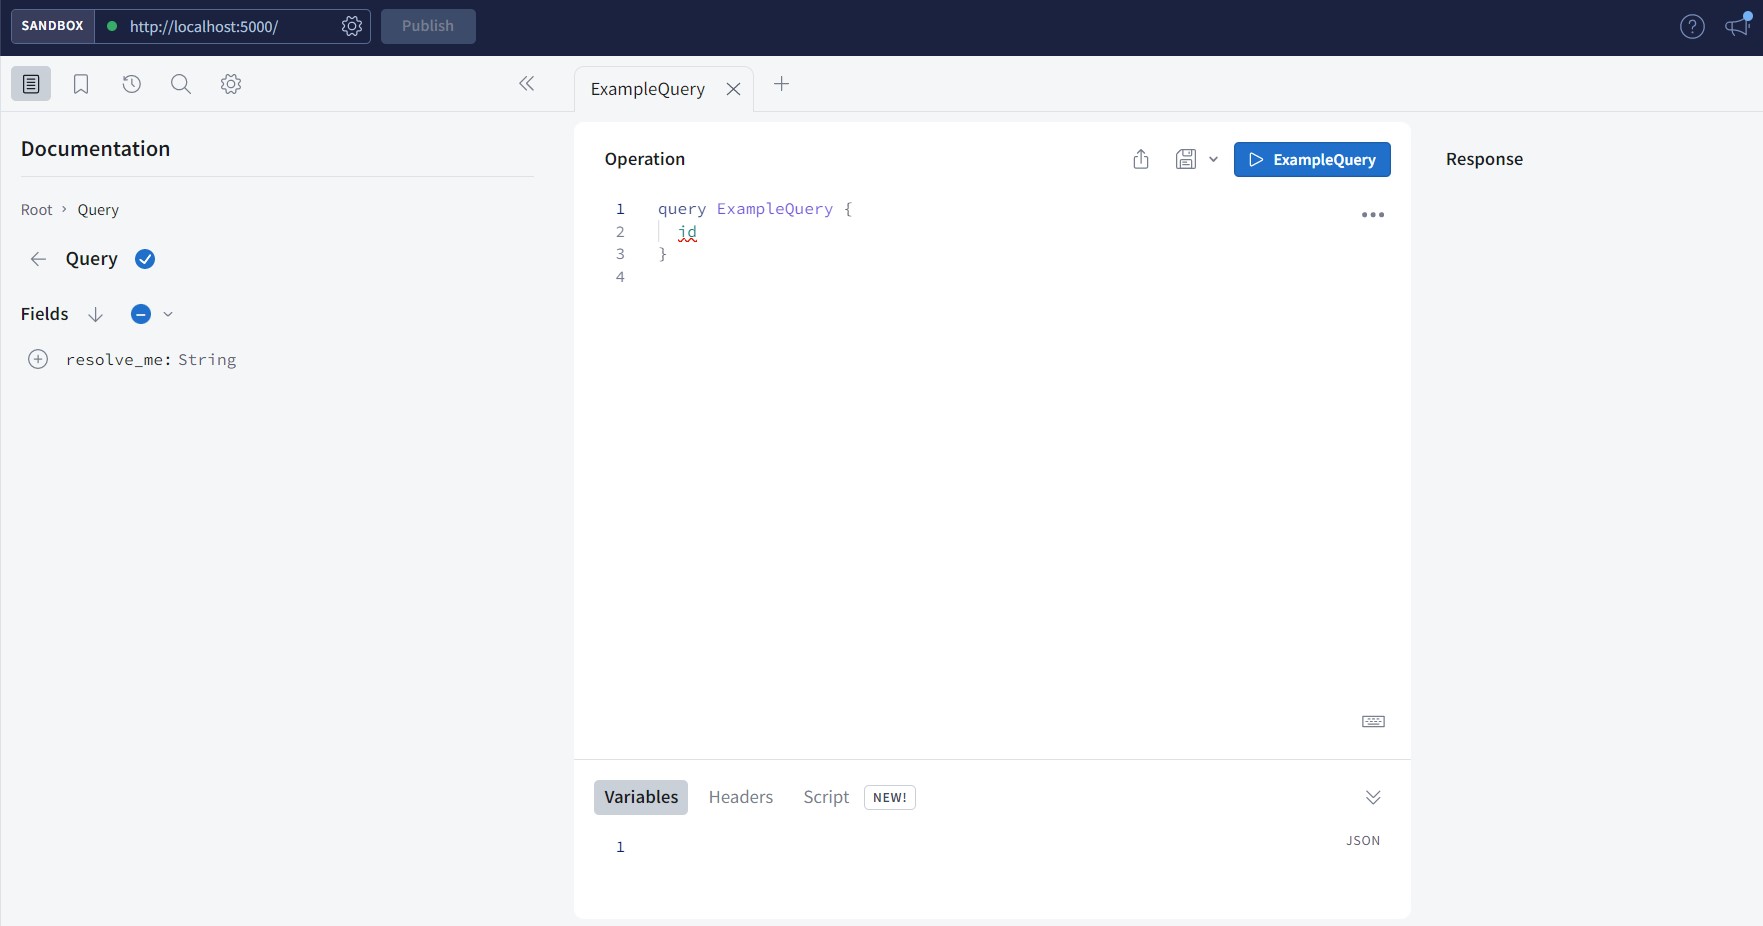
8. Try running the query:
query resolver{resolve_me} |
9. You should see the following response:
{
  "data": {
    "resolve_me": "Resolved"
  }
} |
As mentioned earlier, if you look back at our code, you would see that we have defined a resolver which returns a string “Resolved” when the query “resolve_me” is called.
Pretty cool right? Now lets go ahead and replace the sample Query in typeDef and define the actual schema we are trying to mock.
D. Defining the Schema
We define our GraphQL schema using the GraphQL type system. The schema is a blueprint for what kind of data can be requested from the API. In our case, we have to mock the following Query:
query findAllEmployees {
  allEmployees {
    edges {
      node {
        email
        employeeId
        dateJoined
        isActive
        blogAuthorName
        firstname
        lastname
      }
    }
  }
} |
1. We can do this by defining a Query type that includes the allEmployees field.
const typeDefs = `#graphql type Query { allEmployees: Employees } |
You would notice that allEmployees is of a custom type Employees.
2. Now lets define the custom type Employees
type Employees { edges: [EmployeeEdge] } |
The type Employees has a single field edges which is an array of another custom type EmployeeEdge
3. Let’s define the EmployeeEdge type
type EmployeeEdge { node: Employee } |
The EmployeeEdge type consists of the field node which is of another custom type Employee
4. Finally, lets define the type Employee
type Employee { email: String employeeId: String dateJoined: String isActive: String blogAuthorName: String firstname: String lastname: String } |
As you can see the custom type Employee has several fields of the type ‘String‘
5. Our typeDef should now look similar to this:
const typeDefs = `#graphql type Query { allEmployees: Employees } type Employees { edges: [EmployeeEdge] } type EmployeeEdge { node: Employee } type Employee { email: String employeeId: String dateJoined: String isActive: String blogAuthorName: String firstname: String lastname: String } `; |
6. With this schema, a client can query for all employees by sending the GraphQL query mentioned above
Next, lets take a look at how we can resolve this query and return response for it
E. Mocking the response for the queries
I mentioned earlier that we could resolve the queries by defining a resolver. But in this case allEmployees is of a custom type and defining a resolver can be tedious. So, let us use the magic of @graphql-tools/mock to generate a mock response for the query.
1. To do this lets first import the addMocksToSchema library from package @graphql-tools/mock and library makeExecutableSchema from @graphql-tools/schema
const { addMocksToSchema } = require ('@graphql-tools/mock'); const { makeExecutableSchema } = require('@graphql-tools/schema'); |
2. Next, replace the existing server with the following:
const server = new ApolloServer({ schema: addMocksToSchema({ schema: makeExecutableSchema({ typeDefs, resolvers }), preserveResolvers: true, }), }); |
addMocksToSchema automatically generates mock data for the fields in a GraphQL schema.
3. Our final code should look similar to this:
const { ApolloServer } = require('@apollo/server'); const { startStandaloneServer } = require('@apollo/server/standalone'); const { addMocksToSchema } = require ('@graphql-tools/mock'); const { makeExecutableSchema } = require('@graphql-tools/schema'); const typeDefs = `#graphql type Query { allEmployees: Employees } type Employees { edges: [EmployeeEdge] } type EmployeeEdge { node: Employee } type Employee { email: String employeeId: String dateJoined: String isActive: String blogAuthorName: String firstname: String lastname: String } `; const resolvers = { Query: {}, }; const server = new ApolloServer({ schema: addMocksToSchema({ schema: makeExecutableSchema({ typeDefs, resolvers }), preserveResolvers: true, }), }); const server_port = 5000 const { url } = startStandaloneServer(server, {listen: { port: server_port }}); console.log(`? Server listening at Port: ${server_port}`); |
4. Now, run the script again navigate to http://localhost:5000/ and run the query:
query findAllEmployees {
  allEmployees {
    edges {
      node {
        email
        employeeId
        dateJoined
        isActive
        blogAuthorName
        firstname
        lastname
      }
    }
  }
} |
5. You should see the following response:
{
  "data": {
    "allEmployees": {
      "edges": [
        {
          "node": {
            "email": "Hello World",
            "employeeId": "Hello World",
            "dateJoined": "Hello World",
            "isActive": "Hello World",
            "blogAuthorName": "Hello World",
            "firstname": "Hello World",
            "lastname": "Hello World"
          }
        },
        {
          "node": {
            "email": "Hello World",
            "employeeId": "Hello World",
            "dateJoined": "Hello World",
            "isActive": "Hello World",
            "blogAuthorName": "Hello World",
            "firstname": "Hello World",
            "lastname": "Hello World"
          }
        }
      ]
    }
  }
} |
All the fields in the response are magically populated!!
6. But, in my case I want to return a specific response for each field rather than “Hello World”. We can do this by passing the desired mock data to the addMocksToSchema method
7. First lets create the data that we would like to return. For this example lets add the details of two employees ‘smart learner‘ and ‘slow learner‘ and assign it to a variable employees:
let employees = [ { "email": "[email protected]", "employeeId": "4", "dateJoined": "04-Sept-1976", "isActive": "Y", "blogAuthorName": "user4", "firstname": "Smart", "lastname": "Learner" }, { "email": "[email protected]", "employeeId": "5", "dateJoined": "25-Feb-1977", "isActive": "Y", "blogAuthorName": "user3", "firstname": "Slow", "lastname": "Learner" } ] |
8. Next let us define a constant mock and assign it to the response that we want to return.
const mocks = { Employees: () => ({ edges: employees.map(employee => ({ node: employee })) }), }; |
Here, mock object contains the property, Employees. The value of this property is a function that returns an object that represents the mock data for the Employees type that we defined in our query. This object contains an edges property which is an array of objects, where each object represents a node which contains the employee data.
9. Finally, lets pass this mock object as an argument to the addMocksToSchema function
const server = new ApolloServer({ schema: addMocksToSchema({ schema: makeExecutableSchema({ typeDefs, resolvers }), mocks, preserveResolvers: true, }), }); |
10. Our final code should look like this:
const { ApolloServer } = require('@apollo/server'); const { startStandaloneServer } = require('@apollo/server/standalone'); const { addMocksToSchema } = require ('@graphql-tools/mock'); const { makeExecutableSchema } = require('@graphql-tools/schema'); const typeDefs = `#graphql type Query { resolved: String allEmployees: Employees } type Employees { edges: [EmployeeEdge] } type EmployeeEdge { node: Employee } type Employee { email: String employeeId: String dateJoined: String isActive: String blogAuthorName: String firstname: String lastname: String } `; const resolvers = { Query: {}, }; let employees = [ { "email": "[email protected]", "employeeId": "4", "dateJoined": "04-Sept-1976", "isActive": "Y", "blogAuthorName": "user4", "firstname": "Smart", "lastname": "Learner" }, { "email": "[email protected]", "employeeId": "5", "dateJoined": "25-Feb-1977", "isActive": "Y", "blogAuthorName": "user3", "firstname": "Slow", "lastname": "Learner" } ] const mocks = { Employees: () => ({ edges: employees.map(employee => ({ node: employee })) }), }; const server = new ApolloServer({ schema: addMocksToSchema({ schema: makeExecutableSchema({ typeDefs, resolvers }), mocks, preserveResolvers: true, }), }); const server_port = 5000 const { url } = startStandaloneServer(server, {listen: { port: server_port }}); console.log(`? Server listening at Port: ${server_port}`); |
11. Now run the script again and go to http://localhost:5000/. Run the query again
query findAllEmployees {
  allEmployees {
    edges {
      node {
        email
        employeeId
        dateJoined
        isActive
        blogAuthorName
        firstname
        lastname
      }
    }
  }
} |
12. You should see following response:
{
  "data": {
    "allEmployees": {
      "edges": [
        {
          "node": {
            "email": "[email protected]",
            "employeeId": "4",
            "dateJoined": "04-Sept-1976",
            "isActive": "Y",
            "blogAuthorName": "user4",
            "firstname": "Smart",
            "lastname": "Learner"
          }
        },
        {
          "node": {
            "email": "[email protected]",
            "employeeId": "5",
            "dateJoined": "25-Feb-1977",
            "isActive": "Y",
            "blogAuthorName": "user3",
            "firstname": "Slow",
            "lastname": "Learner"
          }
        }
      ]
    }
  }
} |
Voila!! And that is how we mock the responses for a query.
F. Mocking the Authentication
We explored the process of virtualizing GraphQL responses. Now, moving on, let’s delve into how we can mock the authentication process. The virtualization of GraphQL authentication process can be divided into two distinct parts:
1. Mocking the generation of tokens.
2. Validation of tokens in the header.
It’s important to note that the microservice we’re virtualizing utilizes JWT for authentication. Therefore, this example is written with that specific implementation in mind. However, if your microservice uses a different form of authentication, you can adapt these steps accordingly.
F1. Mocking the generation of tokens
1. To mock the generation of tokens, we need to mock the mutation which is used to return the access tokens
mutation {
    auth(password: "A_PASSWORD_YOU_SET", username: "A_USERNAME_YOU_SELECT") {
        accessToken
        refreshToken
        }
} |
2. To mock this mutation, lets first define a new type Mutation under typeDef.
type Mutation { auth(username: String, password: String): Auth } |
As, we saw in the previous section Mutation consists of a field auth which is of a custom type Auth.
3. So, lets define the type Auth as well.
type Auth { accessToken: String refreshToken: String } |
Here, Auth contains two fields accessToken and refreshToken both of type String
4. Lets create an environment file that would store our mock credentials in the same directory as our node project. Add the variables USERNAME, PASSWORD, ACCESS_TOKEN, REFRESH_TOKEN and assign some dummy values to it.
#.env GRAPHQl_USERNAME="dummy" GRAPHQL_PASSWORD="dummy" ACCESS_TOKEN="dummy-token" REFRESH_TOKEN="dummy-token" |
5. We can then use the dotenv library to import the environment variable to our Javascript file. Lets first import the dotenv library
require('dotenv').config(); |
6. Next, we need to define what happens when the Mutation is invoked. Lets handle this with our resolvers.
const resolvers = { Query: {}, Mutation: { auth: (_, { username, password }) => { if (username === process.env.USERNAME && password === process.env.PASSWORD) { return { accessToken: process.env.ACCESS_TOKEN, refreshToken: process.env.REFRESH_TOKEN }; } else { return { accessToken: null, refreshToken: null }; } }, }, }; |
Here the Mutation takes two input parameters, username and password, The username and password are compared with the USERNAME and PASSWORD that we specified in our environment file. If both the strings match then the values of accessToken and refreshToken defined in our environment file are returned, If the strings do not match then null values are returned.
Now that we have mocked the generation of tokens, lets take a look at how we can validate these tokens.
F2. Validation of tokens in the header
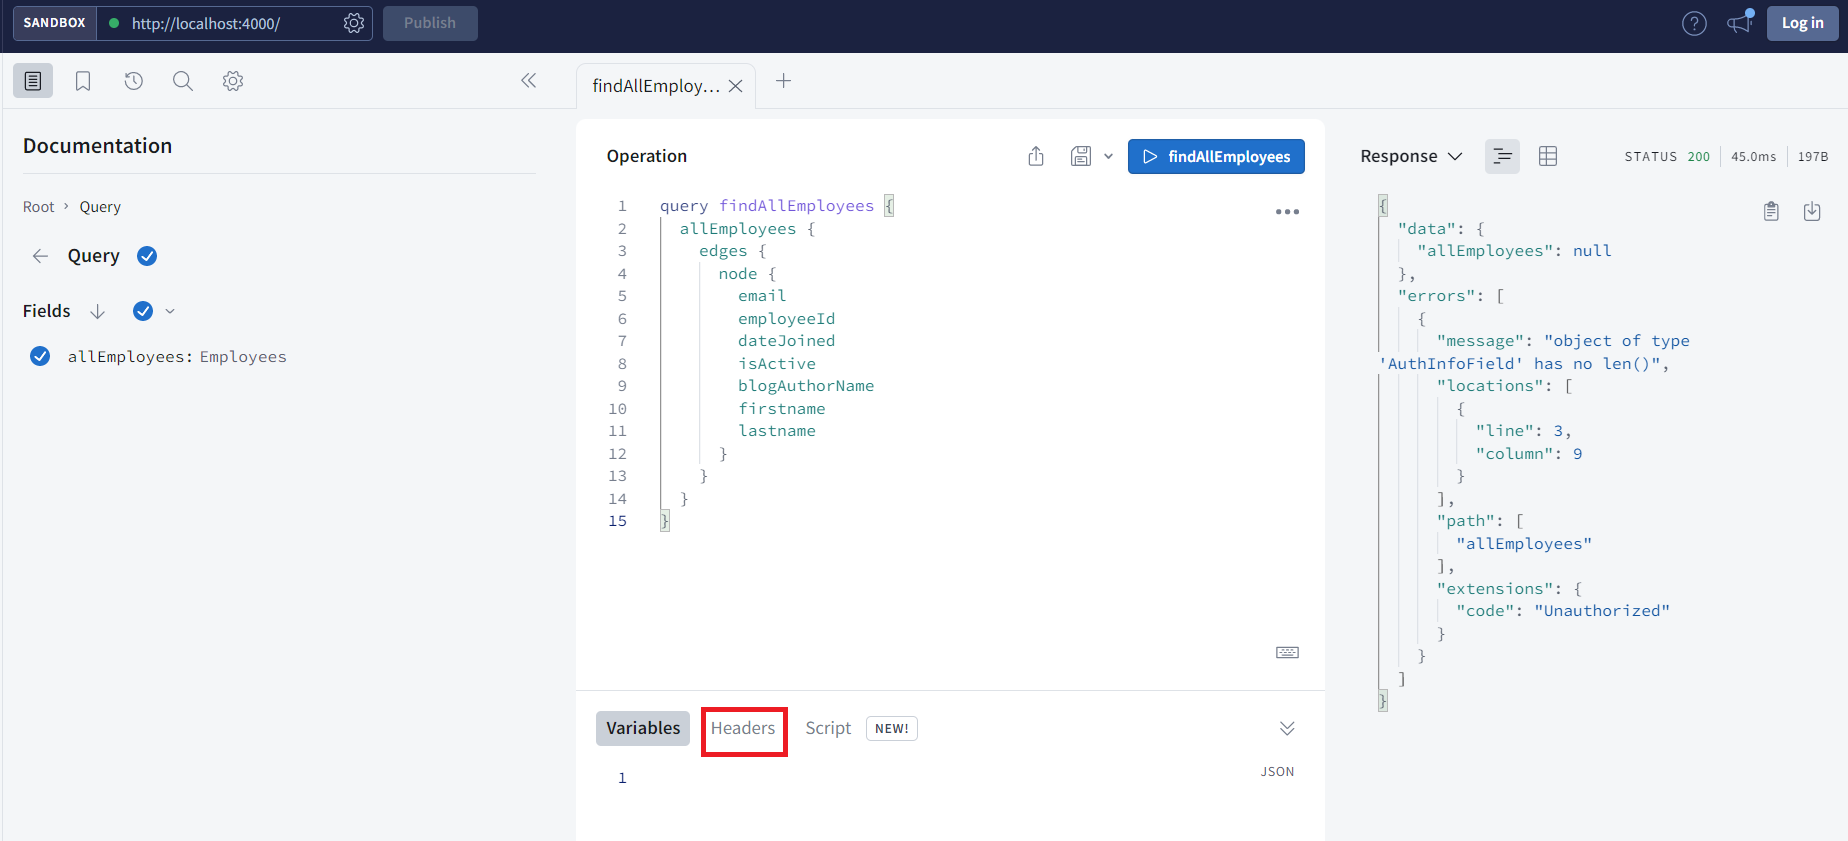
In the real service that we are trying to mock, the access token generated needs to be passed in the Authorization header for authorization of query requests. It returns an error message “object of type ‘AuthInfoField’ has no len()” incase the Authorization Header is not present or is incorrect.
Note: It is to be noted that the current implementation of the service that is mocked has an issue with its error handling. In the case that the Authorization header is absent or invalid, we should be receiving a 401 Unauthorized response code, however, the implementation returns a 200 response code.
1. To mock this process let’s first fetch the authorization header from the request. We can do this by passing req.headers.authorization that fetches the Authorization header, in the startStandaloneServer method.
const { url } = startStandaloneServer(server, { context: async ({ req, res }) => { const token = req.headers.authorization || ''; return { token }; }, listen: { port: server_port }, }); |
Here, we get the header value and assign it to a constant token
2. Now that we have fetched the authorization header, we need to call it inside our resolvers. Since we are trying to add authorization to the Query allEmployees, lets first define allEmployees in our Query resolver.
Query: { allEmployees: () => {}, } |
3. Now since we have to raise a GraphQL error in case the Authorization Header is incorrect or not present, let’s import the error module that will help us raise this error from the graphql package.
const { GraphQLError } = require('graphql'); |
4. Next, we can call the context method which contains the token object in our allEmployees query resolver. We can then compare the token to check if it matches with the expected token, and raise an error which mimics the error we would receive in the actual service if the tokens do not match.
Query: { allEmployees: (root, args, context) => { if (context.token != `Bearer ${process.env.ACCESS_TOKEN}`) { throw new GraphQLError("object of type 'AuthInfoField' has no len()", { extensions: { code: 'Unauthorized' }, }); } }, } |
5. Finally, lets disable the stacktrace for the error as we are just mocking the error received in the actual service. To do this we need to pass the includeStacktraceInErrorResponses option to the constructor of ApolloServer and set it to false
const server = new ApolloServer({ schema: addMocksToSchema({ schema: makeExecutableSchema({ typeDefs, resolvers }), mocks, preserveResolvers: true, }), includeStacktraceInErrorResponses: false }); |
G. Putting it all together
That’s it! We are finally done with our coding. Our complete code should look similar to this:
const { ApolloServer } = require('@apollo/server'); const { startStandaloneServer } = require('@apollo/server/standalone'); const { addMocksToSchema } = require ('@graphql-tools/mock'); const { makeExecutableSchema } = require('@graphql-tools/schema'); const { GraphQLError } = require('graphql'); const fs = require('fs'); require('dotenv').config(); const typeDefs = `#graphql type Query { allEmployees: Employees } type Mutation { auth(username: String, password: String): Auth } type Auth { accessToken: String refreshToken: String } type Employees { edges: [EmployeeEdge] } type EmployeeEdge { node: Employee } type Employee { email: String employeeId: String dateJoined: String isActive: String blogAuthorName: String firstname: String lastname: String } `; const resolvers = { Query: { allEmployees: (root, args, context) => { if (context.token != `Bearer ${process.env.ACCESS_TOKEN}`) { throw new GraphQLError("object of type 'AuthInfoField' has no len()", { extensions: { code: 'Unauthorized' }, }); } }, }, Mutation: { auth: (_, { username, password }) => { if (username === process.env.USERNAME && password === process.env.PASSWORD) { return { accessToken: process.env.ACCESS_TOKEN, refreshToken: process.env.REFRESH_TOKEN }; } else { return { accessToken: null, refreshToken: null }; } }, }, }; let employees = [ { "email": "[email protected]", "employeeId": "4", "dateJoined": "04-Sept-1976", "isActive": "Y", "blogAuthorName": "user4", "firstname": "Smart", "lastname": "Learner" }, { "email": "[email protected]", "employeeId": "5", "dateJoined": "25-Feb-1977", "isActive": "Y", "blogAuthorName": "user3", "firstname": "Slow", "lastname": "Learner" } ] const mocks = { Employees: () => ({ edges: employees.map(employee => ({ node: employee })) }), }; const server = new ApolloServer({ schema: addMocksToSchema({ schema: makeExecutableSchema({ typeDefs, resolvers }), mocks, preserveResolvers: true, }), includeStacktraceInErrorResponses: false }); const server_port = 5000 const { url } = startStandaloneServer(server, { context: async ({ req, res }) => { const token = req.headers.authorization || ''; return { token }; }, listen: { port: server_port }, }); console.log(`? Server listening at Port: ${server_port}`); |
1. Start your server, navigate to http://localhost:5000/. Try running the query findAllEmployees again:
query findAllEmployees {
  allEmployees {
    edges {
      node {
        email
        employeeId
        dateJoined
        isActive
        blogAuthorName
        firstname
        lastname
      }
    }
  }
} |
You would see an Unauthorized error in your response.
2. You can add a header by clicking on the headers tab in the Apollo server’s web interface itself.
3. Set the header key to Authorization and value to 'Bearer . In our case the header would be Authorization: Bearer dummy-token

4. Now run the query again, you would see that the actual response is returned this time.
Hire Qxf2!
Qxf2 is the home of technical testers. We help in testing early stage products and love working with small engineering teams. We employ many emerging testing techniques and implement test ideas using a whole suite of modern testing tools. If this post helped you, consider hiring a tester from Qxf2 for your project. You can get in touch with us via this contact form.

I am a QA Engineer. I completed my engineering in computer science and joined Qxf2 as an intern QA. During my internship, I got a thorough insight into software testing methodologies and practices. I later joined Qxf2 as a full-time employee after my internship period. I love automation testing and seek to learn more with new experiences and challenges. My hobbies are reading books, listening to music, playing chess and soccer.

