Qxf2 engineers are fans of using synthetic data for testing. We have used this technique for years now. But until recently, our experience was limited to SQL. We needed to work with neo4j in one of our projects. There was enough custom Python code and Cypher queries that we had to write as part of creating, backing up and restoring data. So we thought of sharing some of it here.
PS: To help you play along, we are going to implement some seed data for one of our internal projects. The code is open sourced and you can find “Further Reading” section.
These are some principles we use when we designed synthetic data:
1. Understand the Data Model: It is important to have a clear understanding of the data model before creating synthetic data. This allows for the creation of relevant and meaningful synthetic data, which can help identify potential issues.
2. Easy Interpretation: Synthetic data should be designed in such a way that its purpose can be easily grasped by a viewer at a glance. This implies that the data must be easy to comprehend and interpret.
3. Vary the Data: It is important to vary the synthetic data to test different scenarios. This includes varying the data types, values, and relationships to ensure that the database can handle a wide range of data.
4. Make the data extensible: When we create synthetic data for the first time in a project, it is important to design it in such a way that the data is easily extensible. We want to be able to add new data in future without affecting any of the existing tests.
Understanding the data model
Before creating the synthetic data, it’s important to have a clear understanding of the data model. For this example, we’ll be creating synthetic data for the Qxf2-survey app, which uses the Neo4j database. The following ER diagram represents the data model we’ll be working with:
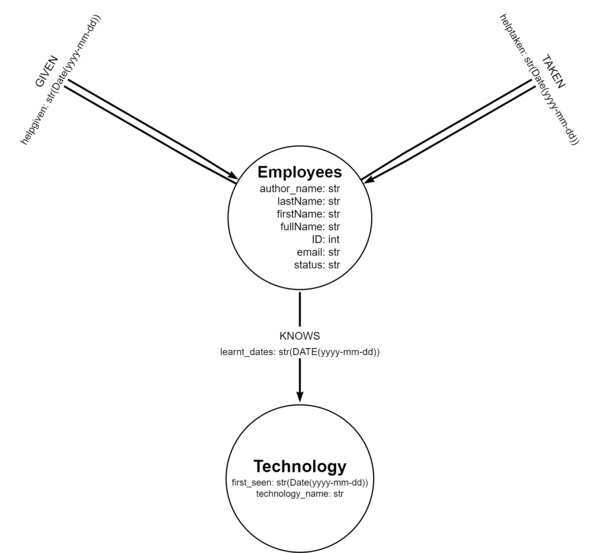
1. As you can see from the above diagram, The Neo4j data model consists of two node labels: “Employees” and “Technology“. The “Employees” label represents individuals in the organization and has properties such as author_name, firstName, lastName, fullName, email, ID, and status. The “Technology” label represents the various technologies used in the organization and has properties such as technology_name and first_seen, both of which are stored as date strings.
2. Also, we see that there is a relationship between the “Employee” and “Technology” nodes called “KNOWS“, which denotes the knowledge that an employee has about a technology. The “KNOWS” relationship has one property named “learnt_dates“, which stores the dates on which the employee learned about the technology.
3. In addition to the “KNOWS” relationship, there are two relationships among the “Employees” nodes: “Given” and “Taken“. The “Given” relationship represents the help given by an employee to another and has a property named “helpgiven“, which stores the date on which the help was given. The “Taken” relationship represents the help taken by an employee from another and has a property named “helptaken“, which stores the date on which the help was taken.
Understanding the API
1. In this example, our focus is to create synthetic data to test a single API endpoint from the Qxf2-survey app. We will be testing the endpoint /survey/admin/QElo_filter_response, which is designed to return the help responses that occurred within a specific date range.
2. The endpoint queries the GIVEN and TAKEN relationship amongst the employees, filters the helpgiven and helptaken dates based on the date parameters passed by the user and returns a response similar to this:
[
  {
    "respondent_id": 1,
    "date": "2022-02-18",
    "question_no": 1,
    "answer": "dummy_user"
  },
  {
    "respondent_id": 2,
    "date": "2022-02-18",
    "question_no": 2,
    "answer": "dummy_user"
  }
...
...
] |
3. In the above response, The “respondent_id” field identifies the employee who submitted the survey response, while the “date” field indicates the date on which the employee either gave or received help from another employee. The “question_no” field provides additional detail on the type of help exchanged, with a value of 1 indicating “TAKEN” help and a value of 2 indicating “GIVEN” help. Finally, the “answer” field allows you to identify the employee who provided or received help from the respondent.
Creating the synthetic data for Neo4j
Now that we have a clear understanding of the data model and the API to test, we can start creating our synthetic data.
We will break down the process to create the synthetic data into two parts:
A. Creating the synthetic Nodes
B. Creating the synthetic relationships
A. Creating the synthetic Nodes
As we know, the API endpoint we are testing queries the ‘GIVEN‘ and ‘TAKEN‘ relationships. In addition, we need to ensure that it does not return help responses from inactive users as well. To test this, we will create three separate nodes: one for an employee who ‘Gives’ help, another for an employee who ‘Takes’ help, and a third node for an inactive employee. This will allow us to test the endpoint accurately and effectively to ensure that it works as intended.
1. First, open your Neo4j Browser or desktop application, create a new database ‘neo4j’ where you want to create the nodes and start the database.
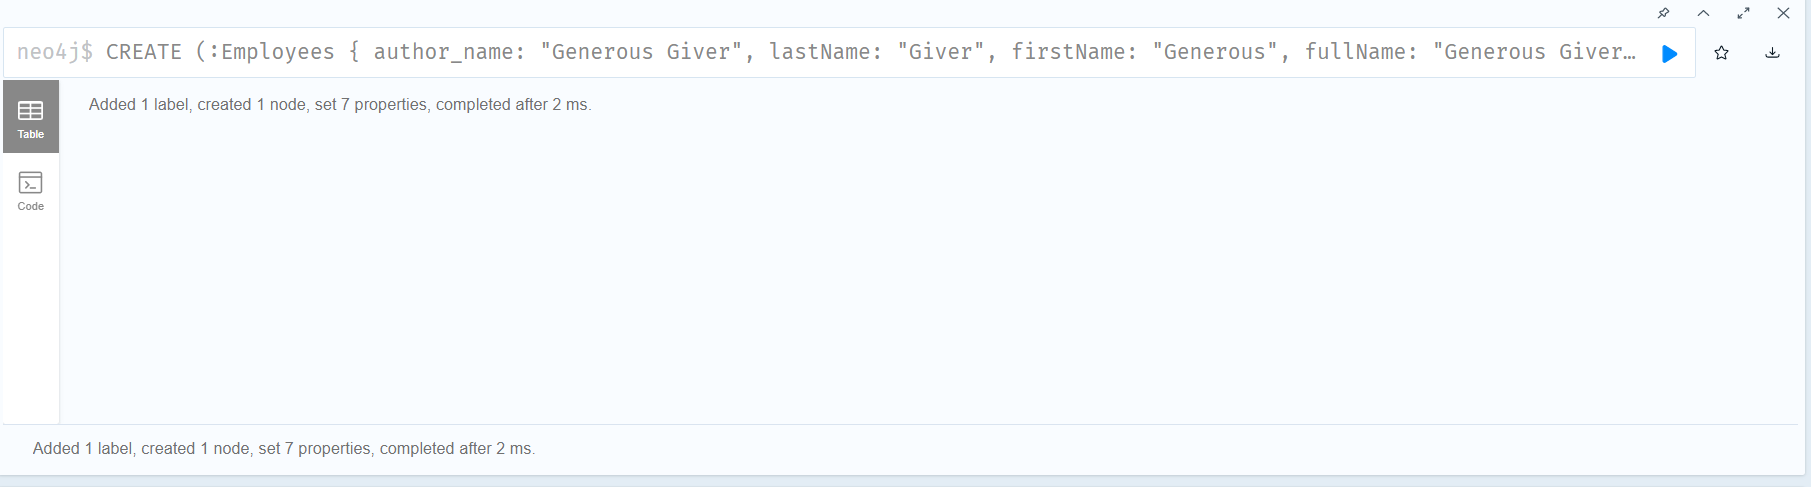
2. In the Cypher editor, lets type the following command to create our first node:
CREATE (:Employees {
  author_name: "Generous Giver",
  lastName: "Giver",
  firstName: "Generous",
  fullName: "Generous Giver",
  ID: 1,
  email: "[email protected]",
  status: "Y"
}) |
3. Pay attention to the naming, we have named our employee as Generous Giver. It is understood by common knowledge that the node represents an employee who gives a lot of help to other employees. Our synthetic data should be commonly understood and meaningful. Therefore, we should strive to use similar naming conventions for all our synthetic data to ensure consistency and clarity
4. Now, press the “Run” button to execute the command. You should see a message indicating that one node has been created.
5. Now that we have our first node created, let’s Repeat the process to create two other nodes:
CREATE (:Employees {
  author_name: "Generous Taker",
  lastName: "Taker",
  firstName: "Generous",
  fullName: "Generous Taker",
  ID: 2,
  email: "[email protected]",
  status: "Y"
})

CREATE (:Employees {
  author_name: "Inactive User",
  lastName: "User",
  firstName: "Inactive",
  fullName: "Inactive User",
  ID: 3,
  email: "[email protected]",
  status: "N"
}) |
6. We have named the two employees as Generous Taker and Inactive User. Again as the name implies , it is understood that Generous Taker represents an employee who receives a lot of help, while Inactive User is a an employee who is no longer active with the company.
Now that we have our nodes created, let’s see how can create the relationships for our synthetic data
Creating the synthetic relationships
From the data model shown above, we know that there can be two relationships ‘GIVEN‘ or ‘TAKEN‘ amongst Employees. So lets add these relations to our synthetic data.
1. First, lets add a relationship ‘GIVEN‘ between employees Generous Giver and Generous Taker , set the helpgiven property and assign some dates to it.
MATCH (a:Employees) WHERE a.lastName="Giver" MATCH (b:Employees) WHERE b.lastName="Taker" MERGE (a)-[R:GIVEN]->(b) SET R.helpgiven = ["1970-01-02", "1970-01-09", "1970-01-16"] |
If you notice, we have assigned some past dates to the helpgiven property, which corresponds to the beginning of the Unix epoch. This is done to separate the synthetic data from real data and make it easier for a person to distinguish between them. You can use similar techniques or patterns for your use case as well.
2. Similarly, lets create a TAKEN relationship between employees Generous Taker and Generous Giver, set the helptaken relationship property, and assign some dates to it
MATCH (a:Employees) WHERE a.lastName="Taker" MATCH (b:Employees) WHERE b.lastName="Giver" MERGE (a)-[R:TAKEN]->(b) SET R.helptaken = ["1970-01-02", "1970-01-09", "1970-01-16"] |
3. Since we also need to verify the API response for inactive users as well, lets create a ‘GIVEN‘ relationship between Generous Giver and Inactive User
MATCH (a:Employees) WHERE a.fullName="Generous Giver" MATCH (b:Employees) WHERE b.fullName="Inactive User" MERGE (a)-[R:GIVEN]->(b) SET R.helptaken = ["1975-01-10"] |
4. Let’s also create a ‘GIVEN’ relationship between Inactive User and Generous Taker
MATCH (a:Employees) WHERE a.fullName="Inactive User" MATCH (b:Employees) WHERE b.fullName="Generous Taker" MERGE (a)-[R:GIVEN]->(b) SET R.helptaken = ["1975-01-17"] |
5. Now, run the following query:
MATCH (n:Employees) RETURN n |
You should see a graph similar to this:
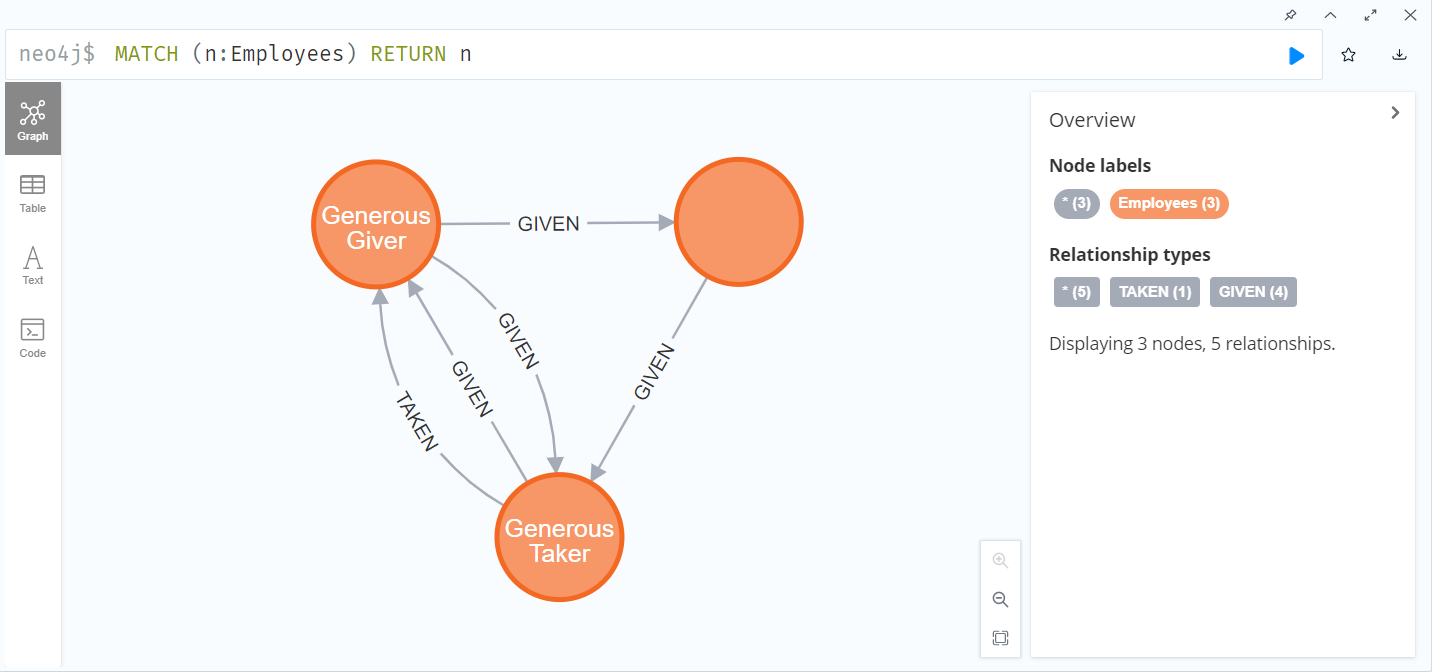
Finally, we are done setting up our synthetic data. Next lets take a look at how we can backup the synthetic data we created.
Creating a backup of the synthetic data in Neo4j
We will be using the ‘neo4j-backup’ Python library to create a script that would backup our database. I prefer this approach over the traditional method of creating a dump file for backup and restore, as it can be challenging to automate the latter.
Initial setup
1. Before starting , you need to have at least Python version 3.6 or above installed on your machine.
2. Let’s start off by installing the necessary python libraries:
pip install neo4j neo4j_backup decouple |
3. Next, let’s create a new Python file and name it “neo4j_backup_script.py“.
We are all set to start writing the script!
Writing the script to backup the synthetic data
1. Let’s start by importing the libraries that we would be using in our script.
from neo4j import GraphDatabase from neo4j_backup import Extractor from decouple import config import shutil import argparse import os |
2. Now, lets define the variables we need to connect to our Neo4j database in an environment file. Create the .env file in the same directory as our python script.
DATABASE_HOST="bolt://localhost:7687" DATABASE_USERNAME="neo4j" DATABASE_PASSWORD="dummy-password" |
Note: To prevent the credentials from being exposed, it’s important to add the .env file to your .gitignore. This will ensure that the file is not included in version control.
3. Next, let’s fetch the environment variables we created in the previous step in our python script. We will be using the config function from the decouple library to achieve this.
HOSTNAME = config("DATABASE_HOST") USERNAME = config("DATABASE_USERNAME") PASSWORD = config("DATABASE_PASSWORD") |
4. Now that we have a way to connect to the database, our script also needs to know the name of our database and the directory where the backup should be stored. So let’s use the argparse module to get these values from the user as command line arguments.
parser = argparse.ArgumentParser() parser.add_argument("--database_name", type=str, help="Provide the name of the database", nargs='?', default="neo4j", const=0) parser.add_argument("--save_dir", type=str, help="Provide the name of the directory in which the backup would be stored", nargs='?', default="synthetic_data", const=0) args = parser.parse_args() database = args.database_name project_dir = args.save_dir |
The --database_name argument is used to specify the name of the database that needs to be backed up, and the --save_dir argument is used to specify the directory where the backup is to be stored.
5. Next, lets define the connection settings for the Neo4j database and create a driver object using the GraphDatabase.driver() function. This will help us connect to our database.
encrypted = False trust = "TRUST_ALL_CERTIFICATES" driver = GraphDatabase.driver(HOSTNAME, auth=(USERNAME, PASSWORD), encrypted=encrypted, trust=trust) |
Note: The code above sets encrypted=False for an unencrypted connection to the Neo4j database. Only use this for local databases. For remote servers, use encrypted=True for encrypted SSL/TLS connections to secure transmitted data.
6. Now that we have connected to our database, we can finally extract the data to create the backup. We can do this using the Extractor class from the neo4j_backup library.
input_yes = False compress = True extractor = Extractor(project_dir=project_dir, driver=driver, database=database, input_yes=input_yes, compress=compress) extractor.extract_data() |
7. Finally, let’s compress the backup directory using the make_archive() function from the shutil library, and then delete the original directory using the rmtree() function.
shutil.make_archive(project_dir, 'zip', project_dir) shutil.rmtree(project_dir) |
8. Our complete script should look like this:
""" Backup Neo4j database """ from neo4j import GraphDatabase from neo4j_backup import Extractor from decouple import config import shutil import argparse import os # Grabbing environment variables HOSTNAME = config("DATABASE_HOST") USERNAME = config("DATABASE_USERNAME") PASSWORD = config("DATABASE_PASSWORD") if __name__ == "__main__": #Add command line arguments to fetch import file and database name parser = argparse.ArgumentParser() #Command line argument to fetch database name. Database name is taken as 'neo4j' if no argument is specified parser.add_argument("--database_name", type=str, help="Provide the name of the database", nargs='?', default="neo4j", const=0) parser.add_argument("--save_dir", type=str, help="Provide the name of the directory in which the backup would be stored", nargs='?', default="synthetic_data", const=0) args = parser.parse_args() database = args.database_name encrypted = False trust = "TRUST_ALL_CERTIFICATES" driver = GraphDatabase.driver(HOSTNAME, auth=(USERNAME, PASSWORD), encrypted=encrypted, trust=trust) project_dir = args.save_dir input_yes = False compress = True #Extract data from database and store the backup extractor = Extractor(project_dir=project_dir, driver=driver, database=database, input_yes=input_yes, compress=compress) extractor.extract_data() shutil.make_archive(project_dir, 'zip', project_dir) shutil.rmtree(project_dir) |
Running the backup script
1. To run the backup script, first make sure that the neo4j database you want to backup is running.
2. Open a terminal, navigate to the location of the neo4j_backup_script.py file and run the following command:
python neo4j_backup_script.py --database_name <database_name> --save_dir <save_directory> |
Make sure to replace database_name with the name of the database you want to backup, and save_directorywith the directory where you want to save the backup file.

3. Once the script finish running, navigate to the save_dir location that you specified in the command to run the script. You should see a new zip file created which contains the backup of your database.
Kudos! We have successfully backed up our synthetic data. Next, let’s have a look at how we can restore the data that we backed up.
Restoring the synthetic data
In the previous section, we used the neo4j-backup library to create a backup of our database. We will be using same library again to restore our synthetic data as well.
We will not cover the initial setup required for this script, as it is identical to the steps outlined in the previous section to create the backup script.
Writing the script to restore the synthetic data in Neo4j
Let’s start by creating a new python file and name it “neo4j_restore_script.py”.
With the file in place, we’re all set to start writing the script to restore the synthetic data.
The creation of the script will be divided into the following sections:
A. Extracting the backup file
B. Importing the backup data
C. Putting it all together
A. Extracting the backup file
In this section, we’ll explore the process of extracting the backup file and preparing it for import.
1. First lets import the libraries that we would be using in our script.
import sys from neo4j import GraphDatabase from neo4j_backup import Importer from py2neo import Graph from decouple import config from zipfile import ZipFile import argparse |
2. Next, in a similar fashion to the backup script, we must define the necessary variables for connecting to our database. As we’re using the same variables as in the backup script, there’s no need to define or add any new variables to our environment file. Therefore, we can simply retrieve these environment variables in our script.
# Grabbing environment variables HOSTNAME = config("DATABASE_HOST") USERNAME = config("DATABASE_USERNAME") PASSWORD = config("DATABASE_PASSWORD") |
3. Now, lets go ahead and define the main function. As with the backup script, we’ll use the argparse module to define the command line arguments that the restore script will accept. To be precise, we’ll specify two arguments database_name and import_file.
if __name__ == "__main__": #Add command line arguments to fetch import file and database name parser = argparse.ArgumentParser() #Command line argument to fetch import file. File name is taken as 'synthetic_data.zip' if no argument is specified parser.add_argument("--import_file", type=str, help="Provide the import file zip", nargs='?', default="synthetic_data.zip", const=0) #Command line argument to fetch database name. Database name is taken as 'neo4j' if no argument is specified parser.add_argument("--database_name", type=str, help="Provide the name of the database", nargs='?', default="neo4j", const=0) args = parser.parse_args() IMPORT_FILE = args.import_file database = args.database_name |
The --database_name argument is used to specify the name of the database that would be restored, and the --import_file argument is used to locate the backup file which was created in the previous section of this post.
4. Now, given that our backup folder is archived, it’s necessary to extract or unzip the archived folder before we can import it. To accomplish this, let’s first define a function to extract our archived file.
def unzip_file(IMPORT_FILE,extract_dir): with ZipFile(IMPORT_FILE, 'r') as zip: # printing all the contents of the zip file zip.printdir() # extracting all the files print('Extracting all the files now...') zip.extractall(extract_dir) print('Done!') |
Here, the IMPORT_FILE parameter is the zip file containing the neo4j backup, and extract_dir is the name of the directory where the archive will be extracted to.
5. Next, Let’s call this function from within our main function:
#Get the directory into which the archive will be extracted extract_dir = os.path.splitext(IMPORT_FILE)[0] unzip_file(IMPORT_FILE,extract_dir) |
We now have our backup folder ready to be imported. Next, lets take a look at how we can import this backup data to a new database.
B. Importing the backup
1. Prior to restoring our database, it is necessary to clear any existing data to ensure accurate restoration. This can be achieved by executing a cypher query that clears the database. In order to run the query, we will be utilizing the Graph library from py2neo.
2. First, let’s create a new file that will hold our cypher queries and name it “cypher.py”. Then, add the following query to the file:
#Delete all the records in the Database(WARNING: Never use this query in production database) DELETE_ALL_RECORDS = "MATCH (n)\ DETACH DELETE n" |
3. Next, lets import this file in our python script
import cypher |
4. Now that we have imported the Query, lets define a constant GRAPH in our main function ,which will hold the authentication for the Neo4j database that will enable us to run the query against the database
GRAPH = auth() |
5. Now lets define the auth() function.
def auth(): "Authenticating with the Database" GRAPH = None try: GRAPH = Graph(HOSTNAME, auth=(USERNAME, PASSWORD)) print("Database authenticated") except Exception as error: raise RuntimeError('Database authentication failed') from error return GRAPH |
6. We can now run the query to clear the database in our main function:
#Clear the existing data in database clear_database = GRAPH.run(cypher.DELETE_ALL_RECORDS) |
7. Having cleared our database, we can now proceed to restore the synthetic data. For this purpose, we need to define the connection settings for the Neo4j database and create a driver object using the GraphDatabase.driver() function, which is the same approach used in the backup script.
clear_database = GRAPH.run(cypher.DELETE_ALL_RECORDS) encrypted = False trust = "TRUST_ALL_CERTIFICATES" driver = GraphDatabase.driver(HOSTNAME, auth=(USERNAME, PASSWORD), encrypted=encrypted, trust=trust) |
Note: As mentioned previously, the encryption is set to false only because the database is on the local system. However, if the database exists on a remote server, make sure to set the encryption to true.
8. Finally let’s import the synthetic data to the database by creating an instance of the Importer class from the neo4j_backup library and calling the import_data() method.
#Import the data to the database importer = Importer(project_dir=extract_dir, driver=driver, database=database, input_yes= False) importer.import_data() |
C. Putting it all together
That’s it! We are finally done with our coding. Our complete code should look similar to this:
""" Clear the existing database and restore the Neo4j backup """ import os import sys from neo4j import GraphDatabase from neo4j_backup import Importer from py2neo import Graph from decouple import config import cypher from zipfile import ZipFile import argparse # Grabbing environment variables HOSTNAME = config("DATABASE_HOST") USERNAME = config("DATABASE_USERNAME") PASSWORD = config("DATABASE_PASSWORD") def auth(): "Authenticating with the Database" GRAPH = None try: GRAPH = Graph(HOSTNAME, auth=(USERNAME, PASSWORD)) print("Database authenticated") except Exception as error: raise RuntimeError('Database authentication failed') from error return GRAPH def unzip_file(IMPORT_FILE,extract_dir): "Unzip the import files" with ZipFile(IMPORT_FILE, 'r') as zip: # printing all the contents of the zip file zip.printdir() # extracting all the files print('Extracting all the files now...') zip.extractall(extract_dir) print('Done!') if __name__ == "__main__": #Add command line arguments to fetch import file and database name parser = argparse.ArgumentParser() #Command line argument to fetch import file. File name is taken as 'synthetic_data.zip' if no argument is specified parser.add_argument("--import_file", type=str, help="Provide the import file zip", nargs='?', default="synthetic_data.zip", const=0) #Command line argument to fetch database name. Database name is taken as 'neo4j' if no argument is specified parser.add_argument("--database_name", type=str, help="Provide the name of the database", nargs='?', default="neo4j", const=0) args = parser.parse_args() IMPORT_FILE = args.import_file database = args.database_name #Get the directory into which the archive will be extracted extract_dir = os.path.splitext(IMPORT_FILE)[0] unzip_file(IMPORT_FILE,extract_dir) GRAPH = auth() #Clear the existing data in database clear_database = GRAPH.run(cypher.DELETE_ALL_RECORDS) encrypted = False trust = "TRUST_ALL_CERTIFICATES" driver = GraphDatabase.driver(HOSTNAME, auth=(USERNAME, PASSWORD), encrypted=encrypted, trust=trust) #Import the data to the database importer = Importer(project_dir=extract_dir, driver=driver, database=database, input_yes=False) importer.import_data() |
Restoring and verifying the data
1. To run the restore script, first make sure that the Neo4j database you want to restore is up and running.
2. Open a terminal, navigate to the location of the neo4j_restore_script.py file and run the following command:
python neo4j_restore_script.py --database_name <database_name> --import_file <backup_file> |
Make sure to replace database_name with the name of the database you wish to restore the data into, and backup_file with the the archived backup file that was created by the backup script.
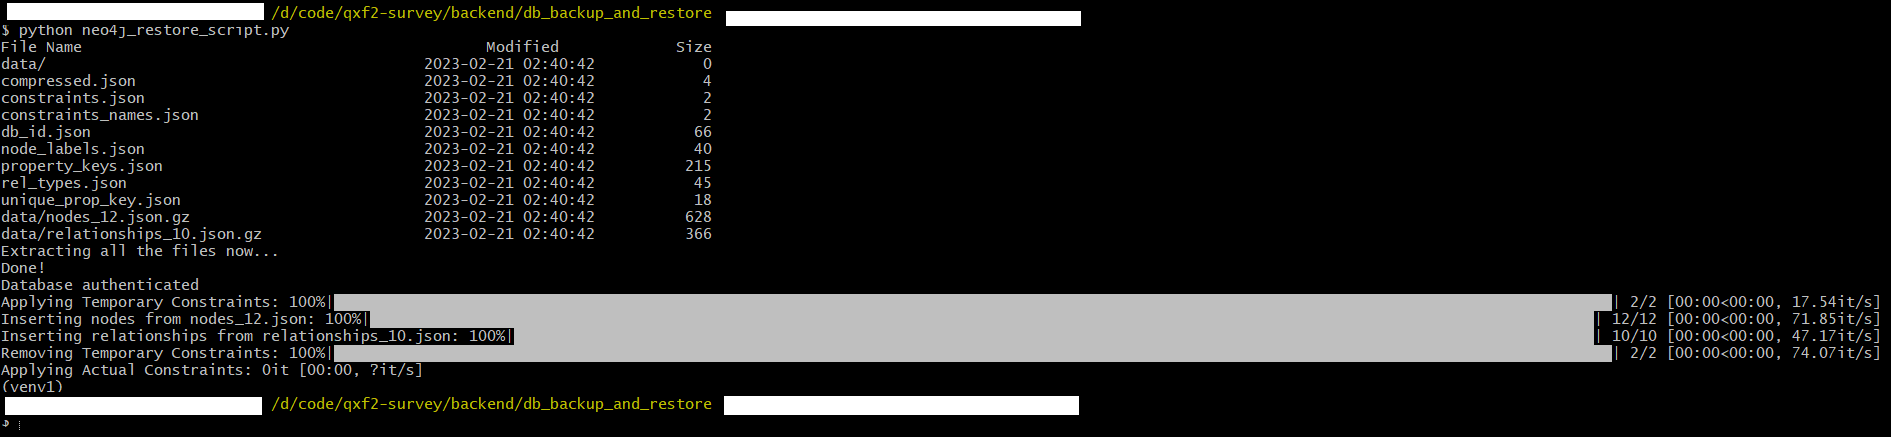
3. Once the script finish running, check your database. If everything went smoothly, your database should be populated with the synthetic data that we created.
Hurray! We have successfully restored our synthetic data!
Further reading
If you’re interested in checking out how we can setup tests for the synthetic data that we created you can checkout out the test “test_responses_between_dates.py” on our Qxf2-survey GitHub repository.
To run the test, you will need to have the Qxf2-survey app set up on your machine. You can follow the instructions provided in the Qxf2-survey app’s Github documentation to set up the survey app on your local system.
Hire technical testers from Qxf2
Qxf2 is the home of the technical tester. As you can see from this post, our testers go beyond the regular “manual” or “automation” paradigm of testing. We are engineers who test software. We lay the groundwork for testing, improve testability and enable your entire team to participate in testing. If you are looking for testers with solid engineering backgrounds, reach out to us here.

I am a QA Engineer. I completed my engineering in computer science and joined Qxf2 as an intern QA. During my internship, I got a thorough insight into software testing methodologies and practices. I later joined Qxf2 as a full-time employee after my internship period. I love automation testing and seek to learn more with new experiences and challenges. My hobbies are reading books, listening to music, playing chess and soccer.

