Qxf2 has been using contract tests at our clients for a bit now. So we decided to write a series of blog posts to help beginners get started with contract testing as often times testers find it difficult in understanding the contract testing workflow and methods.
In this series we will take you on a journey from knowing nothing about Pact and contract testing, all the way to bidirectional contract testing. In this journey we will also go through a few misconceptions and struggles that are easy for a beginner to stumble upon.
We will use one of Qxf2’s internal application “Newsletter Automation” to simulate a scenario for contract testing as we cannot reveal any details about our client’s product.
Understanding Contract testing:
Contract testing is useful when we want two teams that rely on each other to move independently. You can think of it as a reliable way to decouple teams. Contract tests are used to ensure that two or more software components, typically the consumer and the provider, are compatible with each other. They verify that the communication between them is working as expected and that each component meets the requirements specified in the contract. Pact is one of the most popular contract testing tools available, and we will be using the same in this example to setup our contract tests.
We will first use something known as the “consumer driven” contract testing approach to setup the contract tests for the Newsletter Automation Application. This is a useful first step but has some drawbacks we will discuss later.
The socio-technical aspect
A side note. Currently (early 2023), the biggest obstacle we face when we want to implement contract tests at clients is to get multiple teams to agree to write contract tests. This is a socio-technical problem. We do not have a solution. We just bring this point up to warn testers that just knowing how to implement contract tests is not going to be enough. The tester should possess skills in upward management, securing buy-in, and consistently advocating for its value.
Consumer driven contract testing:
Consumer-driven contract testing is a popular method in which the consumer writes the tests, which then become the contract that the provider must adhere to. This approach helps to identify issues before they reach production, resulting in a more stable and reliable product.
The following image shows the workflow of consumer driven contract tests.
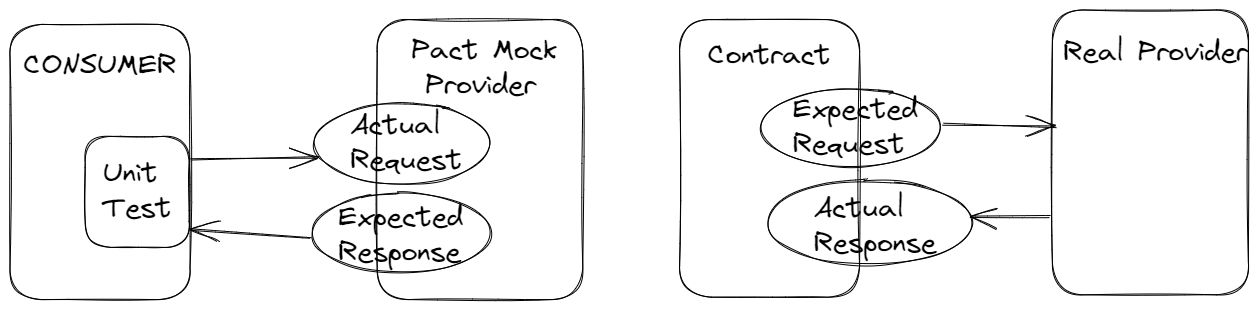
1. There are two entities in Contract tests, The Consumer and The Provider
2. In Consumer-Driven Contract Testing method, the Consumer first writes a unit test that runs against a mock Provider. This mock Provider can be setup using Pact within the same unit test or setup independently using any other tool like WireMock.
3. The mock Provider is configured to return an expected response when it receives a specific request.
4. The test then passes this request to the mock provider. The mock Provider checks if the request matches the expected request and then returns the response that it was configured to return.
5. The test checks if the response received matches with the expected response that the mock Provider was configured to return.
6. If this passes then the expected request and the expected response for that request is captured in a contract and uploaded to a Pact Broker.
7. In the provider end, this contract is downloaded from the Pact Broker and the expected request that is defined within the contract is fetched.
8. This request is then passed to the actual Provider.
9. The response received from the actual Provider is compared with the expected response in the Contract.
10. If the responses matches then the verification test passes and the results are uploaded to the Pact Broker.
For a more detailed explanation on how Consumer-Driven Contract Testing works, we have created a video for the same:
Writing consumer-driven contract tests for Newsletter Automation application:
The Newsletter Automation Application has a Lambda function that receives Skype messages as input and processes these messages to check if the message contains a URL in it. If it does, then it uses an API endpoint to post that URL and store it in a database.
If a URL that already exists in the database is passed in the API call, it returns a response {'message': 'URL already exists in database'}, if not it returns {'message': 'Record added successfully'} on successful addition of the URL to the database. We will be covering both these scenarios in our contract test.
Prerequisites:
-
1. As mentioned previously contract testing has two sides, Consumer and the Provider. In our case the Newsletter Automation Lambda will be the Consumer, and the Newsletter API will be the Provider.
2. We will be using the Pact Python library in this illustration to write a unit test to generate a contract between the Consumer and the Provider
3. Let’s start off by installing the necessary libraries:
pip install pact-python pytest requests |
Importing the libraries:
-
1. Let’s now create a new python file and name it
post_newsletter_article_contract.py.
2. Next, we shall import the required libraries for our test
import atexit import unittest import json import requests from pact import Consumer, Provider |
Setting up a mock Provider:
-
1. Let’s now set the consumer and provider for our contract.
pact = Consumer('NewsletterLambda').has_pact_with(Provider('NewsletterAPI'), pact_dir='./pacts') |
2. Next, we need to setup a mock Provider service which will respond to requests as configured in the pact object(You will see this in the next section).
#Start pact mock provider server pact.start_service() #Stop the mock server on termination of the interpreter atexit.register(pact.stop_service) |
3. In the above code snippet pact.start_service() starts the mock Provider service and this service stops upon termination of the interpreter
Generating the Contract:
-
1. Now that we have our mock provider setup, we will first write the test to generate a contract for the scenario where an article that does not already exist in the database is passed in the API call. For this, we need to first define what the Pact mock provider should respond with if it receives such a request.
class NewsletterApiTest(unittest.TestCase): "Newsletter API test Class containing methods to generate Consumer contract using Pact" def test_post_new_articles(self): "Generate contract for addition of new article, that doesn't pre-exist in that database" path = '/api/articles' data = "url=www.new-article.com&category_id=5&article_editor=Pact_tester" expected_body = {'message': 'Record added successfully'} expected_status = 200 (pact .given('post new article to database') .upon_receiving('a request to post new article') .with_request(method='post',path=path,body=data) .will_respond_with(expected_status, body=expected_body)) |
In the above code you can see that we configure the pact object to respond with a status of 200 and response body {'message': 'Record added successfully'} whenever it receives a request to post a new article.
2. Now, we need to actually send this API request to the mock provider and verify if we get the response that the mock provider was configured to return.
with pact: resp = requests.post(pact.uri + path, data = json.loads(json.dumps(data)), timeout=5) self.assertEqual(resp.status_code, expected_status) self.assertEqual(resp.json(), expected_body) |
3. Our final code should look similar to this:
""" Contract test for Newsletter Automation application's API endpoint to add articles to the database """ import atexit import unittest import json import requests from pact import Consumer, Provider pact = Consumer('NewsletterLambda').has_pact_with(Provider('NewsletterAPI'), pact_dir='./pacts') #Start pact mock provider server pact.start_service() #Stop the mock server on termination of the interpreter atexit.register(pact.stop_service) class NewsletterApiTest(unittest.TestCase): "Newsletter API test Class containing methods to generate Consumer contract using Pact" def test_post_new_articles(self): "Generate contract for addition of new article, that doesn't pre-exist in that database" path = '/api/articles' data = "url=www.new-article.com&category_id=5&article_editor=Pact_tester" expected_body = {'message': 'Record added successfully'} expected_status = 200 (pact .given('post new article to database') .upon_receiving('a request to post new article') .with_request(method='post',path=path,body=data) .will_respond_with(expected_status, body=expected_body)) with pact: resp = requests.post(pact.uri + path, data = json.loads(json.dumps(data)), timeout=5) self.assertEqual(resp.status_code, expected_status) self.assertEqual(resp.json(), expected_body) |
3. Run this test using command pytest post_newsletter_article_contract.py. If it passes then a new contract would be created under ./pacts directory. The pacts directory would be created in the location from which you just ran the test.
4. Your contract would look similar to this
{
  "consumer": {
    "name": "NewsletterLambda"
  },
  "provider": {
    "name": "NewsletterAPI"
  },
  "interactions": [
    {
      "description": "a request to post new article",
      "providerState": "post new article to database",
      "request": {
        "method": "post",
        "path": "/api/articles",
        "body": "url=www.new-article.com&category_id=5&article_editor=Pact_tester"
      },
      "response": {
        "status": 200,
        "headers": {
        },
        "body": {
          "message": "Record added successfully"
        }
      }
    }
  ],
  "metadata": {
    "pactSpecification": {
      "version": "2.0.0"
    }
  }
} |
5. Now similarly, let’s also add test for scenario where URL passed with the API endpoint already exists in the database.
def test_post_existing_articles(self): "Generate contract for addition of an article that already exists in the database" path = '/api/articles' data = "url=www.existing-article.com&category_id=5&article_editor=Pact_tester" expected_body = {'message': 'URL already exists in database'} expected_status = 200 (pact .given('post existing article to database') .upon_receiving('a request to post an existing article') .with_request(method='post',path=path,body=data) .will_respond_with(expected_status, body=expected_body)) with pact: resp = requests.post(pact.uri + path, data = json.loads(json.dumps(data)), timeout=5) self.assertEqual(resp.status_code, expected_status) self.assertEqual(resp.json(), expected_body) |
6. Upon running the test again, the contract gets updated and should look similar to this:
{
  "consumer": {
    "name": "NewsletterLambda"
  },
  "provider": {
    "name": "NewsletterAPI"
  },
  "interactions": [
    {
      "description": "a request to post an existing article",
      "providerState": "post existing article to database",
      "request": {
        "method": "post",
        "path": "/api/articles",
        "body": "url=www.existing-article.com&category_id=5&article_editor=Pact_tester"
      },
      "response": {
        "status": 200,
        "headers": {
        },
        "body": {
          "message": "URL already exists in database"
        }
      }
    },
    {
      "description": "a request to post new article",
      "providerState": "post new article to database",
      "request": {
        "method": "post",
        "path": "/api/articles",
        "body": "url=www.new-article.com&category_id=5&article_editor=Pact_tester"
      },
      "response": {
        "status": 200,
        "headers": {
        },
        "body": {
          "message": "Record added successfully"
        }
      }
    }
  ],
  "metadata": {
    "pactSpecification": {
      "version": "2.0.0"
    }
  }
} |
Now that we have our consumer contract ready, lets look at how this contract can be used at the provider end.
Uploading contract to Pact Broker:
A Pact Broker is an application used to share Pact contracts and verification results between the Consumer and the Provider. You can setup your own Pact Broker server or user already available third party services like Pactflow. Since in this example we go through the end to end setup of contract test, we have access to both the Consumer and the Provider applications. Therefore, we will be setting up a Pact Broker server locally using pact-broker docker image to make it quick and easy.
-
1. Make sure you have Docker and Docker Compose installed in your machine.
2. Create a new docker-compose.yml file
3. Copy the contents of the docker-compose.yml file from Pact’s pact-broker-docker repository, and paste it into the docker-compose.yml file that you created previously.
4. Run the docker-compose file using command:
docker-compose up |
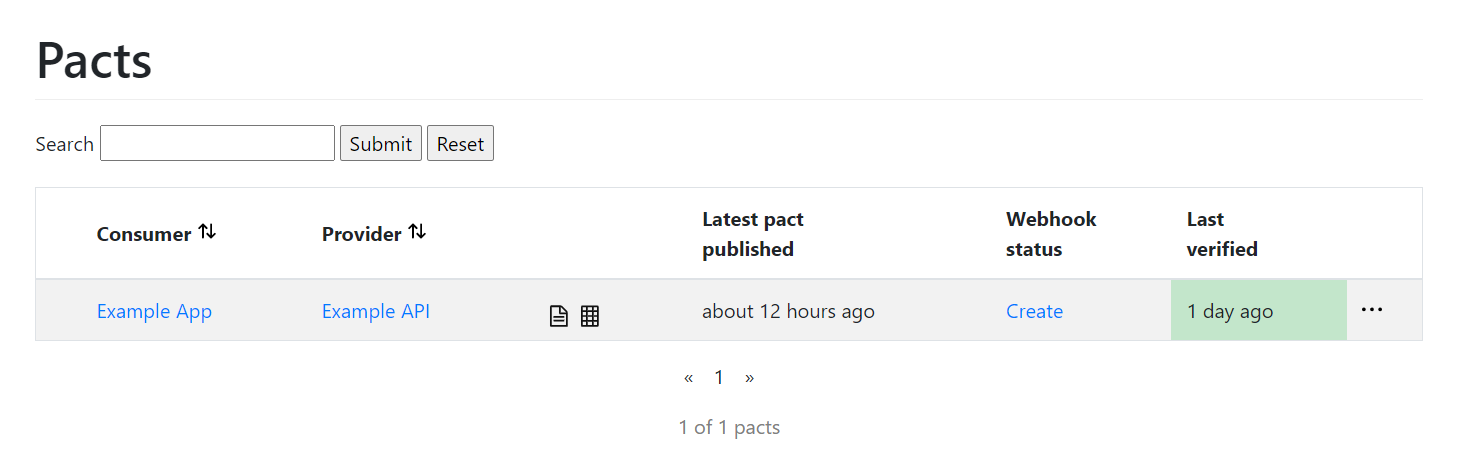
5. Navigate to URL http://localhost:9292, you should see an interface that looks similar to this:
6. Note that this Pact Broker setup is just for illustration purpose and is run locally. If you are setting up a Pact Broker on a server make sure to add authentication to your Broker. You can follow this link for information on authenticating your Pact Broker.
7. Now that our Pact Broker is setup, we can upload our contract to it.
8. For this, first download the Pact Broker Client standalone executable based on your operating system
9. Then run the following command:
(path-to-your-pact-standalone-folder)/bin/pact-broker.bat publish (Path-to-your-contract) --broker-base-url (Pact-Broker-URL) --consumer-app-version (Version) --branch (Branch-name)
Example:
/d/pact/bin/pact-broker.bat publish /d/code/qxf2-lambdas/pacts/newsletterlambda-newsletterapi.json --broker-base-url http://localhost:9292 --consumer-app-version 1.0 --branch newsletter-app-contract-test
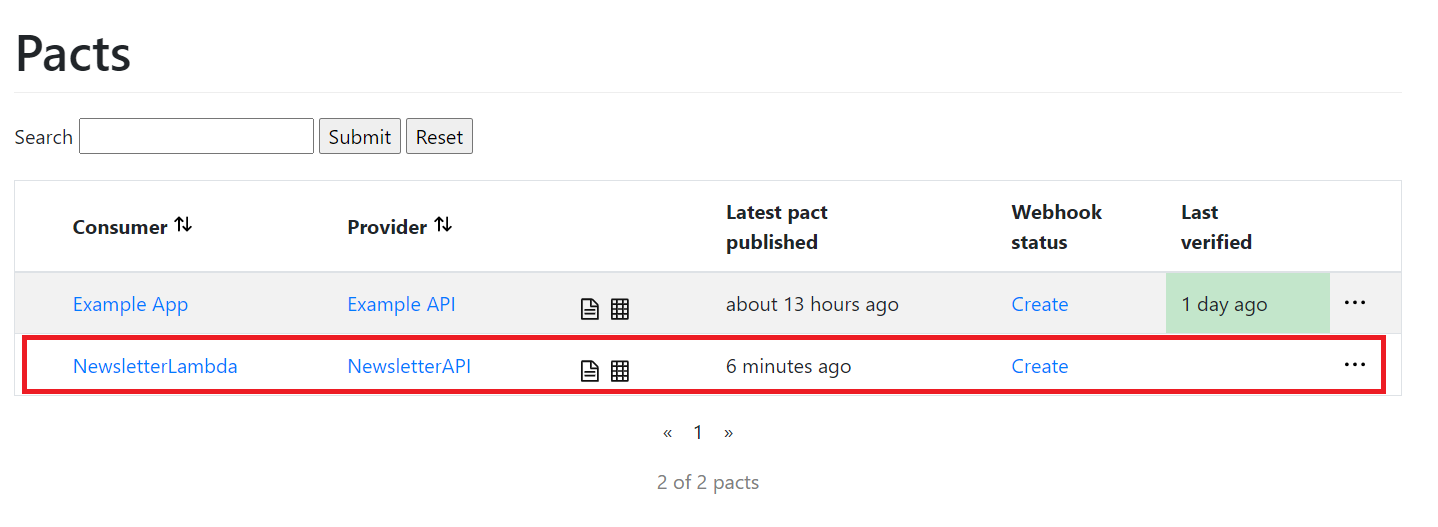
10. If all goes well, the contract gets published on the Pact Broker and your CLI output should look something like this:

11. Navigate to http://localhost:9292, you should see the contract that you just uploaded in the Pact Broker user interface.
Provider verification:
Now, lets take a look at how we can verify this contract in the Provider end. We basically need to fetch the contract from the Pact Broker and verify this contract against the real Provider.
-
1. We will be using the Verifier method from
Pact Python library. So first lets create a new Python file and import the required libraries
import os from pact import Verifier |
2. Next, lets set the Verifier with the details of the Provider, which includes the Provider name and Provider base URL. Make sure the Provider name matches with the name you had specified in the Consumer contract. In this case the Provider name is ‘NewsletterAPI‘
def test_verify_contract_newsletter_api_provider(): "Verify contact against newsletter API" verifier = Verifier(provider='NewsletterAPI', provider_base_url="https://staging-newsletter-generator.qxf2.com") |
3. Now, we are all set to verify the contract against the Provider. We will be using the verify_with_broker() method of Pact verifier to accomplish this.
api_key = os.environ.get('api_key') success, logs = verifier.verify_with_broker( broker_url="http://localhost:9292", headers=['x-api-key:'+f'{api_key}'], publish_version="1.0.0", publish_verification_results=True, verbose=True, provider_version_branch="newsletter_app_provider_verification" ) assert success == 0 |
4. Your entire code would look similar to this:
""" Test to verify Newsletter Automation Consumer contract against Newsletter API """ import os from pact import Verifier #API key to authenticate provider API api_key = os.environ.get('api_key') def test_verify_contract_newsletter_api_provider(): "Verify contact against newsletter API" verifier = Verifier(provider='NewsletterAPI', provider_base_url="https://staging-newsletter-generator.qxf2.com") #Verify Contract and get the verification result. #0 indicates test has passed and 1 indicates failure success, logs = verifier.verify_with_broker( broker_url="http://localhost:9292", headers=['x-api-key:'+f'{api_key}'], publish_version="1.0.0", publish_verification_results=True, verbose=True, provider_version_branch="newsletter_app_provider_verification" ) assert success == 0 |
5. In the above code, the Pact verifier gets the expected request from the contract and passes it to the Provider. It then fetches the response for that request from the Provider and compares it with the expected response present in the contract. If the response matches then the test passes if not it fails. The verification result is then uploaded to the Pact Broker .
6. Run the above test using pytest:
pytest (name-of-test).py
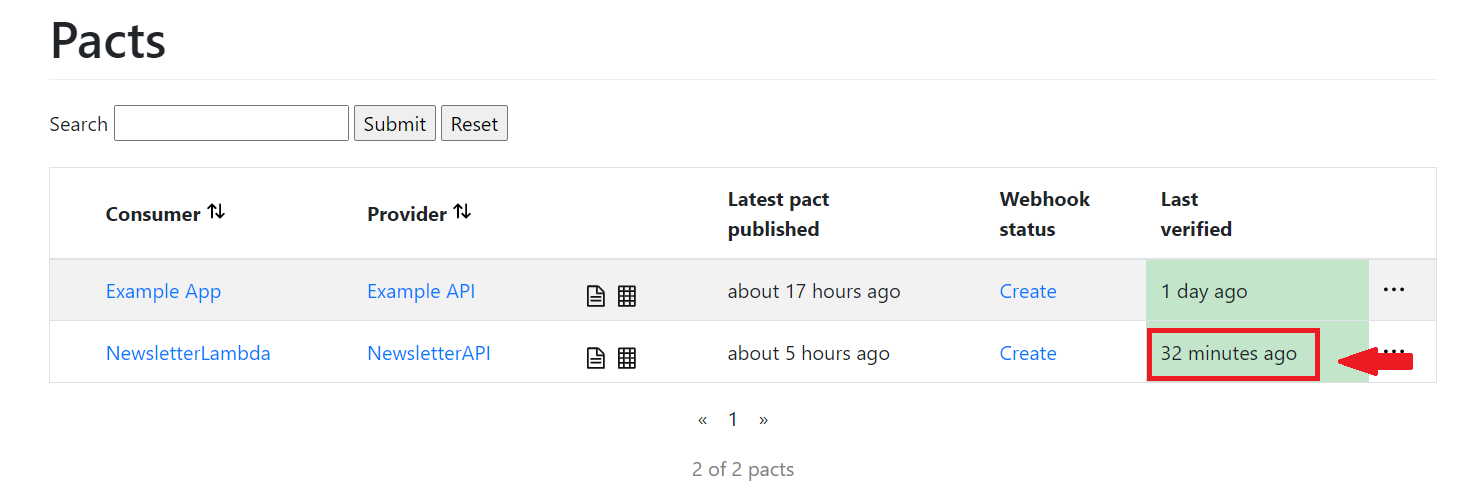
7. If the test passes, you can head to Pact Broker UI i.e. http://localhost:9292. You would be able to to see the Verification result through the UI
Next, lets see the problem with this verification test
Issues with the Provider verification:
If you remember , the Newsletter API endpoint returns the response {'message': 'Record added successfully'} only when the URL passed in the request body is not already present in the Newsletter Automation Database. The verification for this contract passes the first time, but when we try to run the verification again it would fail because the URL was already added to the database the first time the verification was run. So the endpoint would now return the response {'message': 'URL already exists in database'} as the URL is already present. Hence the verification would fail.
How do we resolve this issue?
Enter Provider States.
What are Provider States?
Provider states are a way to set up the state of the provider system before running a contract test. It is particularly useful when the response of an API is dependent on the state of the database.
We can use the Provider state feature during verification of the contract by simply specifying a URL as provider-states-setup-url in the Pact Verifier. The Verifier would make a post request to this URL with the JSON body {consumer: 'Consumer name', state: 'a thing exists'} just before verifying the contract against the Provider. The URL can be an API endpoint and needs to be setup in a way such that it makes the required changes to the database every time it is called.
Setting up Provider State URL:
Now lets setup a Provider state URL for the Newsletter automation application, that would set the Newsletter automation database in the required state to run our verification test. In our case, we need to make sure that the URL passed with the API endpoint being tested should not already be present in the database so that we get the same response every time the verification is run.
To achieve this we will be writing a flask application to create an API that manipulates the Newsletter Automation database to delete the necessary article from the database. We will also handle the scenario where URL passed with the API endpoint already exists in the database by adding the necessary URL to the database. Since the state of the provider i.e. contract condition that is being verified is passed in the POST request body, We can use this to manipulate the database in different ways for different conditions.
""" Pact provider state resolver for Newsletter API provider """ #!/usr/bin/python3 import os from flask import Flask from flask import jsonify from flask import request import requests import pandas as pd app = Flask(__name__) headers = {'x-api-key' : os.environ.get('api_key')} @app.route('/newsletter/provider_states', methods=['POST']) def provider_states(): "Gets the provider state from the request and based it it performs\ suitable operations on the database and return a response" #Get the provider state provider_state = request.json['state'] #Check if a new article is being posted to the database if provider_state == 'post new article to database': #Remove the article if it already exists response = delete_articles() #Check if an existing article is being posted to the database elif provider_state == 'post existing article to database': #Add the article if it does not exist already response = add_articles() #Return default response if none of the provider states match else: response = "None of the Provider states matches,\ if you have made changes to it kindly update the endpoint" print(response) return response def add_articles(): "Add an article to database" article_to_be_added = "www.existing-aricle.com" data = {'url': article_to_be_added, 'category_id': 5, 'article_editor': "pact_tester"} add_article = requests.post("https://staging-newsletter-generator.qxf2.com/api/articles", data = data, headers = headers, timeout=5) add_article_status = add_article.status_code return jsonify(add_article_status) def delete_articles(): "Delete an article from the database" article_to_be_deleted = "www.new-article.com" get_articles = get_all_articles() article_id = get_article_id_from_url(get_articles,article_to_be_deleted) delete_url=f"https://staging-newsletter-generator.qxf2.com/api/article/{article_id}" delete_article = requests.delete(delete_url,headers=headers, timeout=5) return jsonify(delete_article.status_code) def get_all_articles(): "Fetch all articles" get_url = "https://staging-newsletter-generator.qxf2.com/api/articles/all" get_articles = requests.get(get_url,headers=headers, timeout=5) return get_articles.text def get_article_id_from_url(get_articles,article_to_be_deleted): "Get the article ID from the URL of the article" article_dataframe = pd.read_json(get_articles) if article_to_be_deleted in article_dataframe['url'].tolist(): article_id = article_dataframe.loc[article_dataframe['url'] == article_to_be_deleted, 'article_id'].item() else: article_id = None return article_id if __name__ == '__main__': app.run(debug=True, port=5001) |
As you can see in the above code we have created an API endpoint /newsletter/provider_states, that sets the Newsletter Automation database in the desired state based on the condition being tested.
For this example we will run this flask app locally by simply running the python file.
python filename.py |
Next, lets look at how we can use this provider state URL.
Using the provider states
As mentioned previously, we can use the provider state URL that was setup by passing the provider-states-setup-url argument in the Pact verifier. In our case the URL we created is newsletter/provider_states. Therefore we need to add the following argument to the verifier.
provider_states_setup_url="http://localhost:5001/_pact/provider_states" |
Our modified provider verification test would look similar to this:
""" Test to verify Newsletter Automation Consumer contract against Newsletter API """ import os from pact import Verifier #API key to authenticate provider API api_key = os.environ.get('api_key') def test_verify_contract_newsletter_api_provider(): "Verify contact against newsletter API" verifier = Verifier(provider='NewsletterAPI', provider_base_url="https://staging-newsletter-generator.qxf2.com") #Verify Contract and get the verification result. #0 indicates test has passed and 1 indicates failure success, logs = verifier.verify_with_broker( broker_url="http://localhost:9292", headers=['x-api-key:'+f'{api_key}'], publish_version="1.0.0", publish_verification_results=True, verbose=True, provider_version_branch="newsletter_app_provider_verification", provider_states_setup_url="http://localhost:5001/newsletter/provider_states" ) assert success == 0 |
Though Provider States is a handy solution to such issues, it does come with it’s own set of problems.
Drawback of using Provider States:
1. Provider states work well in simple systems, but they become problematic in complex systems where there are multiple consumers and providers. Setting up the provider state for each consumer test can become a tedious process and not very practical.
2. Provider states can create tight coupling between the consumer and provider, as the consumer depends on the the internal state of the provider. This can make it really difficult for providers to update their implementation without breaching the contract.
3. Maintaining provider states can be challenging, especially if the consumer requirement keeps changing over time. Provider may need to keep the state’s updated frequently based on the consumer. This puts an additional burden on the Provider team.
A short teaser of the our next blog in this series:
These limitations might make you doubt that Contract testing is or limited value, right? But wait! What if I told you there is a better way to carry out contract testing that eliminates all these limitations!! Interesting right?
Enter Bidirectional Contract Testing.
We will be covering in detail about this awesome contract testing method in our next blog. So stay tuned.
Hire Qxf2
Hire testers from Qxf2. We have the technical testers you have been looking for. Our team comprises highly skilled testers with strong technical acumen. We excel in testing, possess a deep understanding of your engineering and provide valuable insights to improve testing practices.

I am a QA Engineer. I completed my engineering in computer science and joined Qxf2 as an intern QA. During my internship, I got a thorough insight into software testing methodologies and practices. I later joined Qxf2 as a full-time employee after my internship period. I love automation testing and seek to learn more with new experiences and challenges. My hobbies are reading books, listening to music, playing chess and soccer.

