Problem: Many testers do not get a chance to explore CircleCI
Why this post?
CircleCI is powerful, fast and easy-to-use Continuous Integration and Deployment tool for web applications. CircleCI seems to be growing in popularity as a cloud based continuous integration and deployment tool. Due to a variety of reasons, many testers do not get the opportunity to explore and play around with CircleCI. May be your development teams manage CircleCI, may be you joined a testing team after it was setup and stable. At Qxf2 Services, we strongly believe in exploring the tools that we use everyday. In this post, we will show you how easy it is to set up CircleCI, integrate it with your GitHub account, and automatically set up tests. Happy learning!
For this tutorial, we will assume that there is repository for a product and we write a selenium test in “tests/” directory. We will then update the repository on GitHub and run the tests using CircleCI. We assume that you know how to create and push changes to your GitHub repository.
PS: If you are a tester having a tough time getting started with Git, please let us know. We can write up a tutorial to get you started with Git.
Getting started with CircleCI
1. Create a Selenium test
2. Sign up with CircleCI and integrate with your GitHub Project
3. Configure CircleCI
4. Check-in the circle.yml file
STEP 1. Create a Selenium test
We will write a simple selenium script using python to navigate to Qxf2 Selenium Tutorial page and assert the page title. Once you have written the test, check-in your changes to your GitHub product repository.
""" Selenium Test to login to Qxf2 Tutorial Page and assert the title """ import os from selenium import webdriver # Create an instance of Firefox WebDriver driver = webdriver.Firefox() # The driver.get method will navigate to a page given by the URL # NOTE 1: This URL should reference localhost because it will run within a CircleCI container # But to keep this example simple but informative, we are using an already deployed URL # Check future posts for a complete code sample driver.get("http://qxf2.com/selenium-tutorial-main") # Create a screenshots directory if not present # NOTE 2: We are taking screenshots to show CircleCI artifacts if not (os.path.exists('./tests/screenshots')): os.makedirs('./tests/screenshots') # Save screenshot in the created directory driver.save_screenshot('./tests/screenshots/Qxf2_Tutorial_page.png') # Assert the Page Title assert "Qxf2 Services: Selenium training main" in driver.title # Close the browser window driver.close() |
STEP 2. Sign up with CircleCI and integrate with your GitHub Project
You can sign up with CircleCI using your GitHub account and give CircleCI permission to access your repository on your behalf. CircleCI supports open source projects with 3 free containers for high build throughput.
When you add a GitHub repository to CircleCI, CircleCI automatically adds a deploy key that references this repository. Whenever there is a new commit to your repository CircleCI detects and pulls the latest code and runs the test.
STEP 3. Configuring CircleCI
CircleCI is designed to set up most tests automatically because it infers your settings from your code. However we can customize your build as much as you like with a simple YAML-based config file that you check into version control. circle.yml file makes it easy to tell CircleCI what you need.
circle.yml
## Set the artifacts
general:
  artifacts:
    - "./tests/screenshots" #Save the screenshots for the tests

## Customize dependencies
dependencies:
  pre:
    - sudo pip install -U selenium

## Running Tests
test:
   override:
- python tests/Navigate_Qxf2_Tutorial_Test.py |
Let us closely examine our YAML file.
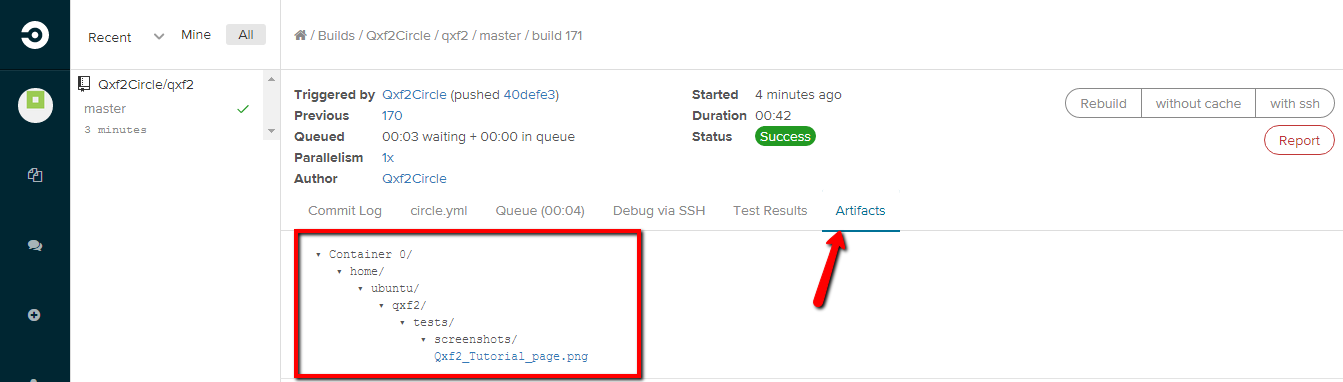
Build artifacts:
The build artifacts such as screenshots, logs, coverage reports, test output can be saved and linked to the build. They will be easily accessible forever in the UI or through the REST API. In the example above we set the artifact directory to “tests/screenshots” folder and we will save the screenshot in our tests in this folder. Once the test runs we can check the artifacts by clicking on Artifacts tab.
general:
artifacts:
– “./tests/screenshots”
Install any dependencies:
The CircleCI environment provides the libraries, languages, and databases needed for most development work. However, if you need to install a particular version of software CircleCI makes it easy to set up your environment to meet your testing needs. In our example we will install selenium which is needed to run our test.
dependencies:
pre:
– sudo pip install -U selenium
Running the test:
By default CircleCI runs nosetests when it find a unittest.py file. However we can override and run custom test commands from your circle.yml file. We will run our test using bash command.
python Navigate_Qxf2_Tutorial_Test.py
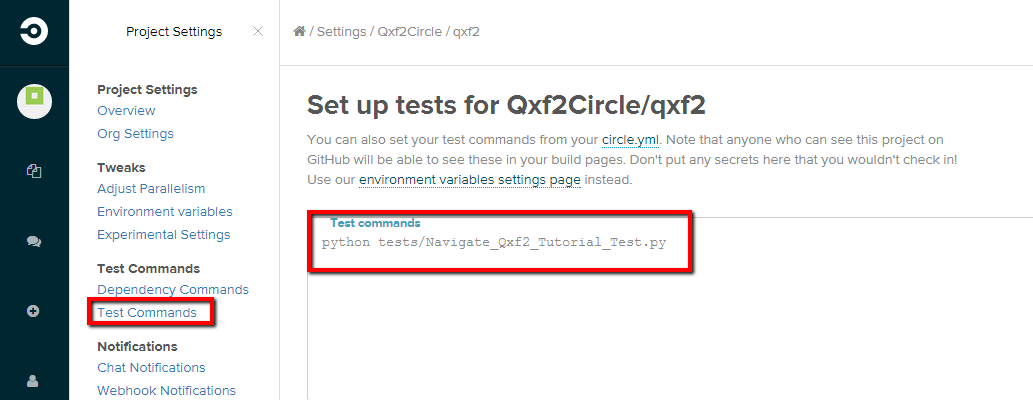
Note: You can also run your test using “Test Commands” in project settings section as shown below. Rather than having it in your Circle.yml file you can add it here.
STEP 4. Check-in circle.yml file
Now once you check-in your circle.yml file, CircleCI will find the new commit to your test and run the test. Make sure the circle.yml file is added to your root directory.
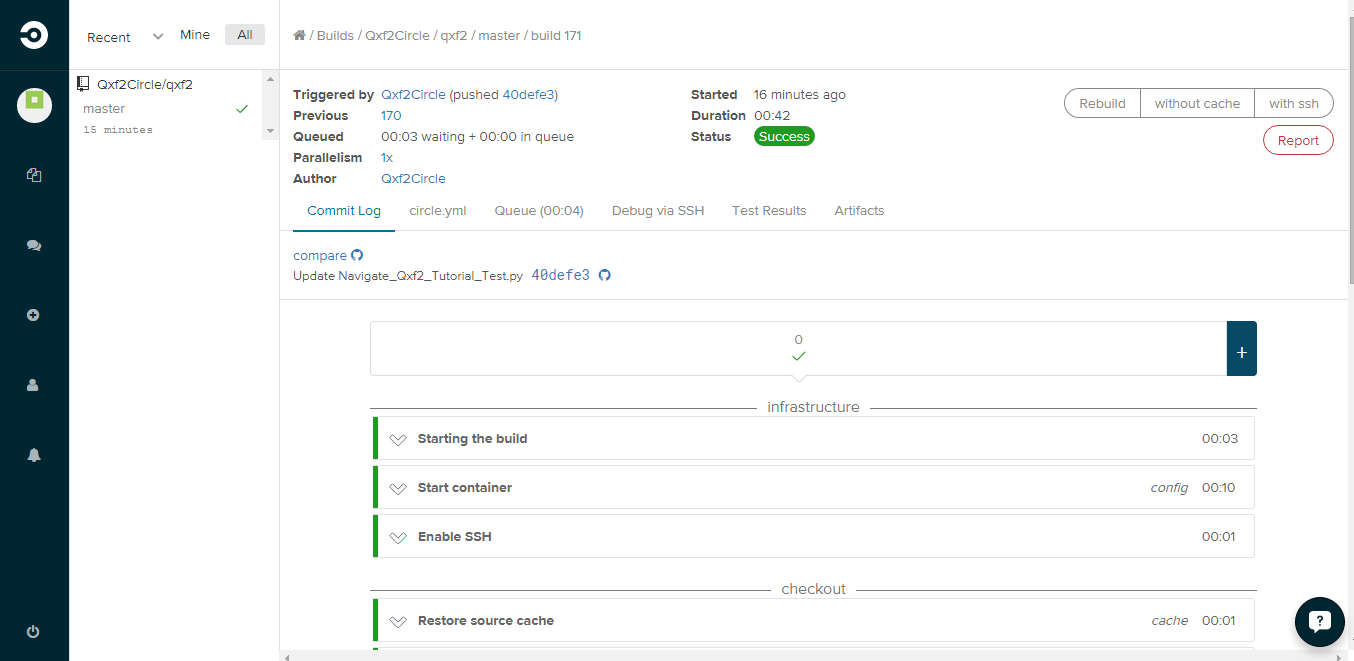
There you go, your test ran and it was a success. Running your tests using continuous integration tool has never been so easy. I will follow up with a couple of more posts on integrating CircleCI containers with BrowserStack and a full fledged example showing you various test triggers.

I am a dedicated quality assurance professional with a true passion for ensuring product quality and driving efficient testing processes. Throughout my career, I have gained extensive expertise in various testing domains, showcasing my versatility in testing diverse applications such as CRM, Web, Mobile, Database, and Machine Learning-based applications. What sets me apart is my ability to develop robust test scripts, ensure comprehensive test coverage, and efficiently report defects. With experience in managing teams and leading testing-related activities, I foster collaboration and drive efficiency within projects. Proficient in tools like Selenium, Appium, Mechanize, Requests, Postman, Runscope, Gatling, Locust, Jenkins, CircleCI, Docker, and Grafana, I stay up-to-date with the latest advancements in the field to deliver exceptional software products. Outside of work, I find joy and inspiration in sports, maintaining a balanced lifestyle.

