We recently stumbled upon Quilt, a data package manager that wants to fill the role of ‘Github for data’. We have enjoyed using it so far. We think it can be useful for testers to manage their test data using Quilt. In this post, we will take an example dataset and show you step by step guide on how to integrate Quilt with your test data.
This is a follow up post of our previous post on Quilt – a Data Package Manager. In our previous post, we talked about Quilt and basic operations that we performed on data and how we could access the older data versions using Quilt.
Sample Dataset
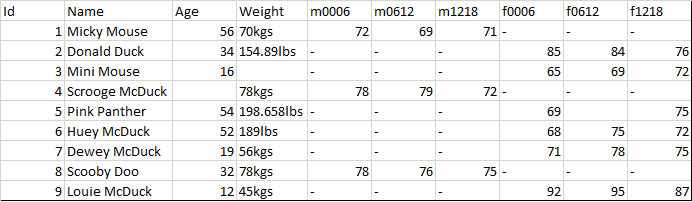
We have created a sample dataset to help you follow this post. We will be using the patient_heart_rate.csv as our example dataset. You can download the sample data from here. The data set is small enough and is in CSV format. Each row in the dataset has data about different individuals and their heart rate details for different time intervals. The columns contain information such as individual’s Age, Weight, Sex and Heart Rates taken at different time intervals. In this post, we will show you how to integrate Quilt at each step of your test data’s life.
- Create test data
- Restructure the data
- Manipulate the existing data in place
- Go back and forth between data versions
Quilt Setup
Quilt can be installed with pip using command
pip install quilt |
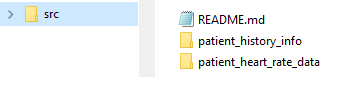
We want Quilt to operate on a directory structure that looks as shown below. We have a root directory src under which we have two sub-directories and a README.md. We created a couple of directories and two test files just so you get a feel for what is happening when you have multiple files spread in multiple directories.
- patient_heart_rate_data folder containing patient_heart_rate.csv file with data relating to patient heart rate.
- patient_history_info folder containing patient_history_details.xlsx with data relating to patient history information.
- A README.md is recommended at the root of the package.
Create test data
Create data? Not so fast! Anyone with even a little experience with data will tell you that it needs to be cleaned. If you look at our data, you can see that there are some problems with missing headers, non-ASCII characters, duplicate records, empty rows, etc., We did some basic cleaning up operations on data to remove non-ASCII characters, duplicate records, empty rows and added column headers. You can refer to our earlier post Cleaning data with Python for some tips and tricks on cleaning data and restructuring the data using Python Pandas library. After basic cleanup, the data looks as shown below. You can download the complete directory structure and data(after basic clean up) from here. We will now create a new Quilt package for this test data.
We convert this data file into a data package using a configuration file, conventionally called build.yml. The build.yml file tells Quilt how to structure a package. Quilt generate automatically creates a build file that mirrors the contents of the directory. An easy way to create a build.yml file is as follows:
quilt generate DIR # where DIR is the root directory |
In our case, the root directory is ‘src’. So we will be using below command to create a build.yml file.
quilt generate src |
Once this command is executed it creates build.yml. If you open the build file you’ll see below contents.
contents:
  README:
    file: README.md
  patient_heart_rate_data:
    patient_heart_rate:
      file: patient_heart_rate_data\patient_heart_rate.csv
  patient_history_info:
    patient_history_details:
file: patient_history_info\patient_history_details.xlsx |
In the build.yml, the patient_heart_rate_data is the package name that package users will type to access the data extracted from the CSV file. You can any time edit build.yml to make the data name or package name easier to understand. In this case we will shorten the package name to ‘patient_data‘.
Now lets create a package and push it to Quilt registry using build and push commands as shown below. Build creates a package and push stores a package in a server-side registry. Package handles take the form USER_NAME/PACKAGE_NAME.
quilt build indira/patient_data src/build.yml |
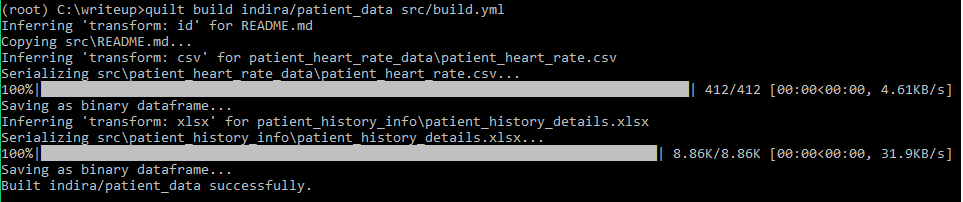
quilt push --public indira/patient_data |

The package now resides in the registry and has a landing page populated by src/README.md. Here is the link to the landing page that is created for this package. You can omit the –public flag to create private packages. Now the first version of test data is in Quilt registry.
Restructure the data
Data changes are quiet common and are dynamic and it is hard to maintain test data when the underlying data model changes. Sometimes you may need to restructure the data like splitting a column into two columns or filling the missing fields or changing the data structure from long format into wide format. Changing the test data and maintaining the data versions for future use or reproducing the test results is a challenge. Quilt solves this problem and makes our job easy by maintaining different hash versions of data packages and allows us to install historical snapshots of data. In below section, we will show how we restructured the data and stored the changes in Quilt registry.
The data changes include:
1. Name column to be separated and shown as FirstName and LastName columns respectively.
2. Remove missing values in Age column.
To perform these changes we have written a python code as shown below(We are using ipython command shell to execute these commands)
#imports import pandas as pd import numpy as np from quilt.data.indira import patient_data #importing the package from quilt #get the data into a dataframe df = patient_data.patient_data._data() #Fill in the missing data in Age Column df[['Age']] = df[['Age']].apply(pd.to_numeric) #Converting the Age column to numeric df['Age']= df['Age'].fillna(df['Age'].median()) # Filling Age Column with Median values #Split the Name into Firstname and Lastname df[['Firstname','Lastname']] = df['Name'].str.split(expand=True) df = df.drop('Name', axis=1) |
The above code simply imports the quilt package(import exposes your package to code), so that you can use the Pandas API and retrieve the contents of a DataNode with _data() method. Rest of the code is a normal python code where the split and missing values are handled. Now we need to assign these changes to the package. For this we will create a new data frame and replace the entire old data frame and reassign that node into the package tree using pkg._set() command as shown below.
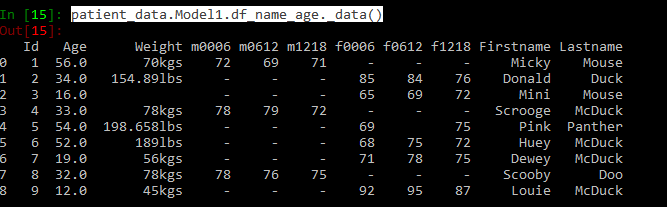
#To create a new dataframe for the Name/Age column changes patient_data._set(['Model1','df_name_age'],df) |
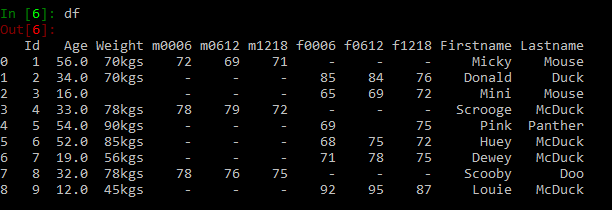
You can view the changed data using command patient_data.Model1.df_name_age._data(). See below for the changed data frame
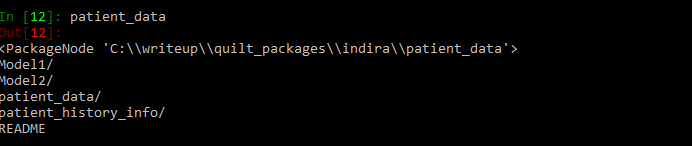
Also you can see the package contents by typing the name of the package. It shows the new group node ‘Model1’ created which looks like this.

Lets build and push the modified package to Quilt registry.
quilt.build("indira/patient_data",patient_data) quilt.push("indira/patient_data") |

See the push history in the Quilt log.
quilt.log("indira/patient_data") |

All the changes(Name and Age columns related) made to the data node are now in Quilt registry. You can check here. This change can be tracked using Quilt log.
Manipulate the existing data in place
Manipulating data is quite common when we are testing any data centric application. While testing a requirement, we realized that we need to change the data format for one of the fields in the test data. If you observe in our data, the way the measurement unit was written for Weight column is not consistent. The second, fifth and sixth rows contain inconsistent unit values (kgs, lbs). The weight column is sometimes spelled as kgs, lbs etc., In order to resolve this, we have written a python code to convert the measuring unit and represent weight column in kgs.
In order to make changes to the existing data we need to first start by installing and importing the package we wish to modify. install downloads a package in the current directory in folder named quilt_modules. import exposes your package to code. Quilt data packages are wrapped in a Python module so that users can import data like code: from quilt.data.USER_NAME import PACKAGE_NAME.
quilt.install("indira/patient_data") # download package from quilt.data.indira import patient_data # import package #get the data into df df = patient_data.Model1.df_name_age._data() weight = df['Weight'] for i in range (0 ,len(weight)): x= str(weight[i]) #Incase lbs is part of observation remove it if "lbs" in x[-3:]: #Remove the lbs from the value x = x[:-3:] #Convert string to float float_x = float(x) #Covert to kgs and store as int y =int(float_x/2.2) #Convert back to string y = str(y)+"kgs" weight[i]= y #Create a new dataframe and assign it to the package tree patient_data._set(['Model2','df_weight'],df) |
This code imports the earlier version of data package(name split and filled missing values changes), does the weight field conversion from lbs to kgs and creates a new dataframe and assigns it back to the package tree. You can check if the data got changed using patient_data.Model2.df_weight._data() command.
Package contents can be checked by typing name of the package as shown below.
Now, lets use Quilt build and push commands to push to registry.
quilt.build("indira/patient_data",patient_data) quilt.push("indira/patient_data") |

The latest changes are now stored in Quilt registry. Here is the Landing page. If you look at the contents section, you can see the different group nodes created for different data model changes.
Go back and forth between data versions
By default Quilt log tracks the data changes and shows the log entries created for the specific version of data. If you observe in the below image, for every build and push a entry is created in the log. Quilt log reveals the history of a package.

The above changes for Model1(Name split) and Model2(Weight conversion) are stored as two different hash versions. So when an application needs to be tested with the older data formats or versions for e.g., In our case, we want the application to be tested without having the weight conversion changes, we can simply use the old hash tag and install the specific package using command install -x OLD HASH as shown below. quilt install -x allows us to install historical snapshots.
quilt install indira/package -x 8543fa6e83939569b8394464c6e170ed1bc9f518f1c9c06a3adc61df321aaee7 |
As a tester, we design our own data sets for testing different requirements. It is hard to maintain test data. Quilt helps us to create different data versions and hence going back and forth between data versions made our testing process simple.
We hope this example helps you understand how to Package, serialize, create versions of data and track the changes using hash tags with Quilt data package manager. Happy Versioning!
If you are a startup finding it hard to hire technical QA engineers, learn more about Qxf2 Services.
References
1. Manage data like source code
2. Quilt Github examples

I am an experienced engineer who has worked with top IT firms in India, gaining valuable expertise in software development and testing. My journey in QA began at Dell, where I focused on the manufacturing domain. This experience provided me with a strong foundation in quality assurance practices and processes.
I joined Qxf2 in 2016, where I continued to refine my skills, enhancing my proficiency in Python. I also expanded my skill set to include JavaScript, gaining hands-on experience and even build frameworks from scratch using TestCafe. Throughout my journey at Qxf2, I have had the opportunity to work on diverse technologies and platforms which includes working on powerful data validation framework like Great Expectations, AI tools like Whisper AI, and developed expertise in various web scraping techniques. I recently started exploring Rust. I enjoy working with variety of tools and sharing my experiences through blogging.
My interests are vegetable gardening using organic methods, listening to music and reading books.


How to add data from my dataset to one of the feilds that I am creating in Mockaroo??
Can you elaborate more on what you are trying to do? Mockaroo is a tool for generating realistic test data and you already have some dataset