This is the last tutorial of Arduino tutorial series. In this tutorial, you will learn about how to interface stepper motor with Arduino and how to move rotor accurately to a specific angle.
Components Required:
-
- Arduino Board
- Jumper Wires
- Stepper Motor ( 28BYJ-48 5VDC)

Fig. 1 Stepper Motor and Step Wiring Above Fig. 1 shows the image of stepper motor 28BYJ-48 and its step wiring details. Stepper Motor (28BYJ-48) operates on 5V DC and it is unipolar type of stepper motor. It has 4 phase. By controlling phase coils, you can move the stepper motor. To move stepper motor in clockwise or anticlockwise direction, we need to provide a step signals in specific sequential order to the stepper motor. To know more about how stepper motor works refer the link here.
- Stepper Motor Driver ULN 2003/2803
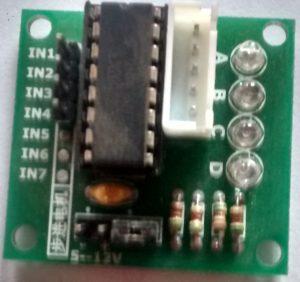

Fig.2 ULN2003 Driver Board Above fig 2 shows ULN2003 Driver Board. Arduino Uno alone is not capable to drive a stepper motor. So, a driver is must for driving a stepper motor.

Note: You can get these components fairly easily at many places (including online). We bought for our engineers this Arduino super-starter kit.
For what kind of applications do you need Stepper Motor?
You can use the stepper motor in any application where you need precise positioning with a motor. Stepper motors can’t run at higher speeds but have a high holding torque. Below are the few applications where you can use the stepper motor:
- In Robotics (for ex. in mobile robots for precise movement)
- For Railway Gate Control System
- In automobiles (for ex. for head light adjustment)
- For 3D printer
- We used it for testing Fitbit heart rate monitoring system, you will get the details here
Interfacing of Stepper Motor with Arduino Uno:
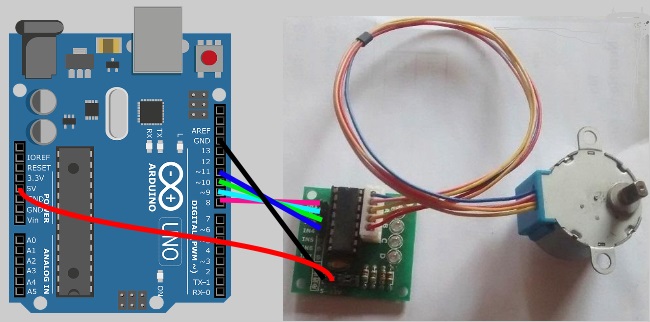
Wiring Details:
- Connect pin number (8 to 11) of Arduino Uno to ULN Driver Board pin (IN1 to IN4) respectively.
- Connect ‘Vcc’ pin of Arduino Uno to ‘+’ pin of ULN Driver Board
- Connect ‘GND’ pin of Arduino Uno to ‘-‘ pin of ULN Driver Board
- Connect ULN Driver Board and Stepper motor using the connector as shown in fig. 3
Look at above fig 3 and wiring details to interface the stepper motor with Arduino Uno.
Write a code to drive stepper motor clockwise and anticlockwise:
#include <Stepper.h> //Declare variables and assign pin number int in1Pin = 8; int in2Pin = 9; int in3Pin = 10; int in4Pin = 11; const int stepsPerRevolution = 2048;// Update the number of steps per revolution required for your motor // Create a stepper object // Note: We are using 28BYJ-48 5VDC Stepper Motor, for this motor, we need to set wiring sequence to (1-3-2-4) instead of (1-2-3-4) Stepper motor(stepsPerRevolution, in1Pin, in3Pin, in2Pin, in4Pin); void setup() { Serial.begin(9600); //Enable serial monitor/communication Serial.print("Set motor speed to (in RPM) : "); // prompt message on serial monitor for user while(Serial.available()==0); { } // wait here until user enter input data int user_speed= Serial.parseInt(); // Read entered integer value and store it in a variable Serial.println(user_speed); // print user speed on serial monitor motor.setSpeed(user_speed); // Set stepper motor speed to user defined speed } void loop() { // step one revolution in one direction: Serial.println("clockwise"); // print text on serial monitor motor.step(stepsPerRevolution); // rotate motor in clockwise direction for one revolution delay(500); // step one revolution in the other direction: Serial.println("counterclockwise"); // print text on serial monitor motor.step(-stepsPerRevolution); // rotate motor in anticlockwise direction for one revolution delay(500); } |
Above sketch/code uses Arduino’s standard library ‘Stepper’. Arduino’s ‘Stepper’ library runs in 4 step mode. To know more about the library and its functions refer the link here. The gear ratio of our stepper motor is 64 and step angle for 4 step sequence is 11.25 degrees. You need this value to calculate the number of steps required to move the motor 360 degrees(one revolution).
The formula’s to calculate steps required to move one revolution and move to a specific angle:
- stepsPerRevolution = (360/Step Angle) * Gear ratio
= 360/11.25 * 64
= 2048 - No. of steps requires to move ‘X’ angle = ( stepsPerRevolution / 360 ) * ‘X’
Now upload the above sketch and open the serial monitor. You will see a message on the serial monitor about stepper motor speed. Please provide motor speed and press enter. Now, your motor starts rotating in clockwise and anticlockwise alternately. To stop rotating motor or to run a motor at the different speed, just press reset button of Arduino Uno. Our stepper motor rotates fine for speed 0 to 25 RPM and it varies from motor to motor.
Hope you liked this tutorial. In this tutorial, you learned how to interface with and control a stepper motor. This was the last tutorial of series. Till now, you learned about reading the data from analog and digital pins, generating digital and analog signals on Arduino pins, interfacing and operating of the LCD display, Servo motor, Stepper motor, Ultrasonic sensor, IR Receiver and use of serial monitors for debugging Arduino code. Now, you are ready to understand how hardware products are designed and you can also guess how they were programmed. You may also have gotten ideas about how to test products that have both hardware and software in them.
Learn more about Qxf2 Services.

I love technology and learning new things. I explore both hardware and software. I am passionate about robotics and embedded systems which motivate me to develop my software and hardware skills. I have good knowledge of Python, Selenium, Arduino, C and hardware design. I have developed several robots and participated in robotics competitions. I am constantly exploring new test ideas and test tools for software and hardware. At Qxf2, I am working on developing hardware tools for automated tests ala Tapster. Incidentally, I created Qxf2’s first robot. Besides testing, I like playing cricket, badminton and developing embedded gadget for fun.


Please I need a stepper motor code to rotate the stepper motor 360 degree clockwise continuously
Hi Charles Musa,
You can remove the anti clockwise code block and also by removing the delay,you can run a stepper motor 360 degree clockwise continiously.
Thanks
#include
const int stepsPerRevolution = 2048; // change this to fit the number of steps per revolution
// for your motor
// initialize the stepper library on pins 8 through 11:
Stepper myStepper(stepsPerRevolution, 8, 9, 10, 11);
void setup() {
// set the speed at 60 rpm:
myStepper.setSpeed(60);
// initialize the serial port:
Serial.begin(9600);
}
void loop() {
// step one revolution in one direction:
Serial.println(“clockwise”);
myStepper.step(stepsPerRevolution);
delay(500);
}
Thank you so much for detailed post sir
Can you share tutorial with other motor driver like DRV8825 and with accelstepper library ?
Hi Hardy,
You can refer to this link https://www.makerguides.com/drv8825-stepper-motor-driver-arduino-tutorial/ It consists of both DRV8825 driver interfacing and accelstepper library code at the end
How can rotate only 90 or 180 degree?
Hi Yeung,
You could adjust the stepper motor’s stepsPerRevolution parameter to achieve 90 or 180 degrees of rotation.
The formula for calculating is as well mentioned in the blog. So if the stepsPerRevolution is 1024, you could expect the motor to rotate 180 degrees.
Hello, the motor does not do anti-clockwise
Please check and correct your wiring sequence.
Thank you very much for your post, it helped me a lot.