This post details about building a wireless toll gate and an automatic parking indicator system using Arduino. It will help anyone (including a beginner) who is interested to try their hands-on building and testing an Arduino project using IR remote / receiver, Ultrasonic sensor and servo motor.
Project brief
The idea is, When a vehicle approaches the toll gate, a button will be pressed in the IR Remote. This will open the toll gate. The vehicle will now gain entry and will proceed towards the parking. As it gets closer to the parking, the Red LED will turn ON and simultaneously Green LED will turn OFF. This will indicate that the parking is now occupied. When the vehicle leaves the parking, the parking will become available again. This will be indicated by the system returning to its default setup. That is, Green LED will be turned ON and on the press of another button in IR Remote the toll gate will be closed.
You could refer to our tutorials, to get a hang on IR Remote / Receiver, Ultrasonic sensor and Servo motor.
This remote based tollgate and automatic parking indicator system is made up of two parallel circuits. One is the toll gate circuit and another being the parking indicator circuit. I had used the Arduino UNO and a breadboard for building this system from the Arduino starter kit. Other requirements pertaining to each of these circuits are detailed below.
Build the toll gate circuit
Components required to build the toll gate circuit :
– IR remote/ receiver
– Servo motor
– A few jumper wires
Wiring details of the toll gate circuit :

Arduino sketch:
The Arduino sketch invokes a Serial Monitor to keep us informed of the workflow at runtime.
#include <IRremote.h> // Load the IRremote library
#include <Servo.h> // Load the servo library

int IR_receiving_pin = 9; // IR receiver pin connected to Arduino pin 9
int Serv_pin = 11; // Servo motor pin connected to Arduino pin 11

// Variables to hold the servo motor's rotation angle at Open and Close positions
int toll_open_position = 180 ;
int toll_close_position = 90 ;

// Decoded values on button press
long decoded_value_for_button_0 = 16738455;
long decoded_value_for_button_1 = 16724175;

IRrecv irrecv(IR_receiving_pin); // Create an IR receiver object and attach the associated input pin
Servo Serv_obj; // Create a servo object

decode_results IR_decoded_value; // Initialize a variable to hold the decoded IR receiver value

void setup() {
// put your setup code here, to run once:

Serial.begin(9600); // Start the Serial monitor
Serial.println("Enabling IR Receiver");
irrecv.enableIRIn(); // Start the IR receiver
Serial.println("Enabled IR Receiver!");

Serv_obj.attach(Serv_pin); // Attach the pin associated with the Servo motor to the servo object
Serv_obj.write(toll_close_position); // Default to toll gate - close position
Serial.println("You are at the Toll gate! Press button 1 to OPEN gate.");
}

void loop() {
// put your main code here, to run repeatedly:

if (irrecv.decode(&IR_decoded_value)) // Checks if a signal is received and decodes it
{
// Circuit 1: Toll gate
if (IR_decoded_value.value == decoded_value_for_button_1)
{
Serial.println("Button 1 pressed. Open toll gate !");
Serv_obj.write(toll_open_position);
}
else if (IR_decoded_value.value == decoded_value_for_button_0)
{
Serial.println("Button 0 pressed. Close toll gate !");
Serv_obj.write(toll_close_position);
}
irrecv.resume(); // Continue to receive the next input
}

delay(1000);

}
Build the parking indicator circuit
The parking indicator circuit should be built in parallel to the toll gate circuit on the breadboard.
Components required to build the parking indicator circuit :
– Ultrasonic sensor
– Red LED and Green LED
– 220 ohms resistors(2)
– A few jumper wires.
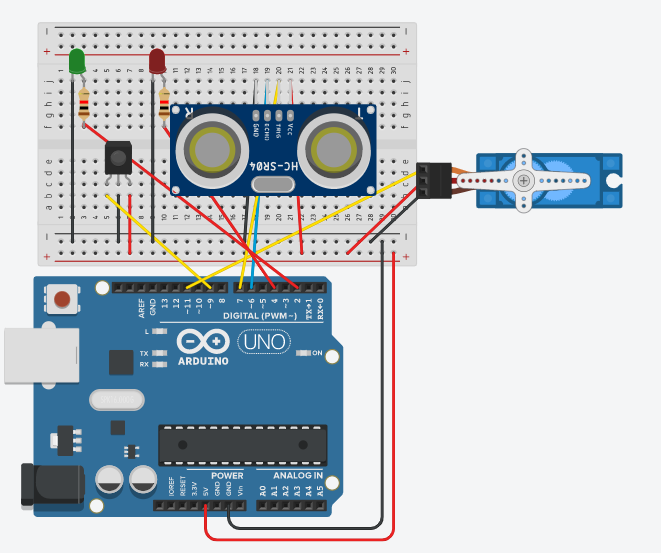
Wiring details of the complete system :
The complete Arduino sketch:
/*
Program to test the toll gate and parking indicator circuits.
*/

#include <IRremote.h> // Load the IRremote library
#include <Servo.h> // Load the servo library
int IR_receiving_pin = 9; // IR receiver pin connected to Arduino pin 9
int Serv_pin = 11; // Servo motor pin connected to Arduino pin 11
int echo_pin = 6; // Ultrasonic sensor's echo pin connected to Arduino pin 6
int trigger_pin = 7; // Ultrasonic sensor's Trig pin connected to Arduino pin 7
int Green_LED_pin = 2; // Green LED connected to Arduino pin 2
int Red_LED_pin = 4; // Red LED connected to Arduino pin 4

float ping_time; // Time for ping to travel from sensor to target and return
long distance_in_cm; // Distance to the target in cms

// Variables to hold the servo motor's rotation angle at Open and Close positions
int toll_open_position = 180 ;
int toll_close_position = 90 ;

// Decoded values on button press
long decoded_value_for_button_0 = 16738455;
long decoded_value_for_button_1 = 16724175;

IRrecv irrecv(IR_receiving_pin); // Create an IR receiver object and attach the associated input pin
Servo Serv_obj; // Create a servo object

decode_results IR_decoded_value; // Initialize a variable to hold the decoded IR receiver value

void setup() {
// put your setup code here, to run once:

Serial.begin(9600); // Start the Serial monitor
Serial.println("Enabling IR Receiver");
irrecv.enableIRIn(); // Start the IR receiver
Serial.println("Enabled IR Receiver!");

Serv_obj.attach(Serv_pin); // Attach the pin associated with the Servo motor to the servo object
Serv_obj.write(toll_close_position); // Default to toll gate - close position
Serial.println("You are at the Toll gate! Press button 1 to OPEN gate.");

pinMode(echo_pin,INPUT); // Set ultrasonic sensor's echo pin as an input pin
pinMode(trigger_pin,OUTPUT); // Set ultrasonic sensor's trig pin as an output pin
pinMode(Green_LED_pin,OUTPUT); // Set GREEN LED as an output pin
pinMode(Red_LED_pin,OUTPUT); // Set RED LED as an output pin
}

void loop() {
// put your main code here, to run repeatedly:

if (irrecv.decode(&IR_decoded_value))  // Checks if a signal is received and decodes it
{
// Circuit 1: Toll gate
if (IR_decoded_value.value == decoded_value_for_button_1)
{
Serial.println("Button 1 pressed. Open toll gate !");
Serv_obj.write(toll_open_position);
}
else if (IR_decoded_value.value == decoded_value_for_button_0)
{
Serial.println("Button 0 pressed. Close toll gate !");
Serv_obj.write(toll_close_position);
}
irrecv.resume(); // Continue to receive the next input
}

delay(1000);

// Circuit 2:Parking Indicator
// Generate a ping by triggering the ultra sonic sensor
digitalWrite(trigger_pin, LOW); // Set the trig pin low
delayMicroseconds(2000); // Wait for the signal to settle in this state
digitalWrite(trigger_pin, HIGH); // Set trig pin high
delayMicroseconds(15); // Wait in this high state
digitalWrite(trigger_pin, LOW); // Ping would have been sent now

ping_time = pulseIn(echo_pin, HIGH); // ping_time is presented in microseconds

distance_in_cm = convert_microsecondsToCentimeters(ping_time); // Calculate distance in cms

if (distance_in_cm >7)
{
digitalWrite(Green_LED_pin, HIGH);
digitalWrite(Red_LED_pin, LOW);
Serial.println("Parking slot available!");
delay(100);

}
else if (distance_in_cm < 7 and distance_in_cm > 0)
{
Serial.println("Distance of the vehicle:");
Serial.print(distance_in_cm);
Serial.print("cm");
Serial.println();
digitalWrite(Green_LED_pin, LOW);
digitalWrite(Red_LED_pin, HIGH);
Serial.println("Parking slot occupied!");
delay(100);
}

delay(1000);
}

long convert_microsecondsToCentimeters(long microseconds) {
// The speed of sound is 340 m/s or 29 microseconds per centimeter.
// The ping travels out and back, so to find the distance of the
// object we take half of the distance travelled.
return microseconds / 29 / 2;
}
A video recording of this project for your reference:
I hope you enjoyed building and testing this remote based tollgate and parking indicator system with Arduino. This system could be further enhanced by making use of wireless sensors to detect the presence of vehicles at the tollgate and operating the gates automatically.
Hire QA consultants from Qxf2 for your startup
Qxf2 understands the urgency of finding the right QA support for startups. We offer flexible, on-demand QA services that can step in immediately, helping you establish quality practices without delay. Check out our quick QA solutions for startups to get expert help when you need it most.
I have done my Masters in Software Engineering. I am very passionate about testing and I’ve had the opportunity to work in different phases of the software life cycle. Have built and tested various applications. My curiosity drives me to explore, learn and keep myself updated. Qxf2 keeps me constantly challenged with interesting work and encourages me into blogging about it. I love music, reading and staying fit!

