This is the seventh tutorial of Arduino tutorial series. In this tutorial, you will learn about how to decode the IR Remote and you will know about what kind of opportunities it will open for you.
Components Required:
- Arduino Board
- Jumper Wires
- IR Remote
- IR Receiver: Following fig. 1 shows the IR Receiver. It has 3 pins: Output, GND, and Vcc. You can identify the pins by looking at fig. 1. IR receiver receives the IR signals from IR remote and decodes that signal. For this tutorial, we used HX1838 model of IR Receiver. It supports the IR remote which operates at 38 KHz. You can check the datasheet here.
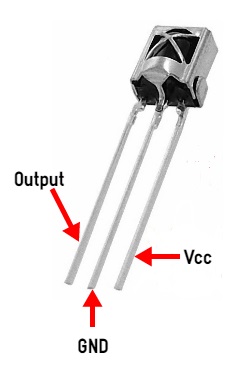
Fig. 1 IR Receiver
Note: You can get these components fairly easily at many places (including online). We bought for our engineers this Arduino super-starter kit.
Interfacing of IR Receiver with Arduino Uno:
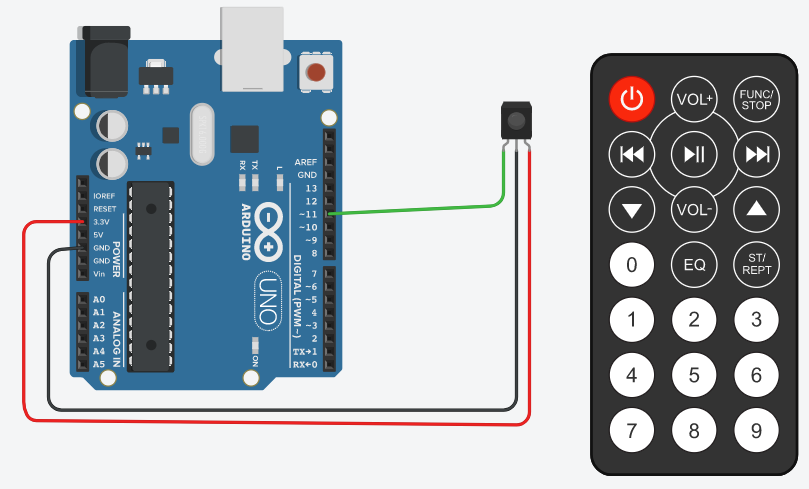
Above fig. 2 shows the interfacing of IR Receiver with Arduino Uno. Interfacing of IR receiver is very easy. You need to just connect 3 pins of IR Receiver to Arduino. You can use a breadboard or you can use M2F (male to female) jumper wires for connection.
Wiring Details:
- Connect the Vcc pin of IR receiver to Vcc pin of Arduino board
- Connect the GND pin of IR receiver to GND pin of Arduino board
- Connect the Output signal pin to pin 11 of Arduino board
Write a code to decode IR Remote signals:
For decoding the IR Remote, we are going to use IRremote Library. To get set up with the IRremote library follow below steps:
- Download latest IRremote library from here.
- Unzip the file and rename the folder name to ‘IRremote’
- Move ‘IRremote’ folder to your Arduino_Root/libraries folder. On my Windows machine, it is located at C:\Program Files (x86)\Arduino\libraries
- If you see a folder with name “RobotIRremote” under Arduino_Root/libraries, please delete that folder. The library ‘RobotIRremote’ has similar definitions to ‘IRremote’ library and causes errors.(src: point 5 of setup instructions)
Arduino Sketch/Code:
#include <IRremote.h> int RECV_PIN = 11; // Declare variables to hold pin number IRrecv irrecv(RECV_PIN); // Create irrecv object decode_results results; // declare variable to hold decoded IR receiver result void setup(){ // put your setup code here, to run once: Serial.begin(9600); //Initialize serial monitor Serial.println("Enabling IR Receiver"); // Print text on serial monitor irrecv.enableIRIn(); // Start the IR receiver Serial.println("Enabled IR Receiver"); // Print text on serial monitor } void loop() { // put your main code here, to run repeatedly: if (irrecv.decode(&results)) // Checks the code received or not { Serial.print("Decoded Signal = "); //Print text on serial monitor Serial.println(results.value); // Print the decoded value on serial monitor irrecv.resume(); // continue to receive the next value } delay(100); } |
Upload above sketch/code on Arduino and open serial monitor. Now, press and hold (or press frequently) any of the buttons on IR remote and you will see the decoded value of that specific button printed on serial monitor multiple times. You can check the decoded values for all buttons and take a note of that decoded code. You can use the decoded codes in a script to control some actions, for example, Turning ON/OFF of Light/TV in a home automation system.
Practice Task:
Once, you are able to decode the IR remote, it will open a lot of opportunities for you to control other devices using the remote. For example, you can do following tasks using IR remote:
- Control Servo Motor Angle
- Control Home Appliances
- Control LED’s
- Control Robot
Hope you liked this tutorial. In this tutorial, you learned a new skill – controlling things wirelessly. Look at our next tutorial here, you will learn how to interface stepper motor with Arduino and how to move rotor accurately to a specific angle. If you follow along, at the end of this series, you will distinguish how hardware devices/instruments/products designed, you can guess how they programmed and you will get ideas about how to test them too.
Learn more about Qxf2 Services.

I love technology and learning new things. I explore both hardware and software. I am passionate about robotics and embedded systems which motivate me to develop my software and hardware skills. I have good knowledge of Python, Selenium, Arduino, C and hardware design. I have developed several robots and participated in robotics competitions. I am constantly exploring new test ideas and test tools for software and hardware. At Qxf2, I am working on developing hardware tools for automated tests ala Tapster. Incidentally, I created Qxf2’s first robot. Besides testing, I like playing cricket, badminton and developing embedded gadget for fun.


thank your for the tutorial, really helped me progress
really appreciated the time and care you have taken in this tutorial and i feel that it has helped me greatly
thank you ……………..xoxo