This is the fifth tutorial of Arduino tutorial series. In this tutorial, you will learn about how to prompt a message on the serial monitor and how to capture the different data type inputs which user provides from the serial monitor.
Components Required:
For this tutorial, you only require an Arduino board.
Importance of Serial Monitor:
Serial monitor plays a very important role in debugging of Arduino Sketches. It is very easy to print helpful debug messages: the data being generated at different digital and analog pins, the data which the Arduino is receiving from the sensor, the signal generated to control the actuators on the serial monitor. In most of the projects, it is a great replacement for LCD display and keypad devices. You can provide the data/instructions from the serial monitor to Arduino to control the actions.
Printing Data/Text on Serial Monitor:
To print text/data on the serial monitor, you need to call following two steps:
-
- Initialize the serial monitor:
Serial.begin(9600); // you can set it to other baud rates also
- Print on the serial monitor:
You can use the below two functions to print text/data on the serial monitor.- Print text and hold cursor on the same line:
Serial.print("Hello "); //Print text and hold cursor on same line
- Print text and move cursor to next line:
Serial.println("Hello "); //Print text and move cursor to next line
- Print text and hold cursor on the same line:
- Initialize the serial monitor:
Read User Data from Serial Monitor:
To read data from the serial monitor, first, you need to check whether user entered data or not. To check user data availability, you need to use Serial.available() function/command. When the user enters the data on the serial monitor, Arduino sets Serial.available() to return ‘1’ and in absence of data it will return ‘0’.
Once you confirm that the user entered some data and you don’t know the expected data type which user will enter or you are interfacing GSM, GPS, Bluetooth, etc for first time use Serial.read() function/command.
Arduino Sketch/Code:
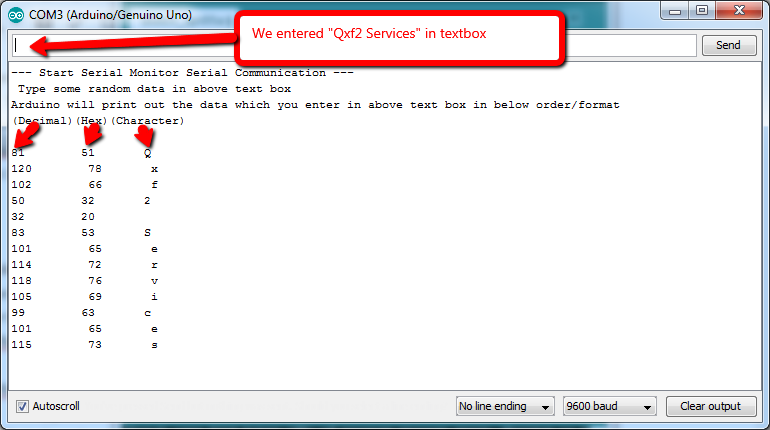
int ByteReceived; // declare a variable void setup(){ // put your setup code here, to run once: Serial.begin(9600); // Initialize Serial Monitor //Prompt the messages for user Serial.println("--- Start Serial Monitor Communication ---"); Serial.println(" Type some random data in above text box"); Serial.println("Arduino will print out the data which you enter in above text box in below order/format"); Serial.println("(Decimal)(Hex)(Character)"); Serial.println(); } void loop(){ // put your main code here, to run repeatedly: if (Serial.available() > 0) //Wait for user input { ByteReceived = Serial.read(); //Read user input and hold it in a variable Serial.print(ByteReceived); //Print decimal value of user input Serial.print(" "); //Add some space Serial.print(ByteReceived, HEX); //Print the hex value of user input Serial.print(" "); //Add some space Serial.print(char(ByteReceived)); //Print the character value of user input Serial.println(); //Move cursor to new line } } |
Upload above sketch, enter some data and look at the serial monitor to see what Arduino received. Fig. 1 shows the data received by Arduino in (Decimal)(Hex)(Character) format. You can repeat the same by changing the modes of the serial monitor. Set the serial monitor to ‘no line ending’, ‘newline’, ‘carraige return’, and ‘Both NL and CR’ mode and observe the data received.
Read Strings from Serial Monitor:
To read a string type of data from the serial monitor, you need to use Serial.readString() function/command to capture the string type of data. Upload and check the below sketch to read strings by providing strings from the serial monitor.
Arduino Sketch/Code:
String name; //Declare a String variable to hold your name void setup() { Serial.begin(9600); // Initialize Serial Port } void loop() { Serial.println("Please enter your name: "); //Prompt User for input while (Serial.available()==0) {} //Wait for user input name = Serial.readString(); //Read user input and hold it in a variable Serial.print("Hello "); //Print well formatted output. Serial.println(name); } |
Read Integers from Serial Monitor:
To read integer type of data from the serial monitor, you need to use Serial.parseInt() function/command to capture the integer type of data. Upload and check the below sketch to read integers by providing integers from the serial monitor.
Arduino Sketch/Code:
int age; //Declare an Int variable to hold your age void setup() { Serial.begin(9600); // Initialize Serial Port } void loop() { Serial.println("How old are you? "); //Prompt User for input while (Serial.available()==0){} // wait for user input age = Serial.parseInt(); //Read user input and hold it in a variable // Print well formatted output Serial.print("You are "); Serial.print(age); Serial.println(" years old."); } |
Read Float values from Serial Monitor:
To read float type of data from the serial monitor, you need to use Serial.parseFloat() function/command to capture the float type of data. Upload and check the below sketch to read the floats by providing float data/value from the serial monitor.
Arduino Sketch/Code:
float height; //Declare a float variable to hold your height void setup() { Serial.begin(9600); // Initialize Serial Port } void loop() { Serial.println("How tall are you (in feet)? "); //Prompt User for input while (Serial.available()==0){} //Wait for user input height = Serial.parseFloat(); //Read user input and hold it in a variable // Print well formatted output Serial.print("You are "); Serial.print(height); Serial.println(" feet tall."); } |
Practice Task:
Build any simple application where you need to take inputs from users and do some processing actions and print output.
For eg. Simple Calculator, Turn On or Off Lights/LED
Hope this tutorial was helpful to you. You learned about how to read the data from and write the data to a serial monitor. We have used the serial monitor in almost all our previous tutorials to print the sensor and actuator data. In next tutorial here, you will learn about the ultrasonic sensor which is helpful in detecting the object and measuring the distance of the object. If you follow along, at the end of this series, you will distinguish how hardware devices/instruments/products are designed, you can also guess how they were programmed, you will get ideas about how to test hardware and you can build and help others in building products.
If you liked this article, learn more about Qxf2’s testing services for startups.

I love technology and learning new things. I explore both hardware and software. I am passionate about robotics and embedded systems which motivate me to develop my software and hardware skills. I have good knowledge of Python, Selenium, Arduino, C and hardware design. I have developed several robots and participated in robotics competitions. I am constantly exploring new test ideas and test tools for software and hardware. At Qxf2, I am working on developing hardware tools for automated tests ala Tapster. Incidentally, I created Qxf2’s first robot. Besides testing, I like playing cricket, badminton and developing embedded gadget for fun.


Have also seen a \t in a Serial.print statement that seems to cause the output at that point proceed to the next tab location on the screen. The result is nicely lined up text. Never seen it documented though
Thank You Sir….It’s very useful for me in understanding I/O modules in arduino for different data types!
Thanks so much Sir.
Thank you very much for the explanations
your god for me