In this tutorial, you will learn about how to interface ultrasonic sensor with Arduino and how to measure the distance of an object using ultrasonic sensor. This is the sixth tutorial of our ‘Arduino tutorials for testers’ series. We are presenting some of the most commonly used hardware components along with some basics of electronics theory. So, if you are the kind that learns by doing, follow along!
Components Required:
- Arduino Board
- Jumper Wires
- Any Object as a target (Book, mobile, human hand, etc)
- Ultrasonic Sensor (HC-SR04)
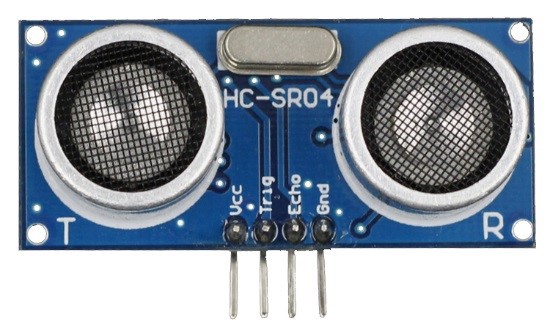
For this tutorial, we are using HC-SR04 ultrasonic sensor which has 4 pins as shown in the above figure 1. Ultrasonic sensors are very helpful in detecting objects and measuring the distance of an object. This sensor works based on the working principle of SONAR (SOund Navigation And Ranging) and you can look at the datasheet here for more specifications.
Note: You can get these components fairly easily at many places (including online). We bought for our engineers this Arduino super-starter kit.
Working Principle of SONAR:
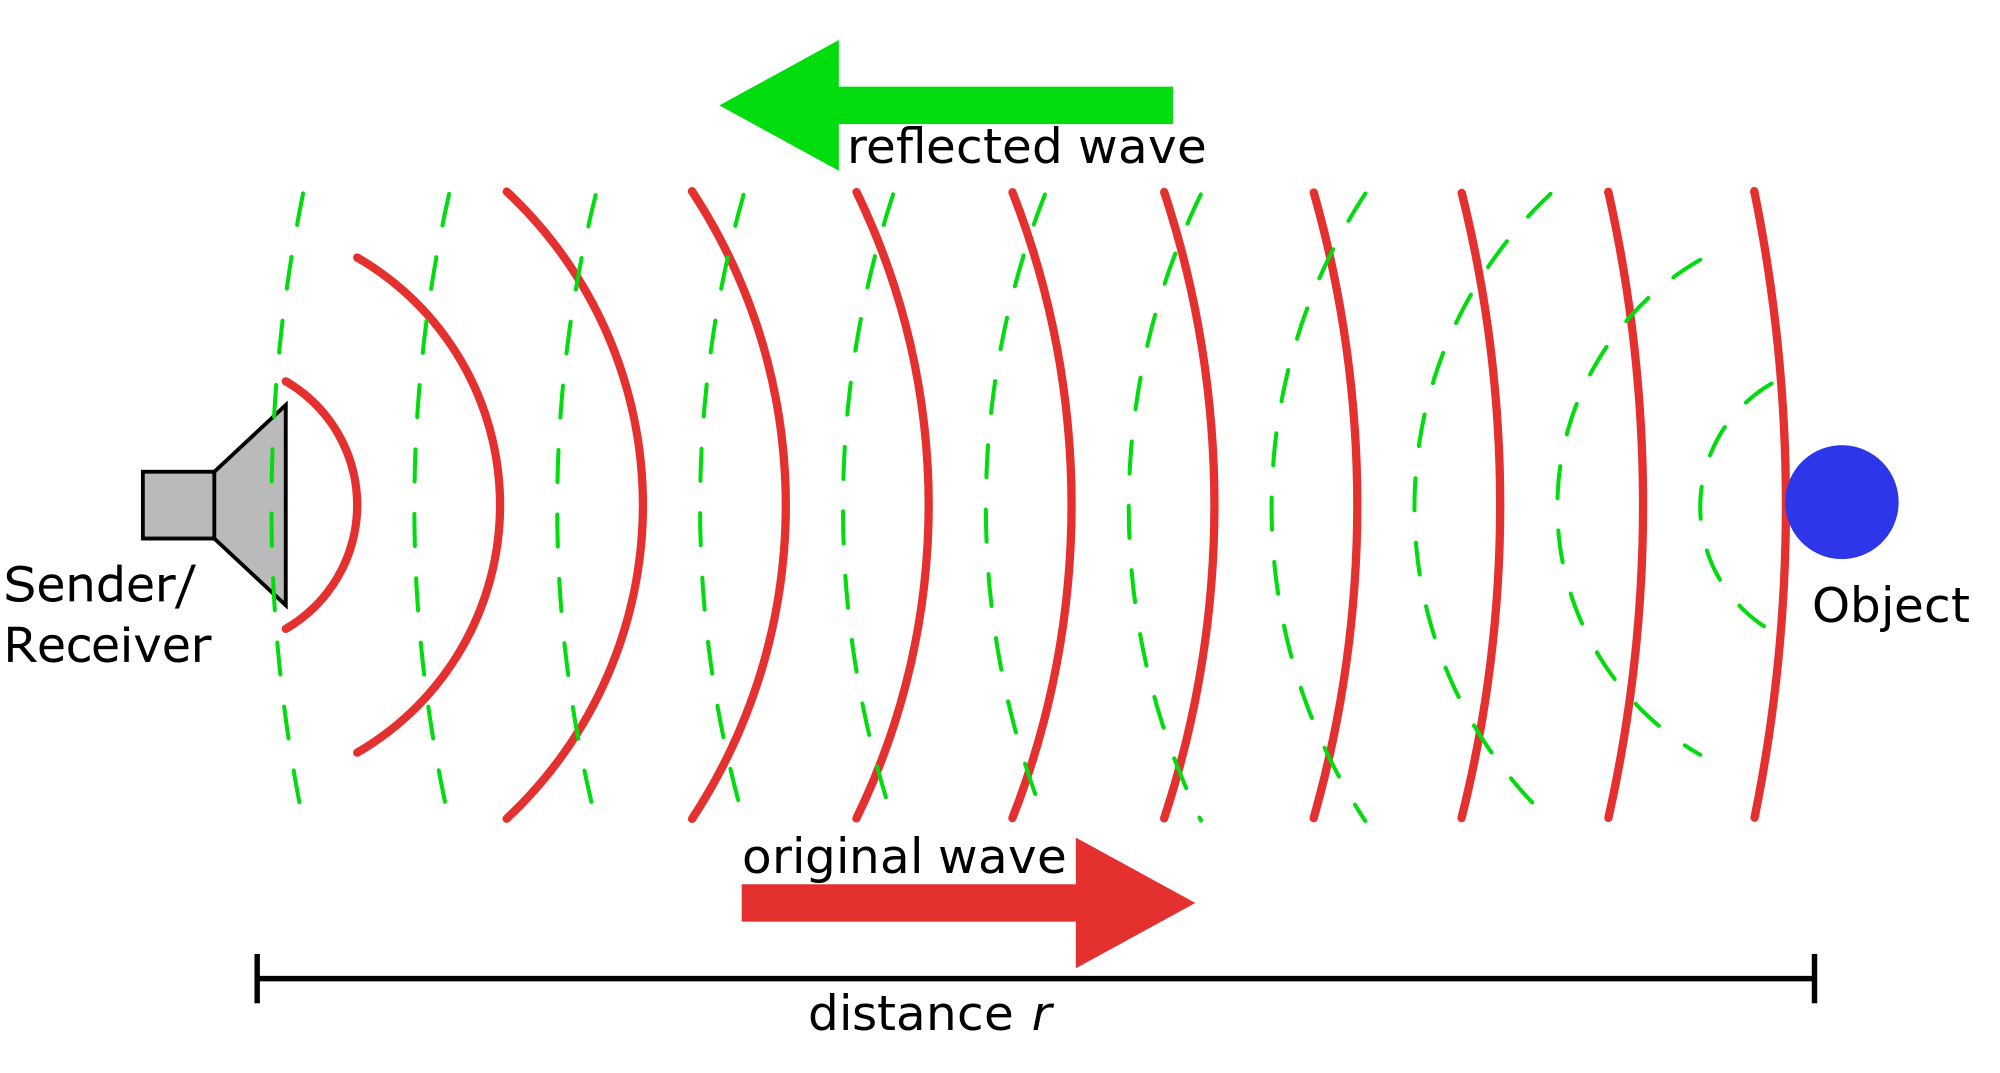
In SONAR, the transmitter (Tx) sends a sound wave towards the targeted object. Sound waves travel from a transmitter toward an object and reflect back from an object. The reflected sound wave travels back towards receiver and receiver will receive the waves. So, here SONAR system calculates the time required for the sound wave to travel from a transmitter to object and from object to a receiver. And the speed of the sound wave in the same medium is constant. So, we can calculate the distance of an object using the standard distance formula.
Distance = Speed X Time
Note: Here, you need to divide the time/distance by 2 as the calculated time is the time required for round trip.
For the ultrasonic sensor, when we send a trigger pulse/signal on trigger pin, a sensor sends waves towards a targeted object and we start looking at Echo pin to get the response of reflected wave. When sensor gets a trigger, it transmits the waves and set the echo pin to HIGH and the status of the Echo pin will be HIGH until it will not receive the reflected wave. So, from the width of the echo pulse, we can calculate the traveling time of transmitted and reflected wave. To trigger the ultrasonic sensor, you need to generate a HIGH pulse for at least 10 microseconds on the trigger pin.
Pin Details of Ultrasonic Sensor:
- Vcc – Vcc pin powers the sensor with +5V
- Trigger – It is an input pin. To initialize the measurement by sending ultrasonic sound waves, you need to provide a high signal for 10 microseconds on this pin.
- Echo – It is an Output pin. This pin goes high for a period of time which will be equal to the time taken for the ultrasonic wave to return back to the sensor.
- GND – This pin is connected to the Ground of the system.
Interfacing of Ultrasonic Sensor with Arduino UNO:

Wiring Details:
- Connect Trigger pin of a sensor to pin 13 of Arduino
- Connect Echo pin of a sensor to pin 11 of Arduino
- Connect Vcc pin of a sensor to Vcc pin of Arduino
- Connect GND pin of a sensor to GND pin of Arduino
Look at the above figure 3 and wiring details to interface ultrasonic sensor with Arduino Uno.
Write code to measure the distance of targeted object:
Things we know:
- We will get the time required for ultrasonic waves to fly back from the targeted object by reading the Echo pin of the ultrasonic sensor.
- The speed of ultrasonic wave at room temperature is approximately 776.5 miles per hour (or you can calculate exact speed of waves by keeping the object at a known distance. Here, you know the distance, you will get traveling time from the sensor, now you need to use a formula to calculate the speed.
- Now, we need to calculate the distance using a formula: Distance = Speed X Time
Arduino Sketch/Code:
int trigPin=13; //Sensor Trigger pin connected to Arduino pin 13 int echoPin=11; //Sensor Echo pin connected to Arduino pin 11 float pingTime; //time for ping to travel from sensor to target and return float distance; //Distance to Target in inches float speedOfSound=776.5; //Speed of sound in miles per hour void setup() { // put your setup code here, to run once: Serial.begin(9600); // Initialize serial monitor pinMode(trigPin, OUTPUT); // Set trigger pin as an output pin pinMode(echoPin, INPUT); // Set echo pin as an output pin } void loop() { // put your main code here, to run repeatedly: // Generate a high signal for min. 10us to give trigger to sensor digitalWrite(trigPin, LOW); //Set trigger pin low delayMicroseconds(2000); //Let signal settle digitalWrite(trigPin, HIGH); //Set trigPin high delayMicroseconds(15); //Delay in high state digitalWrite(trigPin, LOW); //ping has now been sent // Capture the High Width Pulse on Echo pin to calculate the travel time (pingTime) of a wave. // pulseIn() function calculates the time from width of pulse pingTime = pulseIn(echoPin, HIGH); //pingTime is presented in microceconds //Print pingTime on Serial Monitor Serial.print("pingTime : "); Serial.print(pingTime); Serial.println(" microseconds."); // Do conversation in units and Calculate Distance in cm using formula pingTime=pingTime/1000000; //convert pingTime to seconds by dividing by 1000000 (microseconds in a second) pingTime=pingTime/3600; //convert pingtime to hours by dividing by 3600 (seconds in an hour) distance= speedofSound * pingTime; //This will be in miles, since speed of sound was miles per hour distance=distance/2; //Remember ping travels to target and back from target, so you must divide by 2 for actual target distance. distance = distance*160934; // distance in cm // Print distance on Serial Monitor Serial.print("Target Distance: "); Serial.print(distance); Serial.println(" cm."); delay(300); } |
Above code/sketch uses the pulseIn() function to read the travel time. This function requires 2 parameters. The first one is the name of the echo pin and the second one, you can write either HIGH or LOW. In the current case, we set that to HIGH. It means that the pulseIn() function will wait for the echo pin to go HIGH and it will start a timer, then it will wait for the echo pin to go LOW when the sound wave will fly-back which will stop the timer. In the end, the function will return the length of the pulse in microseconds.
Upload the above sketch, put the object (mobile, book) in front of the sensor around 25 -50 cm away. Now, open the serial monitor and you will see the ping time and distance printed on the screen. Move the object near to and away from the sensor and see the distance. For us, this sensor is accurate up to 100 cm.
Hope this tutorial was helpful to you. You can use this ultrasonic sensor for the number of different applications, for example: detecting an object (in any anti-collision bots/drones, in car parking guidance, detecting empty parking place in the parking lots, etc). In the next tutorial here, you will learn about decoding of IR remote and this will take your skills to the next level. You will enter into the world of wireless. You can design and controls things with IR remote. You will get more idea about how products like TV, AC, Music Player were programmed. If you follow along, at the end of this series, you will distinguish how hardware devices/instruments/products are designed, you can also guess how they were programmed, you will get ideas about how to test hardware and you can build and help others in building products.
Learn more about Qxf2 Services.

I love technology and learning new things. I explore both hardware and software. I am passionate about robotics and embedded systems which motivate me to develop my software and hardware skills. I have good knowledge of Python, Selenium, Arduino, C and hardware design. I have developed several robots and participated in robotics competitions. I am constantly exploring new test ideas and test tools for software and hardware. At Qxf2, I am working on developing hardware tools for automated tests ala Tapster. Incidentally, I created Qxf2’s first robot. Besides testing, I like playing cricket, badminton and developing embedded gadget for fun.

