I believe anyone can build Electronics Circuits. And I have written a series of tutorials to test my belief. Yes, it is true. Anyone can learn and build electronics circuits. It doesn’t matter if you are an engineer or not. Learning electronics is easy if you ignore your self-doubt and move ahead to build the circuit. Plenty of people with a non-IT background enter into the software industry and develop, automate and test software products. This is partly due to the fact that the friction to getting started with software is pretty low. Anyone with a decent Internet connection and a computer can begin to experiment and learn software on their own. I think electronics is going to face a similar trend. The barrier to entry has significantly dropped and the amount of things you can build with simple, ready-made kits is astounding. If you don’t believe anyone can build Electronic Circuits, read a nice article here.
Why do testers need to learn about Arduino?
Remember a time when testers knowing how to code was a rarity? Well, our industry has evolved. To keep pace, many software testers learned to write at least a minimal amount of code. The ones that could code decently are in demand and doing well in their testing careers. We think a similar phenomenon is going to happen with testers having to learn basic electronics. The ones that keep pace and learn electronics will be in demand and doing well in their careers. Soon, almost every product you use will take input from multiple sensors. Fitbit is a good example. It has motion sensors, heart rate sensors, etc. An increasingly large number of input interfaces means that some of our testings will rely on having the right instruments to mimic the different inputs. You cannot mimic these inputs using the software only. So, as a tester, you will be forced to know at least the basics of electronics. The most practical gateway we have found to learn about electronics happens to be the Arduino. And that is what we are sharing with you in this series.
A small change in your thought process:
Nowadays, all of us are very comfortable with desktops/laptops. Most of us never think or know how it was built and how the internal circuits work. But all of us are very good at using it. Why is that so? Maybe you were more interested in using desktop/laptop instead of knowing how the internal circuits were designed and how they work. All of us just moved ahead to use desktop/laptop. So, why do you change your thought patterns when you come across a microcontroller? Think of a microcontroller as just a small computer or microcomputer. A microcomputer which has less processing speed, less memory, less RAM compare to your desktop/laptop system configuration. Most of you feel very comfortable to connect printer or scanner to your computer. You just download the software and install the software. So, why do you feel uneasy to interface any sensors or actuators with microcontrollers? In this case, also, you will get a ready-made circuit and piece of code from the internet. You just need to follow some instruction to build the circuit and code. A small change in your thought process can take you to the next level where you can build any embedded product or device. And, nowadays, building a circuit is easy. In the market, you can get a lot of microcontroller based prototype board like Arduino which are very helpful for building the circuits because you don’t need to do soldering, you just need some jumper wires and breadboard to build the circuits. We suggest you, go ahead with Arduino Uno because it is very popular and robust board to learn and play with it.
Introduction to Arduino Uno:
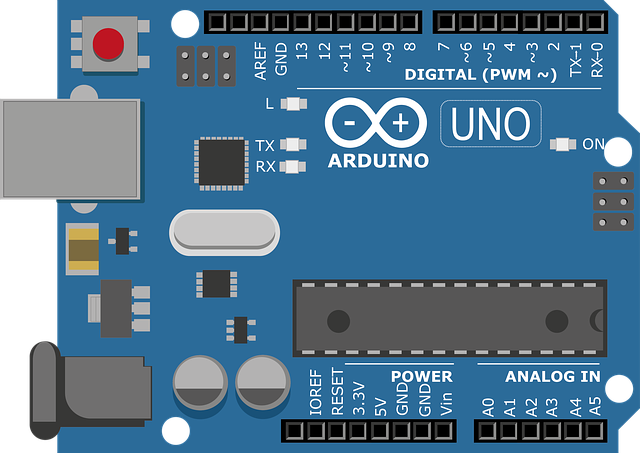
Above figure 1 shows the Arduino Uno Board. It is an open source hardware. You will get this board easily even on online shops. Arduino Uno boards come up with Atmega328P microcontroller. Arduino Uno has 14 digital input/output pins (of which 6 can be used as PWM outputs), 6 analog inputs, a 16 MHz quartz crystal, a USB connection, a power jack, an ICSP header and a reset button. If you are not able to understand the technical specification of this board, it’s completely OK. You don’t need to worry about it. You will understand one by one when you follow our tutorial series. For programming and writing the code, you need to download and install IDE from here.
From where to buy Arduino Board or Arduino starter kit:
You will get the Arduino Board easily from your nearby electronics market or any online sites or from Arduino official store. But, we suggest you, to buy a starter kit, so you can work on a simple project or you can follow any Arduino tutorial series. We bought this Arduino super-starter kit for our engineers.
If the Arduino tutorial kit takes time for delivery or if you not yet ordered the kit, you can start with our tutorials using the online simulator.
List of Arduino Tutorial Series:
- Arduino Tutorials for Testers: Build a door bell
- Arduino Tutorials for Testers: Build a light dimmer
- Arduino Tutorials for Testers: Servo Motors
- Arduino Tutorials for Testers: LCD Display
- Arduino Tutorials for Testers: Serial Monitor
- Arduino Tutorials for Testers: Ultrasonic Sensor
- Arduino Tutorials for Testers: Decoding of IR Remote
- Arduino Tutorials for Testers: Stepper Motor
These posts will help you overcome your self-doubt about building electronics. If you follow along, at the end of this series, you will distinguish/understand how hardware devices/instruments/products are designed, you can also guess how they were programmed, you will get ideas about how to test hardware and you can build and help others in building products.
Now go ahead, get started!
Learn more about Qxf2 Services.

I love technology and learning new things. I explore both hardware and software. I am passionate about robotics and embedded systems which motivate me to develop my software and hardware skills. I have good knowledge of Python, Selenium, Arduino, C and hardware design. I have developed several robots and participated in robotics competitions. I am constantly exploring new test ideas and test tools for software and hardware. At Qxf2, I am working on developing hardware tools for automated tests ala Tapster. Incidentally, I created Qxf2’s first robot. Besides testing, I like playing cricket, badminton and developing embedded gadget for fun.


i have a question.
that is……..
when i write a remote decode program to see the value of that button in serial monitor …………….
it show the value continue…………..(.if i prees for long time).
i want to write a program that ,…………………it will show the value in serial monitor at once time when i will press in the remote button ..(just toggle switch ).it will not show the value continue till i press that button.then when i will press again that button or another button then it will just show value for once time in the serial monitor………………ok???
Hi,
You can write a program by simply comparing the previous value received with the current value received and adding some delay to print the same value in case you press the same button again.
Thanks!