Problem: Jenkins is still somewhat of a black box to testers.
This post is for the hands on tester looking to integrate their Python unit tests with Jenkins.
Why this post?
Jenkins is an extremely popular continuous integration tool. Jenkins is often setup and maintained by the development team or I.T. team in many companies. Testers know about Jenkins but rarely get a chance to explore Jenkins. At Qxf2, we believe in learning and exploring the tools we work with everyday. In a previous post, we showed you how to get started with Jenkins. In this post, we will show you how to install and configure plugins and run some Python unit tests.
Overview
This post will walk you through the following steps:
1. Download and install Jenkins
2. Install and configure the required Jenkins plugins
3. Install Python mock and Python nose
4. Add Python unit test cases
5. Set up the project in Jenkins
6. Start the build
7. Verify the result
We are going to be using a fairly popular Python plugin call ShiningPanda.
NOTE: If you are new to Python unit tests, please refer to our previous blog on Python unit checks where we downloaded the Python Chess application and wrote a Python unit test for it.
A step by step guide
STEP 1: Download and install Jenkins
Jenkins provides installers for different operating systems. In companies, it is more common to see Jenkins hosted on a *nix system. Our best guess is that most testers use Windows. Our goal is to help you, the tester, learn about Jenkins. So we are choosing to use Windows in this example. You can download the Windows native package as a zip file. Extract the file and install Jenkins. Since we are installing Jenkins using the Windows installer, we don’t need to do anything else as the Windows installer automatically runs Jenkins as a Windows service.
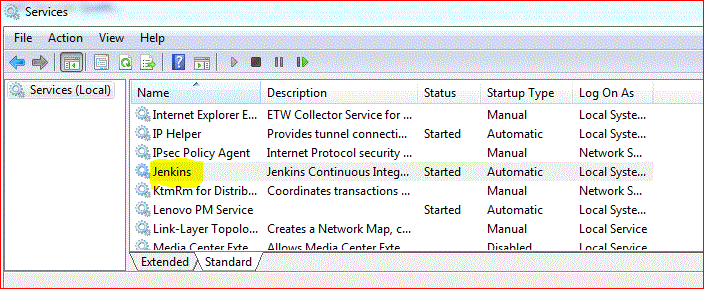
You can verify Jenkins is running as a service by launching the Services app from the Windows Start Menu and looking for a running service called “Jenkins” among the list of all windows services running on the machine.
By default, Jenkins runs at http://localhost:8080/. You can change it by editing jenkins.xml, which is located in your installation directory.
STEP 2: Install and configure required Jenkins Plugins to run Python Unit Test
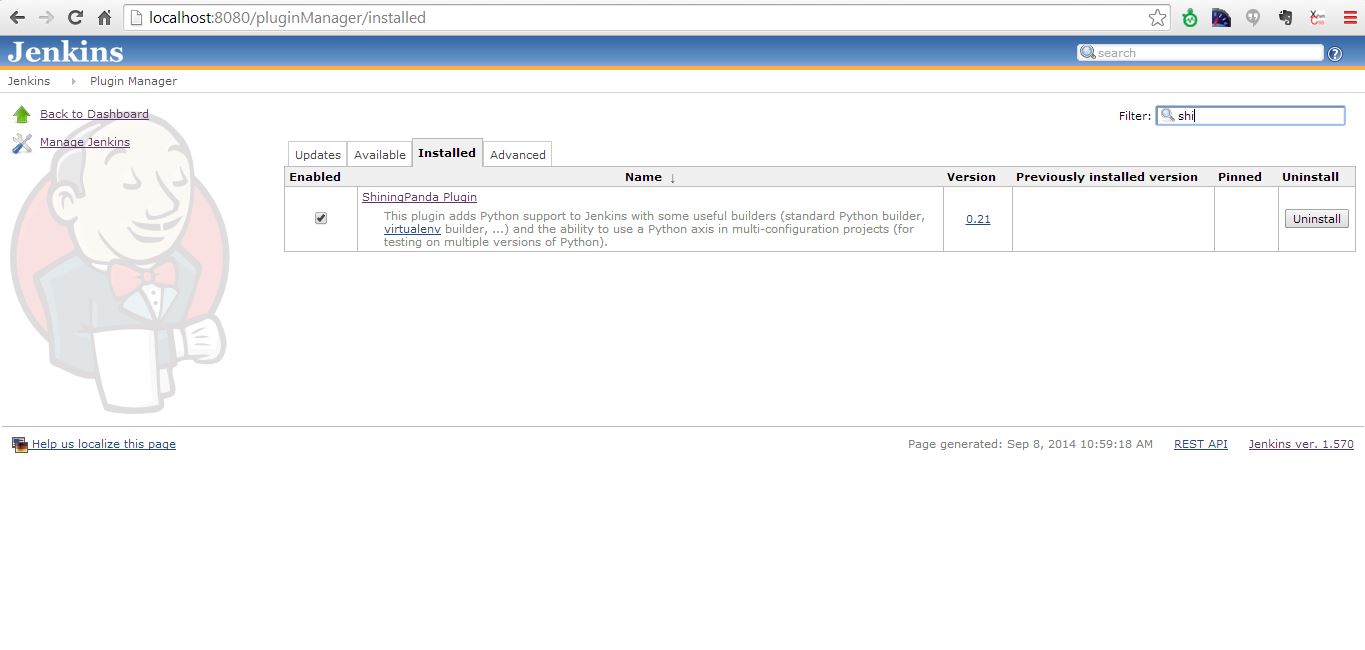
There are various Python Plugins available to build python files in Jenkins. We will use ShiningPanda Plugin which provides Python support to Jenkins with some useful builders.
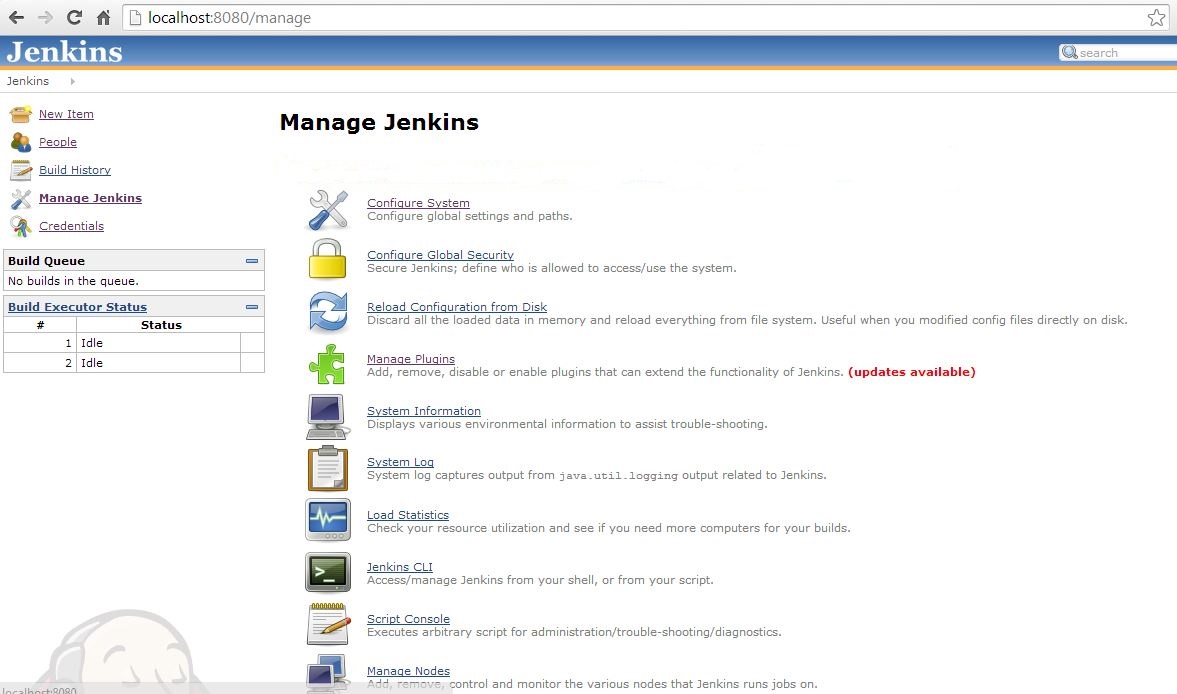
To install the plugin click on the Manage Jenkins link on the left-hand side of the page. On the next page click on Manage Plugins link. Finally on Plugin Manager page click on the Available tab and search for ShiningPanda. Check the checkbox for the plugin and install it.Jenkins will install the selected plugins and then take a moment to restart
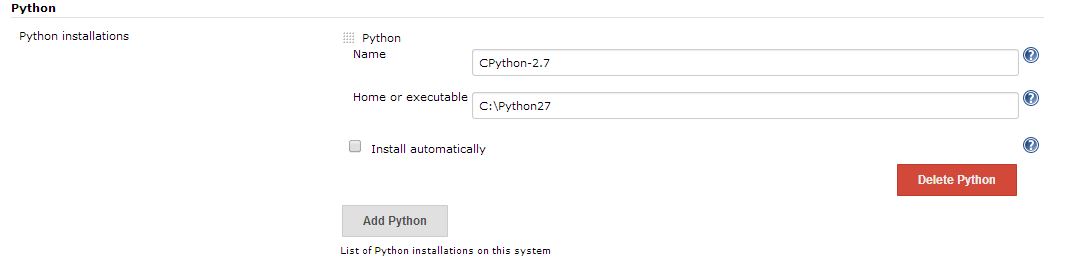
To configure Python installations, navigate to Manage Jenkins > Configure System. Search for the Python. Select Python Installations and configure it. The Name is the name of the Python installation and Home or executable is the path to the root folder of the Python installation
STEP 3: Install Python mock and Python nose
We will use the Python mock module in our test case to mock some classes. The mock module has one of my favorite features – patch decorators, that make it easy to mock classes. We are doing this on Python 2.7. For Python 3.x you could skip this step. To install mock, open a command prompt and run:
pip install -U mock |
Python nose extends unittest to make testing easier. By default, nose will run tests in files or directories under the current working directory whose names include “test” or “Test”. To install nose, open a command prompt and run:
pip install nose |
STEP 4: Add Python unit test cases
In real life, you run a suite of tests. To make this example realistic, we are going to be writing three test cases. If you are already comfortable with Python nose, you can choose to run exactly one test.
Test 1: Please refer to our previous blog on python unit check where we have written a python unit test for a python chess app. The test case to check whether the GetListOfValidMoves method is getting called with the arguments that we expect it to be called with.
Test 2: Check if the mocked method was called at least once with some arguments
""" Example written for Qxf2 Services' blog post on Python Unit Checking Check if IsCheckmate method in ChessRules class calls GetListOfValidMoves Assert that it called at least once with some expected argument """ import unittest, mock import ChessRules from ChessBoard import ChessBoard class CheckIsCheckmate(unittest.TestCase): "Class to unit check the IsCheckmate method of ChessRules.py module" # creating a mock for GetListOfValidMoves @mock.patch('ChessRules.ChessRules.GetListOfValidMoves') def test_called_with_args(self, mockGetListOfValidMoves): "Unit test for ChessRules method: IsCheckmate" # Creating objects of Chessboard and ChessRules class and calling IsCheckmate function with each piece for initial position and "black" color cb = ChessBoard(0) #Create a chess board object with the initial position chess_rules_obj = ChessRules.ChessRules() chess_rules_obj.IsCheckmate(cb.GetState(),"black") # Create expected_arg_calls list which is supposed to be called with GetListOfValidMoves for initial position # IsCheckmate calls GetListOfValidMoves with arguments: board, color (who is to play?) and co-ordinates of a square with a piece on it expected_arg_calls = [] for row in range(0,2): for col in range(0,8): expected_arg_calls.append(mock.call(cb.GetState(), 'black', (row, col))) # assert that method was called at least once with some argument mockGetListOfValidMoves.assert_any_call(cb.GetState(),"black",(1,6)) if __name__=="__main__": unittest.main() |
Test 3: Check if the mocked method was called exactly 16 times
""" Example written for Qxf2 Services' blog post on Python Unit Checking Check if IsCheckmate method in ChessRules class calls GetListOfValidMoves Assert that the mocked method is called 16 times """ import unittest, mock import ChessRules from ChessBoard import ChessBoard class CheckIsCheckmate(unittest.TestCase): "Class to unit check the IsCheckmate method of ChessRules.py module" # creating a mock for GetListOfValidMoves @mock.patch('ChessRules.ChessRules.GetListOfValidMoves') def test_call_count(self, mockGetListOfValidMoves): "Unit test for ChessRules method: IsCheckmate" # Creating objects of Chessboard and ChessRules class and calling IsCheckmate function with each piece for initial position and "black" color cb = ChessBoard(0) #Create a chess board object with the initial position chess_rules_obj = ChessRules.ChessRules() chess_rules_obj.IsCheckmate(cb.GetState(),"black") # Create expected_arg_calls list which is supposed to be called with GetListOfValidMoves for initial position # IsCheckmate calls GetListOfValidMoves with arguments: board, color (who is to play?) and co-ordinates of a square with a piece on it expected_arg_calls = [] for row in range(0,2): for col in range(0,8): expected_arg_calls.append(mock.call(cb.GetState(), 'black', (row, col))) # check the number of times your mocked method was called self.assertEqual(mockGetListOfValidMoves.call_count,16) if __name__=="__main__": unittest.main() |
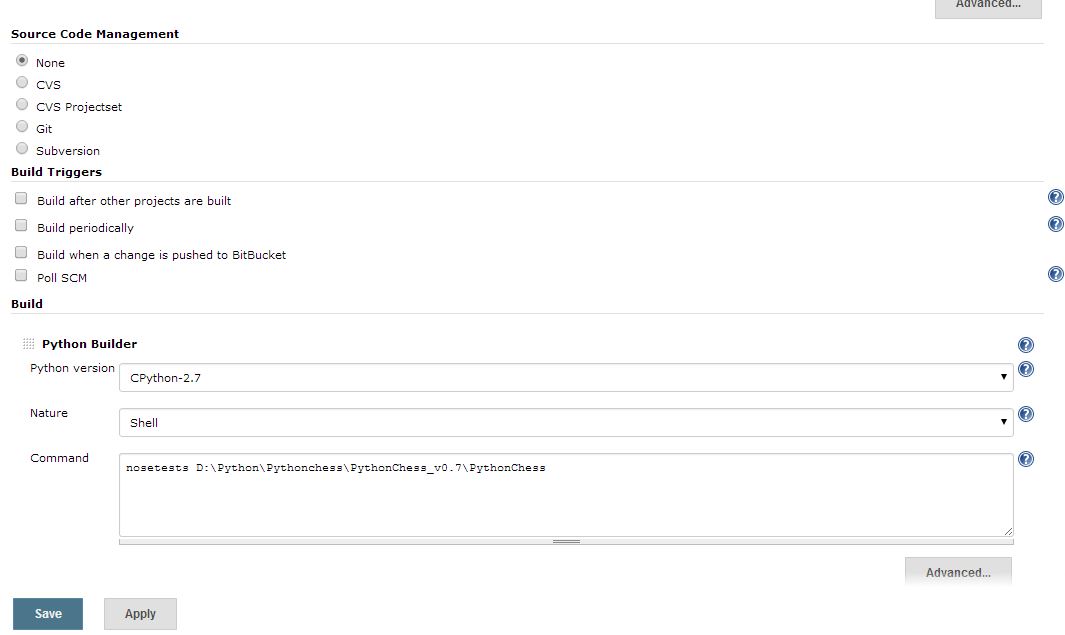
STEP 5: Set up the project in Jenkins
- Go to Jenkins, select “New Item”, enter a name for your build and then choose “Build a free-style software project and click “OK”.
- We will run the project directly from our local machine. Configure the project as “None” under “Source Code Management”.
- Click on “Add Build step” and select Python Builder.
- Select the Nature as Shell and in command field enter “nosetests $Path of testcase ”
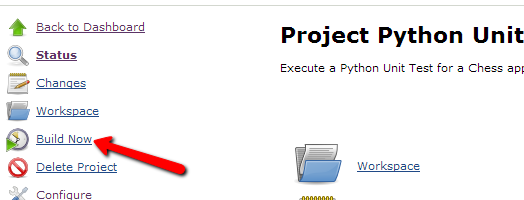
STEP 6: Start the build
Go back to your build page in Jenkins and click on “Build Now”. The Build will start and you can view the status.
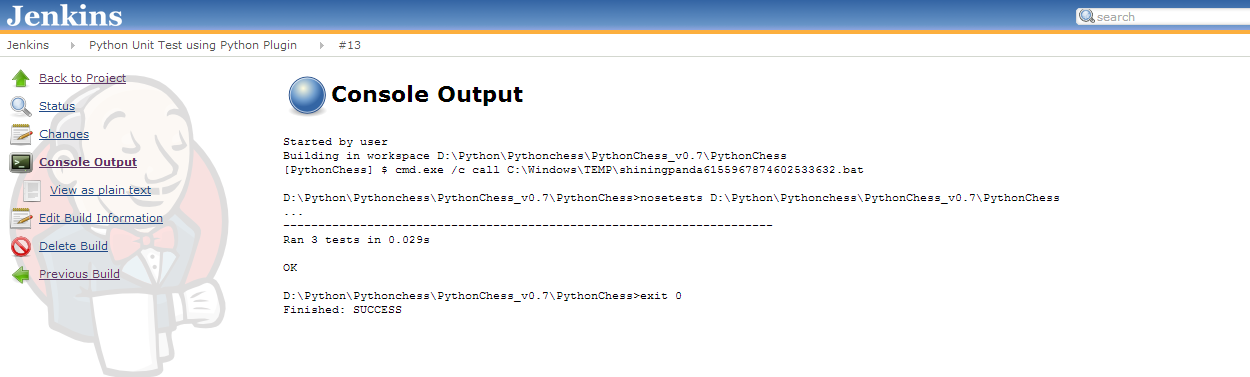
STEP 7: Verify the result
Click on Console Output to view the Result. All the 3 test cases ran and the status shows as “SUCCESS”
And that brings us to the end of this tutorial on integrating your Python unit tests with Jenkins. As always, we are happy to answer any questions you may have.

I am a dedicated quality assurance professional with a true passion for ensuring product quality and driving efficient testing processes. Throughout my career, I have gained extensive expertise in various testing domains, showcasing my versatility in testing diverse applications such as CRM, Web, Mobile, Database, and Machine Learning-based applications. What sets me apart is my ability to develop robust test scripts, ensure comprehensive test coverage, and efficiently report defects. With experience in managing teams and leading testing-related activities, I foster collaboration and drive efficiency within projects. Proficient in tools like Selenium, Appium, Mechanize, Requests, Postman, Runscope, Gatling, Locust, Jenkins, CircleCI, Docker, and Grafana, I stay up-to-date with the latest advancements in the field to deliver exceptional software products. Outside of work, I find joy and inspiration in sports, maintaining a balanced lifestyle.


Thank you so much Avinash for this post!
I was trying to find such step by step guide for quite a while. Its precise but covers everything.
I was done with the configuration and test run in less than 10 minutes.
Thanks again for the post. 🙂
Keep up the great job!
Helpful Info. Clear steps. Thank you.
Nice description. I followed and ran tests in 10 minutes.
Please post more tips like this.
SM,
QA Engineer, VA, USA
how to generate repor htmls form the output?
Anand,
We haven’t tried it but below links may help you to generate html reports.
https://wiki.jenkins.io/display/JENKINS/HTML+Publisher+Plugin
https://wiki.jenkins-ci.org/display/JENKINS/Cucumber+Reports+Plugin
how do i get test case report rather printing all in logs?
i want to share the report with some one
Anand,
Have you tried HTML Plugin? Ideally this should help.
https://wiki.jenkins.io/display/JENKINS/HTML+Publisher+Plugin
https://wiki.jenkins-ci.org/display/JENKINS/Cucumber+Reports+Plugin
Hi,
I have unittest case and I want convert it to nosetest, please suggest whats the best way to do it.
Snippet of the code:
class DSDTaskSuccessChartValidation(unittest.TestCase)
@file_data(“../../../testdata/web/webportal/” + filename)
def test_validate_downlink_task_success_chart_data(self, data_set):
#–Assertions
I am calling tests like this:
testSuite = unittest.TestSuite(suites)
result = runner.run(testSuite)
Hi Ankit,
You don’t need to do anything specific in your scripts to run the test using nosetest.
– install nose
– cd to the directory where you have the test
– nosetests (run this command)
Note: Make sure that the system is able to find nose.
Thanks & Regards
Avinash Shetty
Hi,
how can write a unit test that validates what are the plugin installed, splunk configuration test and github.
Hi Kumar,
I am not able to understand what unit tests you are planning to write? Can you give more details on what exactly you are trying here?
Thanks & Regards
Avinash Shetty
Hi,
awesome post, very clear and concise. I am working with IronPython and the RobotFramework. Basically on my pc I get to compile my testcase perfectly, just by typing “ipy -m robot test.robot” in my command prompt. However when I try to do something like that on Jenkins I get an error that those commands don’t exist. I tried to make a Python Builder and specify the path to IronPython and type my command like in the image in Step 5, but it says “whitespaces are not allowed”.
Do you have any idea what might be the issue? Sorry for asking here, but I feel like you will definitely know the answer.
Hi Bobby,
Jenkins is probably Unix based,so the path to IronPython should not have any spaces in it.
You can try changing the path to IronPython using short name notation.
You can refer this link:https://stackoverflow.com/questions/892555/how-do-i-specify-c-program-files-without-a-space-in-it-for-programs-that-cant/45923797
Thanks
Annapoorani
Hello, Avinash Shetty
I want to ask to ask you i have not tried before testing but now i write some Django Test Cases.
can you help me how I integrate Django Test Cases with Jenkins.
Navkant, wouldn’t simply adding the line
python manage.py testto your Jenkins job configuration do it?Hi Avinash Shetty,
can you please help me…
how can i trigger build at particular time through python using. manually we are set time in build periodically like */15 * * * * but how can we do it from python. Please help me this is my task i am trying like anything but i cant found how to do.
Hi Noor Basha,
To trigger build at a particular time using python script,
1. you need to make a GET call to get a config.xml file. “get_job_config(name)” Refer api details here
2. Then you need to modify that config.xml. Here, you can refer the config.xml file of job which is scheduled. Usually, you need to add/modify the following lines:
<triggers> <hudson.triggers.TimerTrigger> <spec>45 9-16/2 * * 1-5</spec> </hudson.triggers.TimerTrigger> </triggers>3. Now, make a call to update the configuration of job. “reconfig_job(name, config_xml)”