In this post, we will show you how to use Windows Inspector to identify UI elements and write stable selectors for your desktop automation scripts.
When you start automating Windows desktop applications using WinAppDriver or Appium, one of the first hurdles you’ll run into is figuring out how to locate elements on the app or Windows UI. If you’ve done web automation before, you know how easy it is to inspect a webpage, grab an XPath or ID, and write your locator. But with desktop apps, it’s a little different, you’re dealing with UI Automation properties, not HTML. That’s where Windows Inspector (Inspect.exe) comes in handy. It’s a free tool from Microsoft that lets you peek inside your app’s UI tree and grab reliable element properties for your test automation.
What You’ll Learn:
By the end of this post, you’ll know how to:
- Launch and use Windows Inspector (Inspect.exe)
- Identify element properties like AutomationId, Name, and ClassName
- Decide which attributes make the most stable selectors
- Use these properties in your Appium or WinAppDriver test scripts
We’ll even show you a small example using the Windows Calculator app.
Prerequisites:
Before you follow along, make sure you have:
- A Windows 10 or 11 system
- Windows SDK installed (this includes Inspect.exe). Download and install it from official site here
- A sample app to test, we’ll use the standard Windows Calculator app
Note: If you already have Visual Studio or the Windows SDK installed, you likely already have Inspect.exe available on your machine.
What is Windows Inspector (Inspect.exe)?
When you’re working with desktop app automation, you need a way to see how Windows identifies UI elements behind the scenes. That’s exactly what Windows Inspector (Inspect.exe) does. Windows Inspector is a free tool that comes with the Windows SDK. It lets you explore an app’s UI Automation tree, basically, the structure Windows uses to understand buttons, text boxes, labels, and more.
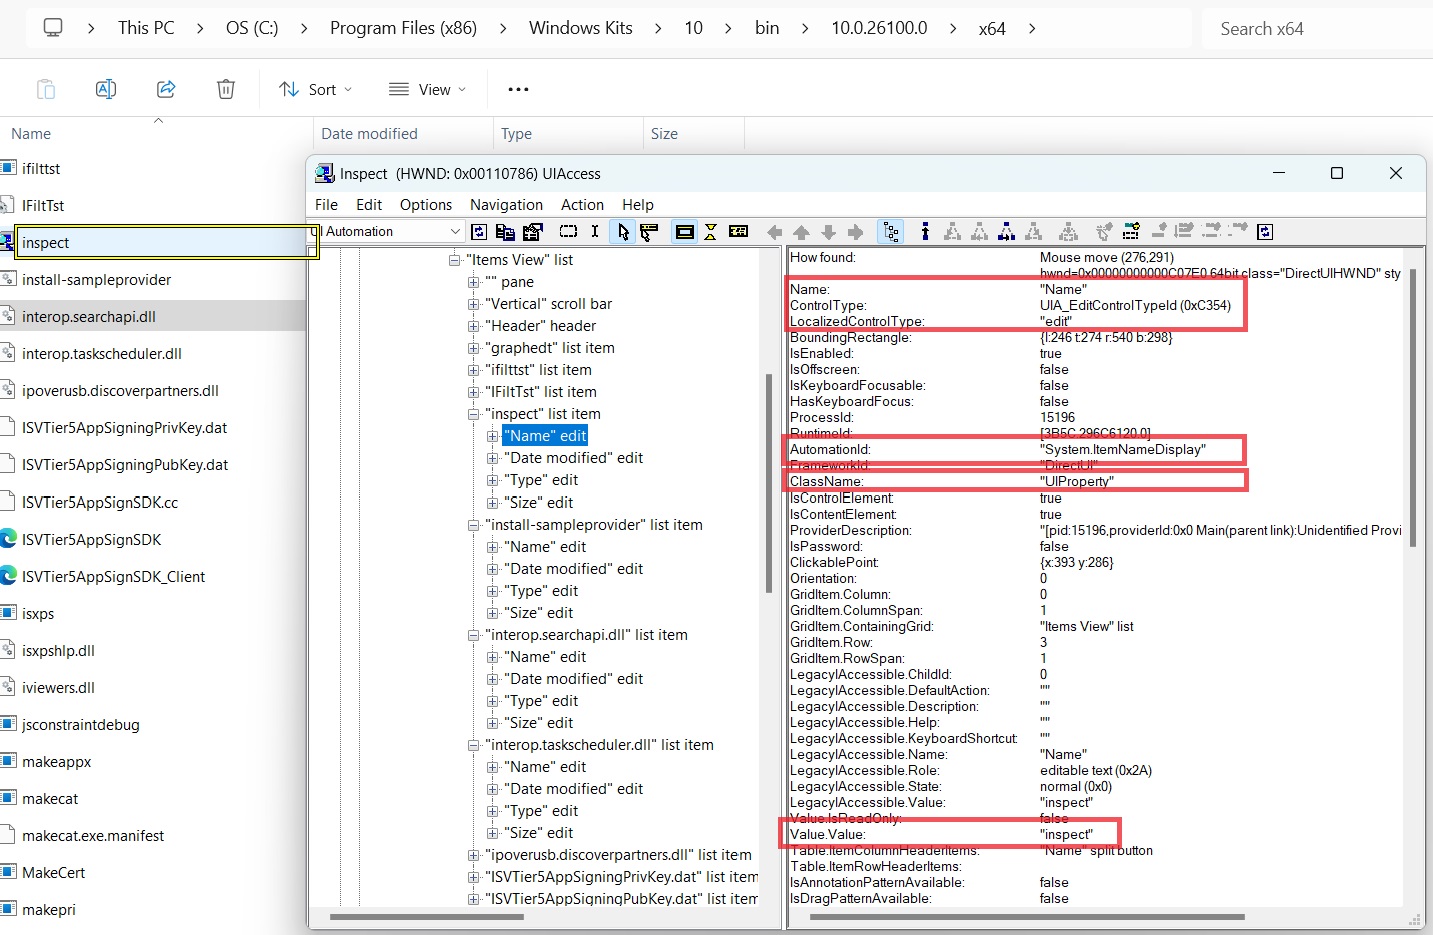
Each UI element exposes properties such as:
- AutomationId: a unique identifier for the element
- Name: what the user sees (like the label on a button)
- ClassName: the control’s class (for example, Button, Edit, Text)
- ControlType: defines the type of element (button, checkbox, etc.)
- And many more…
These properties are exactly what tools like WinAppDriver and Appium rely on to find elements.
You can find the Inspect.exe tool at the following path (after installing Windows SDK):
C:\Program Files (x86)\Windows Kits\10\bin\(version)\x64\Inspect.exe
Launching Windows Inspector:
Let’s get started with opening the tool and getting familiar with its layout. If you already have the Windows SDK installed, you should be able to find and launch Inspect.exe easily.
- To locate it, open File Explorer and navigate to:
C:\Program Files (x86)\Windows Kits\10\bin\ - Inside this folder, you’ll see one or more version-numbered directories (for example, 10.0.22621.0). Open the latest version → go into the x64 folder (or x86 if you’re on a 32-bit system). You should see a file named Inspect.exe.
Example path:
C:\Program Files (x86)\Windows Kits\10\bin\10.0.22621.0\x64\Inspect.exe - Double-click Inspect.exe to launch it. If it opens successfully, right-click it and select Send to → Desktop (create shortcut). This makes it easier to access next time.
Note: If you don’t see Inspect.exe in the path above, you may need to install the Windows SDK.
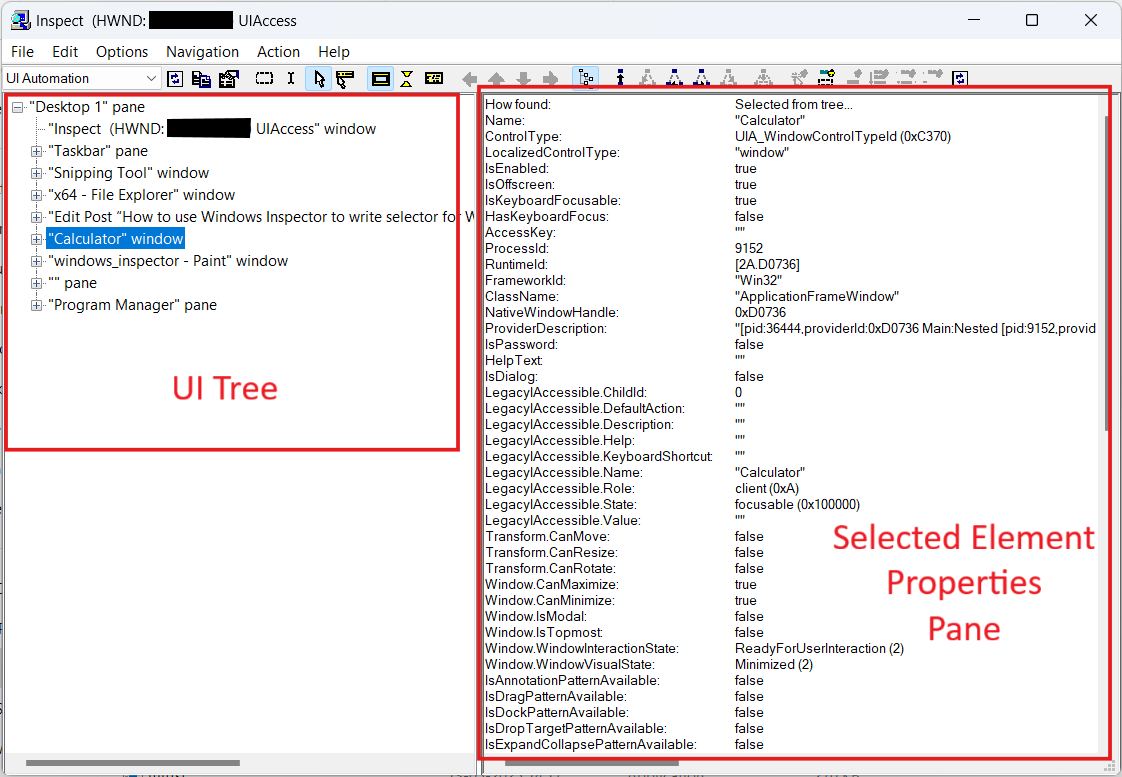
Once it’s open, you’ll see a window with two main sections:
- On the left, a UI tree showing the hierarchy of your app’s elements.
- On the right, the properties pane showing details about the selected element.
Inspecting Your Desktop App:
Now that you have Inspect.exe open, let’s see how to use it to explore a real desktop application. For this example, we’ll use the Windows Calculator. It’s simple, available on every system, and perfect for learning how to inspect UI elements.
- Open the Calculator app.
- Switch to the Windows Inspector window.
- Click the “watch cursor” icon (mouse pointer image) and “show highlight rectangle”(double rectangle image) on the toolbar.
- Hover your mouse over the Calculator app.
You can do this by searching “Calculator” from the Start menu.
Make sure Always on top is enabled (from the “Options” menu) so that the Inspector stays visible.
This activates the inspection mode.
As you move the cursor around, different parts of the Calculator (like buttons and text areas) will get highlighted. Click/hover on an element (for example, the “One” button). Windows Inspector will freeze the highlight and display detailed information about that element on the right-hand pane. The right-hand pane shows various properties for the selected element. Look at screenshot below.
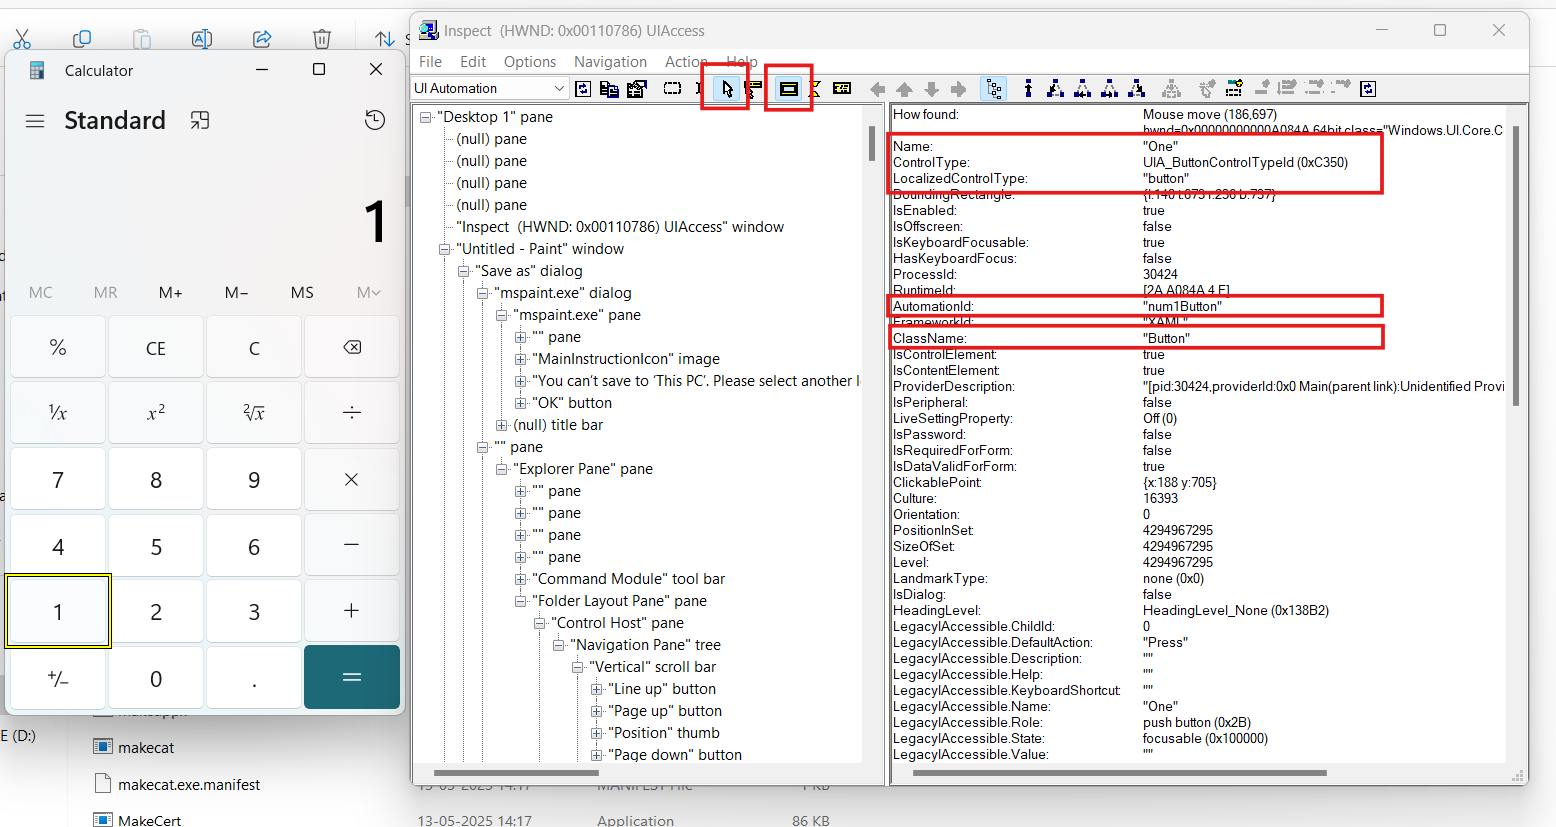
At this point, you’ve learned how to identify elements and gather their attributes. These attribute values will form the basis of your selectors in automation scripts.
Picking the Right Selector:
Once you start exploring your app with Windows Inspector, you’ll notice that each element has multiple properties like AutomationId, Name, ClassName, and ControlType. But which one should you actually use in your automation scripts?
Let’s break it down.
- Use AutomationId whenever possible
- Fallback to Name when AutomationId is missing
- Use ClassName or XPath as a last resort
This is usually the most stable and unique way to identify an element. If the app developer has set an AutomationId, it won’t change even if the UI layout changes.
# Best choice: use AutomationId

element = driver.find_element(AppiumBy.ACCESSIBILITY_ID, "num1Button")
Some apps don’t define AutomationIds for their elements. In that case, you can use the Name property. It usually matches the label or text shown on the screen.
# Works fine if element has a clear visible label

element = driver.find_element(AppiumBy.NAME, "One")
Note: The Name property may change if your app supports multiple languages or dynamic labels, so use it carefully.
ClassName can be used if your app has multiple similar controls but no AutomationId or Name.
XPath should be your last option. It is powerful but fragile (breaks easily if the UI changes).
# Example using ClassName

buttons = driver.find_elements(AppiumBy.CLASS_NAME, "Button")
# Example using XPath
element = driver.find_element(AppiumBy.XPATH, "//Button[@Name='One']")
You’ve now learned how to use Windows Inspector (Inspect.exe) to find and understand UI elements in desktop applications. Windows Inspector is an essential tool if you’re building automation for Windows desktop apps using frameworks like Appium or WinAppDriver. Once you get comfortable with it, you’ll find it much easier to write clean, stable locators and debug tricky UI elements. However, we noticed that writing complex XPaths or absolute paths isn’t always straightforward with Windows Inspector, especially when dealing with legacy applications that lack unique attributes. In such cases, we found that Appium Inspector handles these scenarios better.
Stay tuned for our next Qxf2’s post, where we’ll explore how to use Appium Inspector effectively for desktop automation!
Need help testing the hard stuff? Contact Qxf2
Very few QA teams bother with desktop automation these days. Not us. In fact, Qxf2’s open-source test automation framework already supports Windows desktop testing out of the box. If you need help setting up reliable desktop tests or want to extend your existing setup, reach out. We enjoy the technical bits others skip.

I love technology and learning new things. I explore both hardware and software. I am passionate about robotics and embedded systems which motivate me to develop my software and hardware skills. I have good knowledge of Python, Selenium, Arduino, C and hardware design. I have developed several robots and participated in robotics competitions. I am constantly exploring new test ideas and test tools for software and hardware. At Qxf2, I am working on developing hardware tools for automated tests ala Tapster. Incidentally, I created Qxf2’s first robot. Besides testing, I like playing cricket, badminton and developing embedded gadget for fun.

