In this post, we will help you run one Great Expectations test as part of your CI/CD pipeline using GitHub Actions. This post is second in our series to help testers implement useful tests with Great Expectations for data validation. If your instinct says that adding a single test to a CI/CD pipeline should not be the next part, read on to find out why we think this is an important next step that a tester should fight for.
My audience is software testers and those interested in testing. I have taken care to infuse this post with a lot of “tester-like” thinking. Also, shared my thought process to help you introduce test automation (not just using Great Expectations) within your team. You can find it in the section titled ‘Prepare your team’ later in this post.
Note 1: I am choosing GitHub Actions and Slack for this blog post because they are popular with our clients.
Note 2: While working to get my test to CI, I came across great_expectations_action, a dedicated GitHub Action for Great Expectations. It helps in triggering a Checkpoint which will perform data validation on our data. However, when I started to use the action, I found it failing in the first step where a Docker image is built. Digging deeper, I saw that it was due to an incompatible Node.js version. Subsequently, I fixed the issue and raised a PR. To get things going, I chose a simple GitHub Action which will allow me to run a Python script.
Note 3: This post needs you to be setup with Great Expectations as a pre-requisite. It also assumes you are familiar with Great Expectations and the related terminology. If you are not already setup and familiar with Great Expectations, please follow Great Expectations tutorial with a real-world scenario: Part 1.
Here is how we will be using GitHub Action for:
We will be doing the above steps in this blog post. But before we go there, I want to talk a bit about why I feel CI is the next step.
A minimum viable test
The lean movement made the concept of a Minimum Viable Product (MVP) popular. It is the minimum set of features which, when presented to a real user, allows you to validate your hypotheses about the utility of your product. Think about rolling out your test automation efforts in terms of validating its value. When it works, this approach is a good way to put out your test automation efforts, keep the team focused on the value the tests deliver and not just relegate all test automation efforts to the infamous “catch up” mentality. The software product in this case is your test automation while your users are your team members – developers, product owners, support team, managers, other testers, etc. Our test have different value propositions for each of them.
In our case, having one test run against historic data with every build is more than sufficient to start collecting information about how our different stakeholders can find our tests useful. And so, we end up proposing that adding test automation to the CI/CD pipeline should happen right after the first test has been developed.
Overview
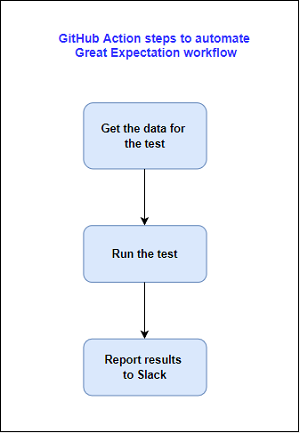
To recap, in the previous post we have written a test for date column of github_stats table to check if the date is according to required specification. Now, the next step is to use our test to perform regular checks on new data as it keeps coming in. To get our test working in a CI environment and receive Slack notifications after the run, we will be doing four main steps:
1. Get the data for the test
2. Run the test using GitHub Action
3. Report results to Slack
4. Store results
Let us go through each of them:
1. Get the data for the test
In the earlier post, we created an Expectation Suite and ran it against historical data (the github_stats CSV file). Now, as testers we should first arrive at what amount of data do we need for our test. For instance, in my case, I am downloading the data from a Cloud based database table as a CSV file. Now, I do not want to download all the data daily but instead divide it as batches for my test. Say, I want to test if on each day statistics for all repos is being collected. Then, I would limit my data to a date range of getting only the before day’s data. Since my test would run daily, I can make sure that for that day all stats look fine. However, in this blog I will not go into those details but instead continue using the github_stats CSV file we have currently so that you can play along.
2. Run the test using GitHub Action
To run the Expectation Suite having the date format Expectation, we need a Checkpoint. It validates our Expectation Suite against the batch of data. Earlier, we used Checkpoint while creating and testing our Expectation Suite. Now, we will create a Checkpoint which we can save and configure to run on a schedule. To do that, we will perform the following steps:
2.1) Create a Checkpoint
2.2) Generate Python script to trigger the Checkpoint
2.3) Run the Python script using GitHub Action
2.1) Create a Checkpoint
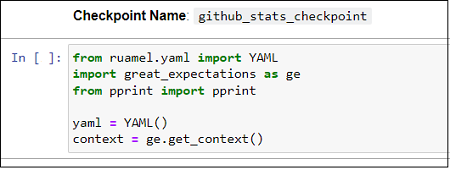
We can create a Checkpoint using the following Great Expectations CLI command.
great_expectations checkpoint new github_stats_checkpoint
It opens up a Jupyter Notebook (like we have seen with other commands) which has the boilerplate code for completing the task. Run all the cells in the notebook.
The first step is to initialize Data Context which all supporting components that Great Expectations consists of.
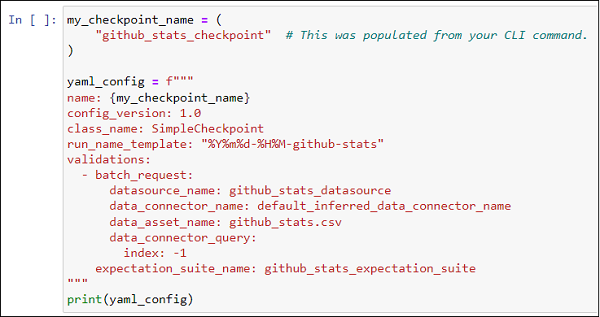
Next, we will create a Checkpoint using SimpleCheckpoint (one of the Checkpoint classes provided by Great Expectations) which is good enough for our case for now. I changed the run_name_template to reflect github_stats
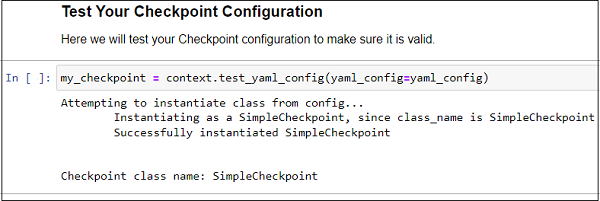
Now, to test our Checkpoint, lets use test_yaml_config() which will run a check to verify if our Checkpoint configuration is correct.
After the above successful test, we will now save our Checkpoint. It is present as github_stats_checkpoint.yml under checkpoints folder.
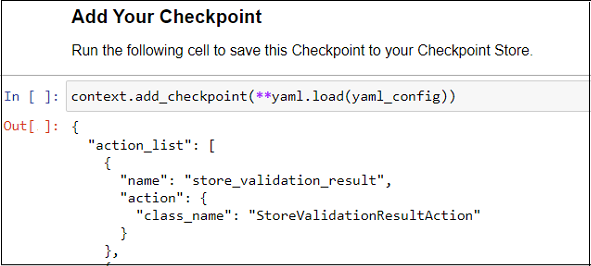
The last step is to run our Checkpoint and optionally view results in Data Docs. Uncomment the lines in the last cell and run it.
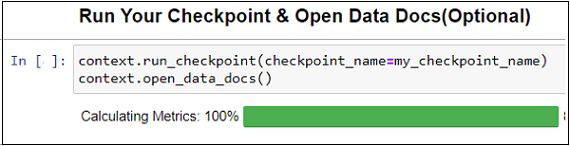
Running a Checkpoint opens Data Docs which is documentation generated by Great Expectations. We will talk about these little later.
2.2) Generate Python script to trigger the Checkpoint
In the above section, we saw how to run a Checkpoint using Great Expectations CLI command. We can also use Python to run a Checkpoint. This will be useful in our CI environment. Great Expectations provides a convenient way to generate a Python script using the below command:
great_expectations checkpoint script github_stats_checkpoint

As observed in the screenshot, a script with the name ‘run_github_stats_checkpoint.py‘ is generated under uncommitted folder by default. We would want to move this script to checkpoints folder since files present under uncommitted are not checked into version control.
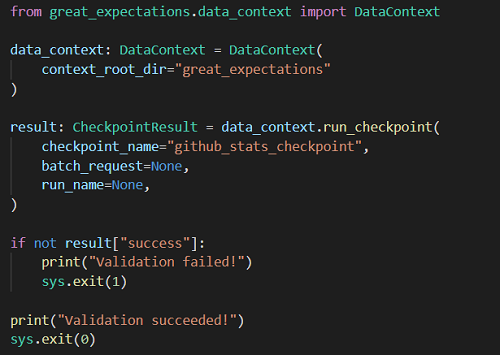
Looking at the script, we see that first DataContext is initialized which is then used to call run_checkpoint method. The context_root_dir is the location where the Great Expectations folder is present (the location will be by default specific to your local system). To make it run using GitHub action, we will update it as following:
context_root_dir="great_expectations"
If you would like, refer the script here. Ensure that it is placed under great_expectations/checkpoints folder.
2.3) Run the script using GitHub Action
Now that we have the script ready, we will create a GitHub workflow to run it.
i) First, add a requirements.txt file in your github repository with great_expectations in it.
ii) Then, create .github/workflows directory (if not already present) to store our workflow file.
iii) Under the directory, create a file called github_stats_run.yml which will contain all the steps we want to run as part of our workflow.
iv) In the workflow, we will create a job which will have four steps:
* Install python
* Checkout our repository
* Install dependencies
* Run Checkpoint
name: run-github-stats-checkpoint

jobs:
  great_expectations_validation:
    runs-on: ubuntu-latest
    steps:
    - name: Install python
      uses: actions/setup-python@v3

    - name: Copy Repository contents
      uses: actions/checkout@main

    - name: Install dependencies
      run: |
        python -m pip install --upgrade pip
        pip install -r requirements.txt

    - name: Run Checkpoint
      run: |
python great_expectations/checkpoints/run_github_stats_checkpoint.py |
Refer the script here. Place this script as github_stats_run.yml in .github/workflows folder.
v) Test the action
We will trigger the action manually and verify if the Checkpoint has run successfully. In your github repo, navigate to Actions tab. Under Workflows, you should fine run-github-stats-checkpoint workflow. This is the name we have provided for our workflow in the yml file. Select the workflow and click on ‘Run workflow’.
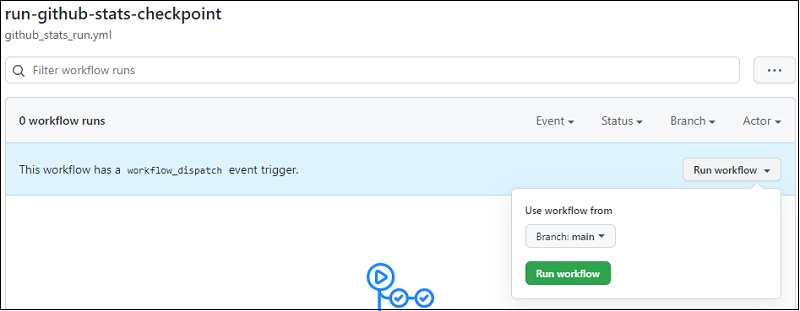
The workflow is triggered which completes all the steps we listed above.
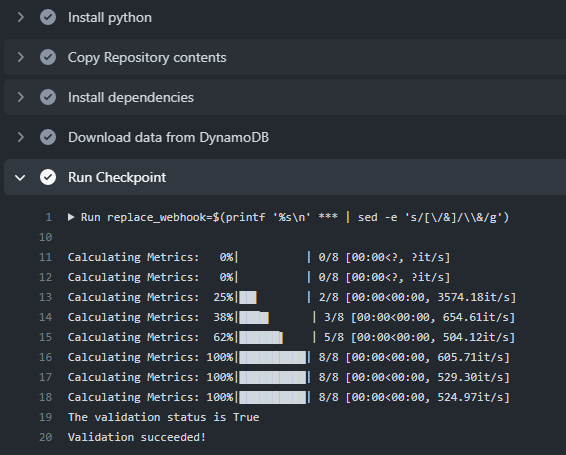
The Checkpoint has run our test and performed validation for github_stats data.
3. Report results to Slack
We have so far automated our test run. Next, we want some sort of automatic notification about the test run. Great Expectations has integration with different communication channels like Email and Slack. In this blog I will show how to receive notifications in Slack because that is what majority of us use. At Qxf2, we use Skype as our means of communication. So, I added functionality to send to Skype too. But I will not be covering that here.
To send notification to Slack, we will perform the following steps:
3.1) Create a Slack Webhook
3.2) Add Slack notification action to Checkpoint
3.3) Create a GitHub Secret for the Webhook
3.4) Use the Webhook in GitHub Action
3.5) Test the notification
Before we go into the steps in detail, make sure you have performed the following:
* Downloaded Slack (or opened in browser)
* Created a workspace or use an existing one
* Created a Slack channel or use an existing one
3.1) Create a Slack Webhook
Slack apps can automate many activities and have access to APIs and webhooks. We will use an Incoming Webhook which are useful to send messages from external sources to a Slack channel.
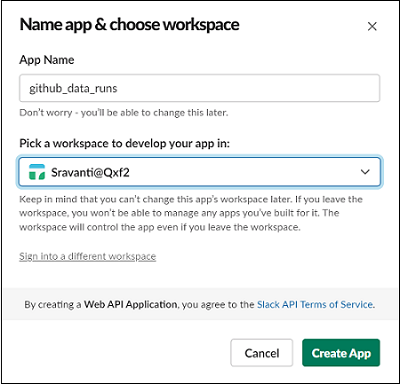
i) Navigate to https://api.slack.com/apps?new_app and choose to create a new app from Scratch. You could also use an existing app you have. Provide a name and select your workspace.
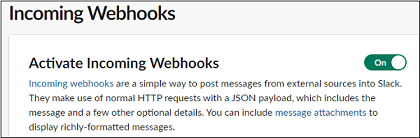
ii) On the Basic Information page, click on Incoming Webhooks. Use the ‘Activate Incoming Webhooks’ toggle button to enable posting messages feature.
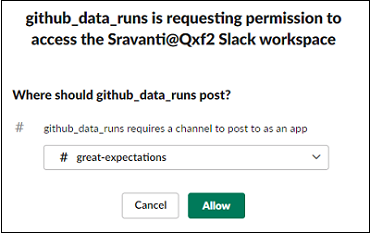
iii) Scroll down to ‘Webhook URLs for Your Workspace’ section and click on ‘Add New Webhook to Workspace’ button. Choose the channel on which you want notifications to be received.
iv) A new Webhook URL will be generated which can be used to post messages on the channel. Ensure that you do not share this with anyone.
We will use this Webhook for in Slack notification action. Let us do that next.
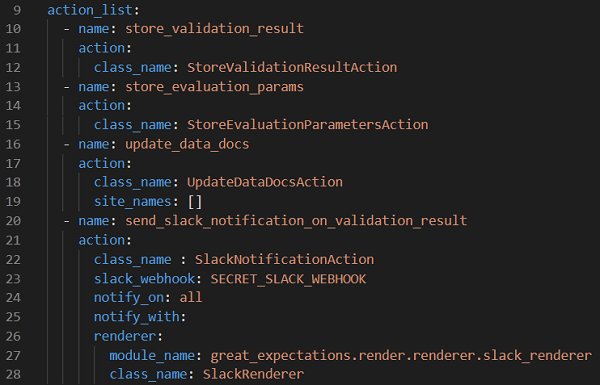
3.2) Add Slack notification action to Checkpoint
To be able to trigger slack notifications after a Checkpoint run, we need to the associated action to the list of checkpoint actions. In the github_stats_checkpoint.yml present under Checkpoints folder, go to the action_list, and add the following code. The action uses SlackRender class provided by Great Expectations which has the Slack integration code. Here, we need to provide the Webhook we created earlier. We will use a placeholder text (Eg, SECRET_SLACK_WEBHOOK) for our secret here. And substitute this with our actual Webhook URL stored as GitHub secret. We will take a look at that next.
  - name: send_slack_notification_on_validation_result
    action:
      class_name : SlackNotificationAction
      slack_webhook: SECRET_SLACK_WEBHOOK
      notify_on: all
      notify_with:
      renderer:
        module_name: great_expectations.render.renderer.slack_renderer
class_name: SlackRenderer |
3.3) Create a GitHub Secret for the Webhook
As we just discussed, we need to place our Webhook URL as a secret. To do that, in your GitHub repository, navigate to Settings -> Secrets -> Actions secrets and add a New repository secret. Place your Webhook URL here.

I gave my secret name as ‘VALIDATION_NOTIFICATION_SLACK_WEBHOOK’
3.4) Use the Webhook in GitHub Action
Remember the placeholder variable (SECRET_SLACK_WEBHOOK) we used in our Checkpoint file earlier? We need to substitute it with our Webhook URL present as GitHub secret. To do that, I used sed to do a simple search and replace.
replace_webhook=$(printf '%s\n' ${{ secrets.VALIDATION_NOTIFICATION_SLACK_WEBHOOK }} | sed -e 's/[\/&]/\\&/g') sed -i "s/SECRET_SLACK_WEBHOOK/$replace_webhook/g" great_expectations/checkpoints/github_stats_checkpoint.yml |
Go to the GitHub workflow (github_stats_run.yml file) we defined earlier, and add the above code to the Run Checkpoint step.

Refer to the complete github_stats_run.yml script here.
3.5) Test the notification
After adding the Slack notification functionality, let us trigger the workflow again and verify if a notification has come up in Slack. Check the Slack channel which you have configured while creating the webhook. We can see summary of our validation run in the notification message:
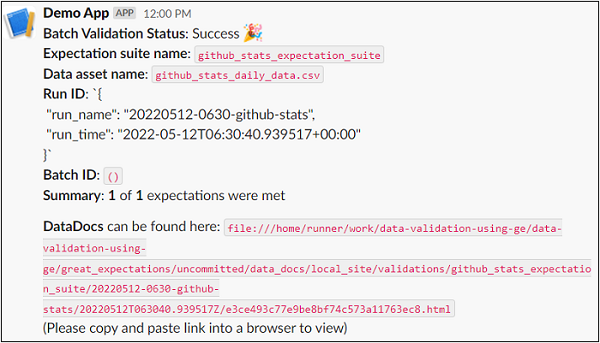
We will look at the Data Docs later. The link is the default location which we cannot access right now since it is run inside the GitHub Action runner.
4. Store Results
The results from Checkpoint run are shown in form of Data Docs. It is structured documentation consisting of information about the validation run. When we ran our Checkpoint using GitHub Action, the Data docs generated cannot be accessible outside. So, we need to host these on any static site such as Netlify. We will see how to do that in the next blog.
Preparing your team
SKIP THIS SECTION IF YOU ALREADY HAVE BUY-IN FROM YOUR TEAM!
Just having the technical capabilities to run your tests in the CI/CD pipeline is not enough to ensure your test automation efforts with Great Expectations are going to succeed. In my experience, most teams resist having to do the work needed to roll out test automation properly. In fact, this resistance is so common that I think it is worth dedicating a section to help you plan this stage out!
The number one reason we fail to introduce this kind of thinking into our teams, even when we try, is because we are poorly prepared to make a case for it. We do not take time to lay the groundwork for your team to accept a new idea. Neither do we prepare arguments required to convince the various stakeholders that adding one small test to the CI/CD pipeline is the best use of the team’s time.
From a tester’s perspective, before we start writing out more tests, it makes sense to get our first test up and running with the CI/CD pipeline. But that is far easier said than done because this is a truly collaborative step in the process. As testers, we would most probably have limited to no access to different environments. So, we need to rely on developers, DevOps to help us along the way. Also, we might want input about the tests from our product owners. So, there is some preparatory work we need to do before adding our tests in the deployment pipeline.
Here are some things you can try to prepare for before you propose this idea. I might not have the answer for all these as they are highly contextual. But I am listing out some considerations and my thoughts about them just in case they apply to you as well.
a) Prepare to defend the use Great Expectations as a tool
Some folks might point to other kinds of alerting and monitoring that could be used – why put in so much effort? For example, even within Qxf2, we use CloudWatch alerts as part of our data collection process. In my opinion, Great Expectations can be extended to go beyond just the surface level checks that are usually applied on data, say in form of constraints. It provides a good platform to try out different kinds fuzzy checks as well. In addition, it allows us to democratize our tests and get more people involved in testing. When speaking to your managers or engineering leaders, do not fail to stress the last point! They love hearing ideas for making more people within the team write tests.
b) Set expectations within the team
You are going to be introducing a new check into the CI/CD pipeline. Most folks within your team are NOT going to have context about it. They are likely to ignore failures and think it is your responsibility alone. Make sure you tell your team what to expect. Tell them the benefits. Ask them for feedback. And help them understand what they should do if they notice a failure message. Repeat the context multiple times if you have to. The worst thing that can happen to such an effort is that nobody pays attention except the QA team!
c) Prepare arguments for drawbacks of the test
Folks are going to point out that this test barely does anything. That the test is not efficient. Also, the Slack messages are not user-friendly enough, etc. Keep arguments prepared. In most cases, tell them this is still an early version that still delivers more value than not having the test itself. And that over time, you will be addressing these concerns.
d) Have a discussion around version control
I do not yet have a good answer to where your tests have to be housed. For example, your Great Expectations tests could be part of whatever repositories house the data collection code. It could also be a separate repo. This decision will really depend on how your application code has been organized. If you are struggling with this point, just ask a developer. They can advice you.
Next Steps
We have our test running and setup notifications regarding for it. Next, we will take a look using Data Docs to view the results. Also, we will try to customize our notifications to add more details about the test. Thanks for reading and keep an eye out for the next one!
References
1. How to create a new Checkpoint in Great Expectations
2. Sending Slack messages using Incoming Webhooks
3. Trigger Slack notifications as an Action
I have been in the IT industry from 9 years. I worked as a curriculum validation engineer at Oracle for the past 5 years validating various courses on products developed by them. Before Oracle, I worked at TCS as a Manual tester. I like testing – its diverse, challenging, and satisfying in the sense that we can help improve the quality of software and provide better user experience. I also wanted to try my hand at writing and got an opportunity at Qxf2 as a Content Writer before transitioning to a full time QA Engineer role. I love doing DIY crafts, reading books and spending time with my daughter.


Hi Sravanti,
This is a great blog, I am exploring Great_expectations and one thing I couldn’t figure out on their site or this blog is How to trigger these tests in automation(not through git). At the place where I work, data is sent over through a snow-pipe into snowflake so great_expectations looks good but how would we trigger a test when a new dataset is added?
Hi,
Have you tried using
pytestto trigger theGreat Expectationscheckpoint Python scripts?We have used
pytestto solve checkpoint trigger in one of our projects, it helped us solve a triggering problem(we will be blogging about it soon).I had to look up about Snowpipe, what mechanism do you use to detect the staged files?
Possible triggers for your checkpoints with
pytest:– You can write a poller, constantly checking Snowpipe staged file availability and trigger your tests using pytest from the poller Python script
– You can create a
systemdunit to run your checkpoints usingpytest, pytest fixtures can be used to check the availability of staged files and based on it, test step can be executed.