I noticed many testers with no knowledge of web APIs do not have an easy way to start learning about them. Most tutorials directly dive into the technical details of how to use APIs as part of writing automated checks. I wanted to provide an easy analogy for APIs that will set you up to explore this topic further.
DISCLAIMER: I have tried to make this post relatable. I think that will help you become more comfortable with the concept of APIs … which means this post is not always technically accurate. If you want technical accuracy, please read a textbook.
The key to get started with web APIs
At Qxf2, we have had many testers learn about APIs for the first time in their career. Observing their learning struggles, we identified one common stumbling block. We don’t want other testers stumbling at the same place. So if you are new to APIs, we have one critical piece of advice: Do not get hung up on what the term API means.
Do not go chasing after the exact definition of the term “API”. Yes, seriously! Forget about defining the term API for now. It’s ok!
The definition of an API is overly broad and has a lot of technical jargon. Like you can use a microwave without knowing about electromagnetism, you can get started with APIs for testing without knowing its definition. Just develop a feel for what it is. This post was written so you, the tester, can develop a feel for what an API does. You can work your way back to a definition once you have a feel for what APIs do.
Ok, let’s see how the API works
To explain in detail about API working procedure let me take a customer ordering a sofa from Pepperfry (Indian IKEA) as an example.
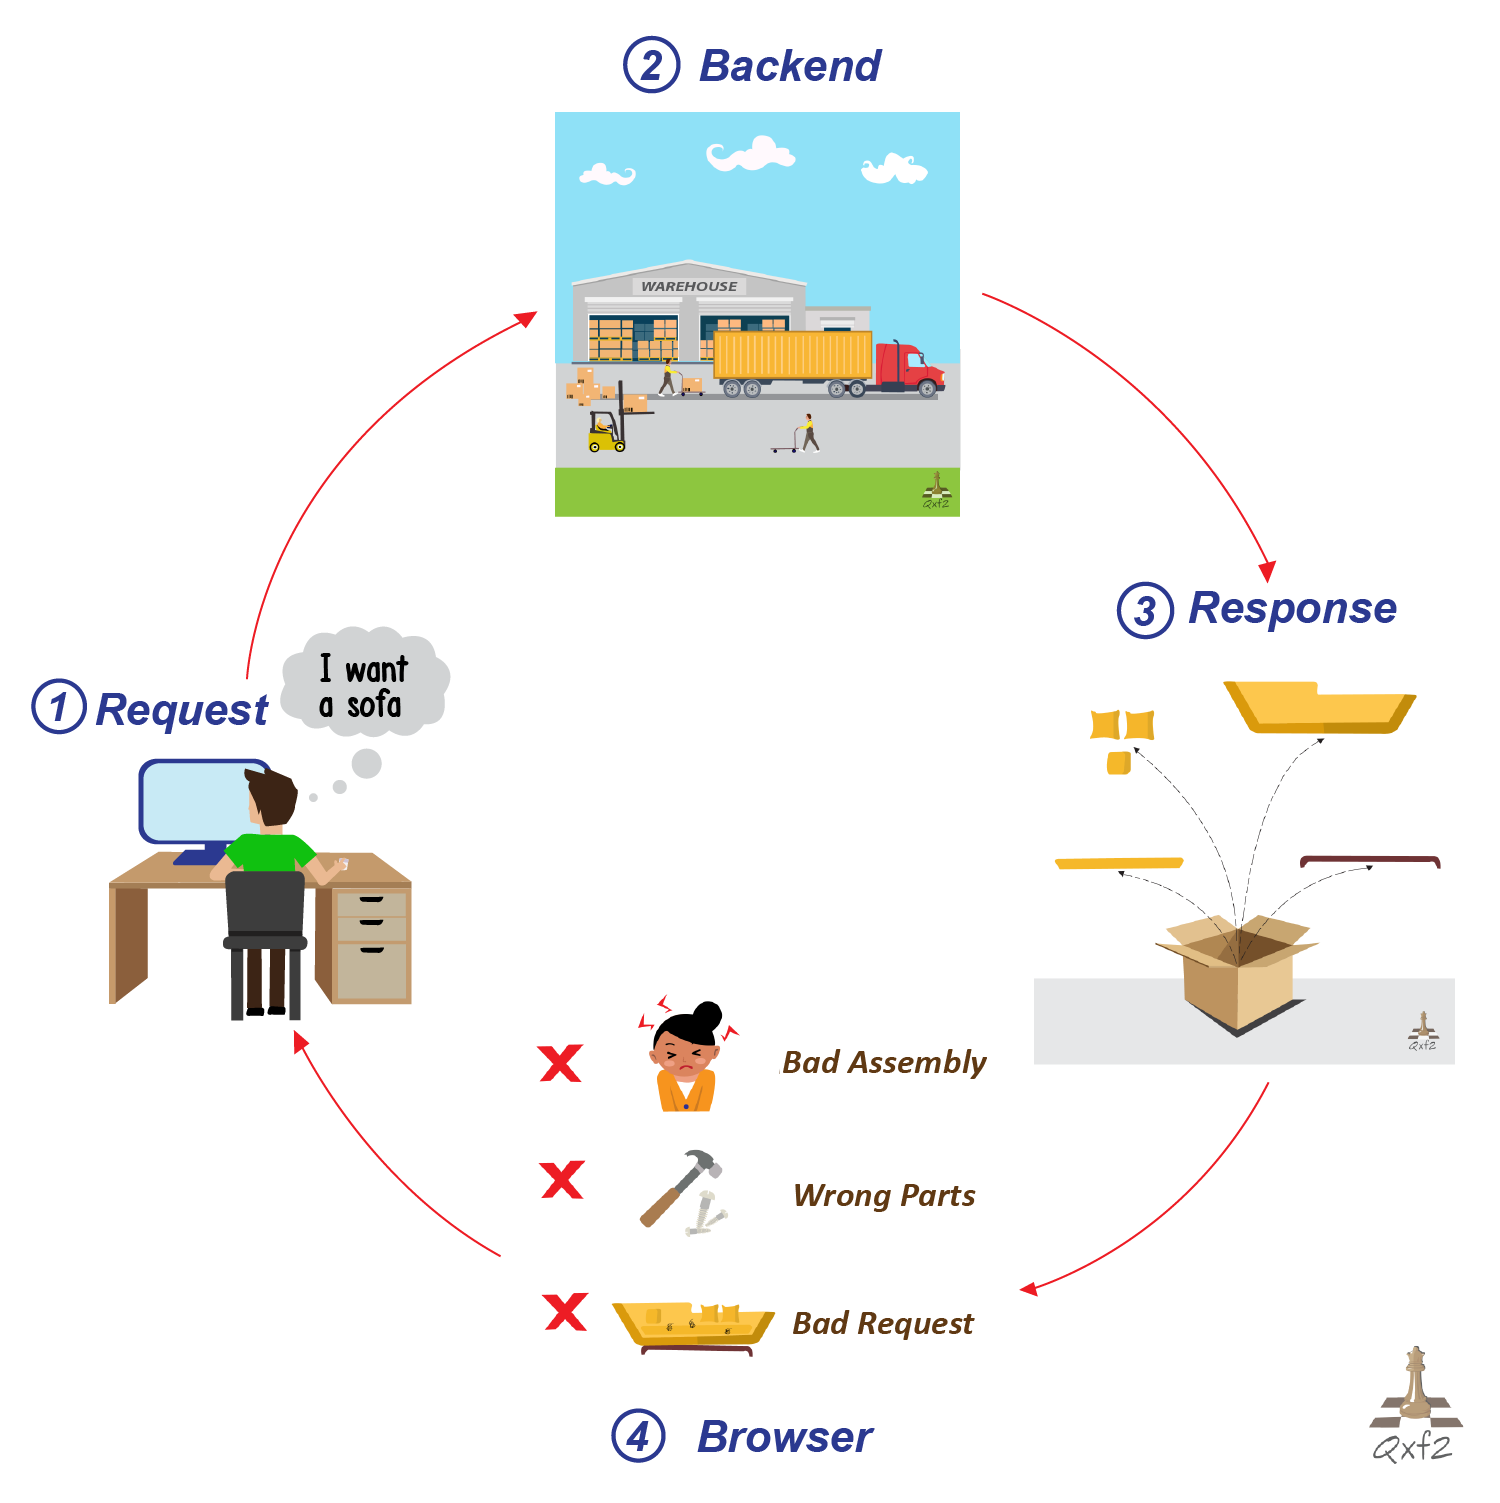
A customer orders a sofa. He provides his house address, credit card details and the model details of the product he wants. The order will be sent to Pepperfry’s warehouse. The warehouse will pack all the parts of the sofa into a box, insert assembly instructions, label the box and send it for shipping. The customer receives the box and assembles the sofa by using the instructions given.
Modern web applications behave similarly. The browser (customer in our analogy) makes a request and the web application sends back a response. Instead of sending a fully built web page (the sofa), the backend (the warehouse), sends data (pieces of the sofa) over the network (shipping) back to the browser. The browser assembles what the backend sent into something visual for the users viewing the web page.
In our analogy, the API is the part between the warehouse receiving a request and the box being shipped to the customer. So you can think of API calls as simply a combination of requests and responses without the visual aspect of the browser being involved.
So how is this helpful while testing web applications?
There are several things that could go wrong when a customer orders a sofa from Pepperfry. Some examples: the customer details are not specified properly, the incorrect order is placed, the warehouse is out of stock, the wrong parts are shipped, the shipping messes up the delivery, the product is defective, the customer assembles the parts badly, etc. Many of these problems can be detected even before the customer assembles the product. In fact, the costliest way to detect problems is to have the customer assemble all the parts and then find out something went wrong.
Similarly, when using web applications, several things could go wrong. Some examples: the browser details are specified incorrectly, the URL specified is incorrect, the backend is choking under high load, the response is formed incorrectly, the network mangles the response, the response data is incorrect, the browser assembles the data badly, etc. Many of these problems can be detected even before the browser assembles the web page. In fact, the costliest way to detect problems is to have the browser assemble all the data and then find out something went wrong.
So using APIs for testing can have these benefits:
i) you catch some errors quicker than if you used only GUI testing
ii) appropriate error message helps you isolate issues better
iii) you do not rely on the browser and so your setup is easier
The big drawback, of course, is that the API cannot catch important GUI related errors.
NOTE: Having the customer assemble all the parts, use the product and then figure out what went wrong is the surest way to identify all problems. I am not arguing that point at all. I am pointing out that it is inefficient to rely on that method in some cases. Some problems can be identified faster and isolated better even without assembling the end product. So do not stop your GUI testing – instead, start using API checks as another layer of testing for your web applications.
Key components of a web API:
Till now I have discussed how the APIs work at a high level. Hopefully you have a better feel for APIs. Now, let’s get familiar with how API calls look like. The key components of a web API call are:
1. HTTP methods
2. URL
3. data
4. headers
5. response

NOTE: This mental model is to help you get started. Please do not stop your learning here. There are concepts like cookies, session handling, authentication and security that I am not touching as part of this post.
1. HTTP methods:
HTTP method tells the server what kind of action the user wants to do. We have different HTTP methods. They are GET , POST , PUT , DELETE ,OPTIONS and HEAD. Usually, when we start using the API we will be confused which method to be used for the request. So again I am taking the example of Pepperfry for explaining the methods.
For example, if we want to:
a. view the different types of sofas, we usually use the GET method.
b. place an order, we usually use the POST method.
c. modify an existing order, we usually use the PUT method
d. cancel the order, we usually use the DELETE method.
When you are starting, just get comfortable with the idea that:
i. GET fetches something without changing anything.
ii. POST/PUT change something on the backend.
It’s ok if you are confused about the distinction between POST and PUT or cannot figure out what the other HTTP methods do.
2. URL:
The URL specifies which resource the user wants to access. For example, to view a particular sofa, the URL would be: http://www.pepperfry.com/octo-three-seater-sofa-in-light-brown-colour-by-vive-1493040.html?type=clip&pos=2:1
3. Data:
Often, we need to pass extra data when sending a request. This data is often what makes the request unique and easy to understand for the server. For example, if we want to view the availability of sofa, then the data sent with the request could be something like ‘7-seater’, ‘leather’ and ‘black color’.
We need to pass data in a format that the server (backend) understands. Modern web applications usually use two standard formats – JSON and URL encoded. If the data is passed as key/value pair in the URL after a question mark, we call that URL encoded data. JSON is another popular format for passing data. For example, if we want to view the availability of sofa, then the parameter which will be sent to the request will be in this format. {“size”:”7”,”type”:”leather”,”color”:”black”}. It is harder to observe the transfer of JSON data, but in the coming posts, we will show you how to inspect real API calls and observe the JSON data being passed.
4. Headers:
The header field gives additional information about the request. If we like to add HTTP headers to a request, simply pass in a dictionary to the headers parameter. For example {‘content-type’:’application/json’}
While sending the request, if the user specifies the content type is application/JSON, then the server understands the client or user can understand the data in the specified format given in the request. If the server sends back data in any other format, the client will throw an error.
The one more header we frequently use is session id. Why do we go for session id? HTTP is a stateless protocol, so it is difficult to keep track of the communication between the user and the server. So the session-id will be assigned to the client. When we send the request, if the session-id is specified, then the server will give the response with the same session-id. You can think of this as a customer’s unique id or home address.
Pseudo-code
Here is pseudo-code place an order to buy sofa without using a browser:
url = 'https://www.pepperfry.com' data = {“name”:”aaa”,”item”:”sofa”,”payment”:”cash on delivery”,”address”:”Qxf2 services, Bangalore”} data_format = json.dumps(data) headers = {‘content-type’:’application/json’ , ‘session-id’:”12sd3345542332”} response = requests.post(url , data , headers) |
So far we have discussed the request which we sent to the server. So this request will be taken to the server. The response will be carried back to the client. Now let’s get comfortable with the response.
5. Response:
When you are starting with APIs, you need to know of only two components of any response:
a. the status code
b. the data sent back
The ‘status code’ includes error codes that describe any errors that may have occurred when processing the request. Common response codes we get from the server are:
- 200 – Success
- 404 – Not Found
- 403 – Forbidden
- 503 – Service unavailable
- 400 –Bad Request
If the request is fulfilled then the status code we get is 200. If the specified URL couldn’t be found then we get a 404 error. If we don’t have any proper permission to access the particular page then we get 403 forbidden errors. If the particular website is down we get 503 services unavailable error.
The API response is usually data in either JSON or HTML format which is understood by the browser.
Where do I go from here?
If you are feeling a bit more comfortable about the concept of APIs, then we have a number of tutorials to guide you through your next steps. The next set of tutorials deals with concrete examples. They will show you how to
1. observe the API calls being made by your application
2. mimic API calls quickly without a browser
3. write automated API checks using Python
If you liked this article, learn more about Qxf2’s testing services for startups.
Please post your questions and comments below.
I completed my Master in Engineering (Computer Science) and moved to academia. I pursued a career in teaching for several years. I handled several undergraduate Computer Science courses: Java, Information Security, Data structures and Operations Research. I was looking for remote working opportunities that would allow me to continue pursuing my technical interests. So I joined Qxf2. I have been enjoying testing software, writing Python and picking up a whole host of other useful testing tools. I am an enthusiastic learner, highly collaborative and strive for continuous improvement. My hobbies are practicing Yoga and playing badminton.


Awesome explanation for a basic user to get started. Kudos
Very nice explanation!! Thank you!.