In our previous blog we gave you an introduction to contract testing, explained Consumer-Driven Contract Testing approach ,setting up Consumer-Driven Contract tests, using Provider states and some of its drawbacks as well. In this blog we will introduce you to the concept of Bi-Directional Contract Testing. We will also show you how to setup Bi-Directional contract tests with an illustrative example.
Note: As for early 2023, the technique of Bi-Directional contract testing is still a fairly new. Qxf2 currently lacks significant real-world experience in Bi-directional contract testing. We are sharing insights derived from our internal experiments, providing you with our firsthand learnings. While we are in the process of developing our understanding, our opinions on the subject are still evolving and not yet fully formed.
What is Bidirectional Contract Testing?
Bi-Directional contract testing is an advanced approach to contract testing that addresses some of the limitations of the Consumer-Driven Contract Testing (CDCT) methodology. While CDCT focuses on testing the contracts from the consumer’s perspective, bidirectional contract testing extends this concept by also verifying the contracts from the provider’s perspective. This ensures a more comprehensive and reliable testing process for microservices-based architectures. Bi-Directional Contract Testing uses a schema comparison approach to compare the Consumer contract against the Provider contract. As of now , Bidirectional contract tests is only supported by PactFlow.
PactFlow is an enhanced version of the Pact Broker. It offers additional functionalities necessary for effectively utilizing Pact in large-scale environments. Some of the features that PactFlow offers are single sign-on (SSO), user administration, an enhanced user interface (UI), secure storage for sensitive information and support for Bi-Directional Contract Testing.
How Bidirectional Contract Testing Works
The following image shows the workflow of Bi-Directional Contract Testing:
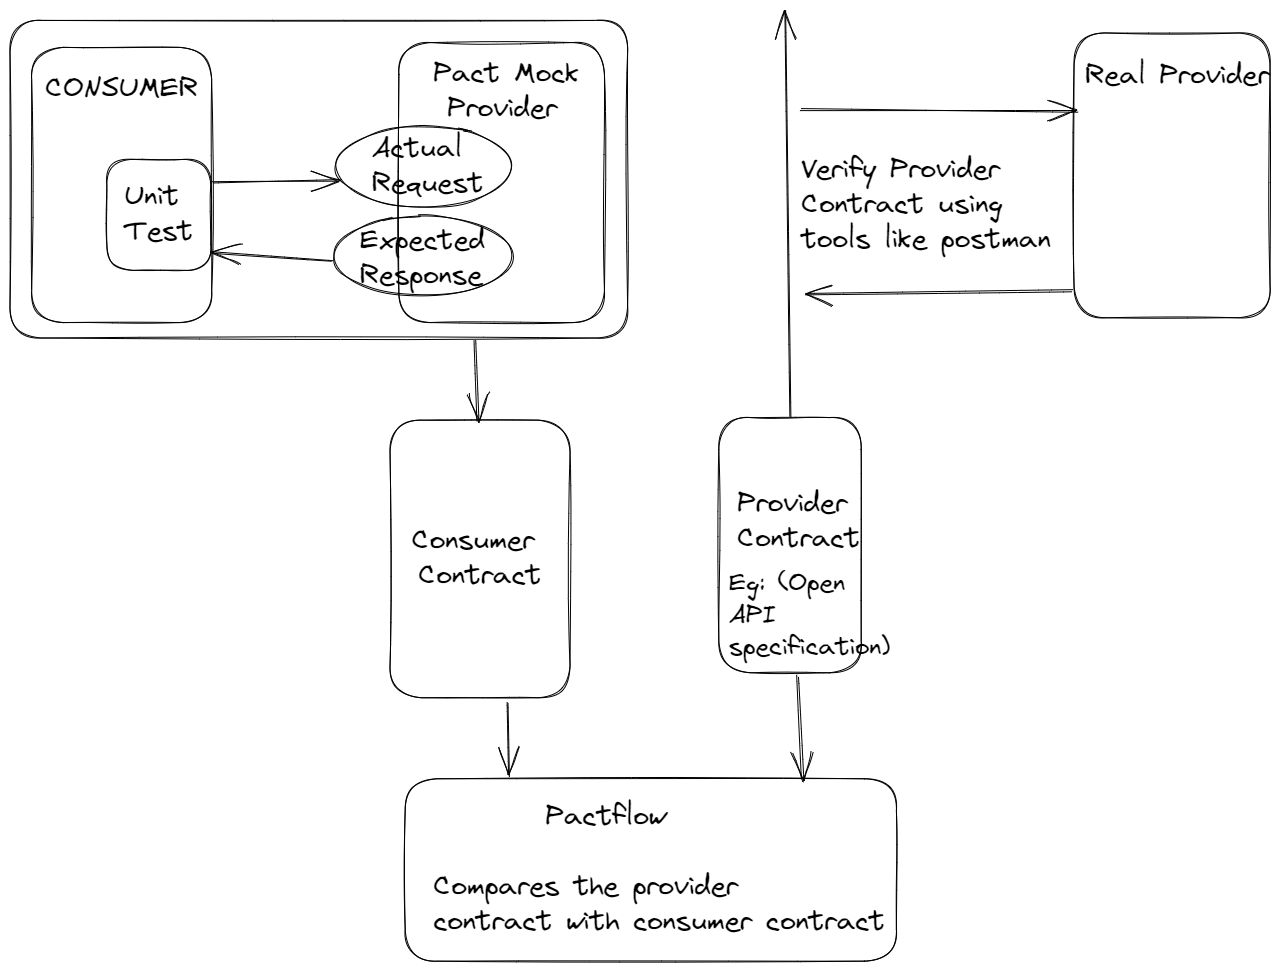
1. Just like Consumer-Driven contract testing, the Consumer writes a unit test that runs against a mock Provider to generate a contract.
2. The mock Provider can be setup using Pact within the same unit test or setup independently using any other tool like WireMock.
3. The mock Provider is configured to return an expected response when it receives a specific request.
4. The test then sends this request to the mock provider. The mock Provider checks if the request matches the expected request and then returns the response that it was configured to return.
5. The test checks if the response received from the mock Provider matches with the expected response.
6. If this passes then the expected request and the expected response for that request is captured in a contract and uploaded to a PactFlow.
7. In the Provider end, we first need to generate a Provider contract, such as an OpenAPI documentation for the Provider API.
8. The Provider contract has to be validated by testing it against the Provider using functional API testing tools such as Postman, ReadyAPI etc. or even through code using tools like Swashbuckle or Schemathesis
9. The results of this test are stored into a file
10. The Provider contract is then uploaded to PactFlow along with the test result.
11. PactFlow then compares the Consumer contract with the Provider contract to ensure the Consumer contract is a valid subset of the Provider contract.
12. Finally, the verification results are generated indicating if either Consumer or Provider breaches each others contract or not
For a more detailed explanation on the workflow of Bi-Directional Contract Testing, we have created a video for the same:
Setting up Bidirectional Contract Test for Newsletter Automation Application
In our previous blog we had shown setting up Consumer-Driven Contract tests for the Qxf2 Newsletter Automation application. Now let’s see how we can setup Bi-Directional contract test for it.
Now, the first step is to create a Consumer contract. We already created this contract and went through the steps to do so in our previous blog. We will use the same Consumer contract for our Bi-Directional contract test as well. So, lets see how we can upload this Consumer contract to PactFlow.
Uploading Consumer Contract to PactFlow
Once you signup to PactFlow, you would be provided with you’re own PactFlow server. We need to upload our contracts to this server.
1. We will be using the Pact Broker Client standalone executable which we setup in our previous blog here as well, to upload our contracts.
2. We can upload our consumer contract with the following command:
<path-to-your-pact-standalone-folder>/bin/pact-broker.bat publish <Path-to-your-contract> --broker-base-url <Pact-Broker-URL> --consumer-app-version <Version> --branch <Branch-name> --broker-token <PactFlow-Read/write-API-token> |
Example:
/d/pact/bin/pact-broker.bat publish /d/code/qxf2-lambdas/pacts/newsletterlambda-newsletterapi.json --broker-base-url https://test-qxf2.pactflow.io/ --consumer-app-version 1.0 --branch Newsletter_Consumer --broker-token dummytoken |
Note: You can find your PactFlow Read/Write API token under setting->API Tokens in your PactFlow server UI.
3. If the contract get’s uploaded successfully, you should be able to see a similar output in your terminal:

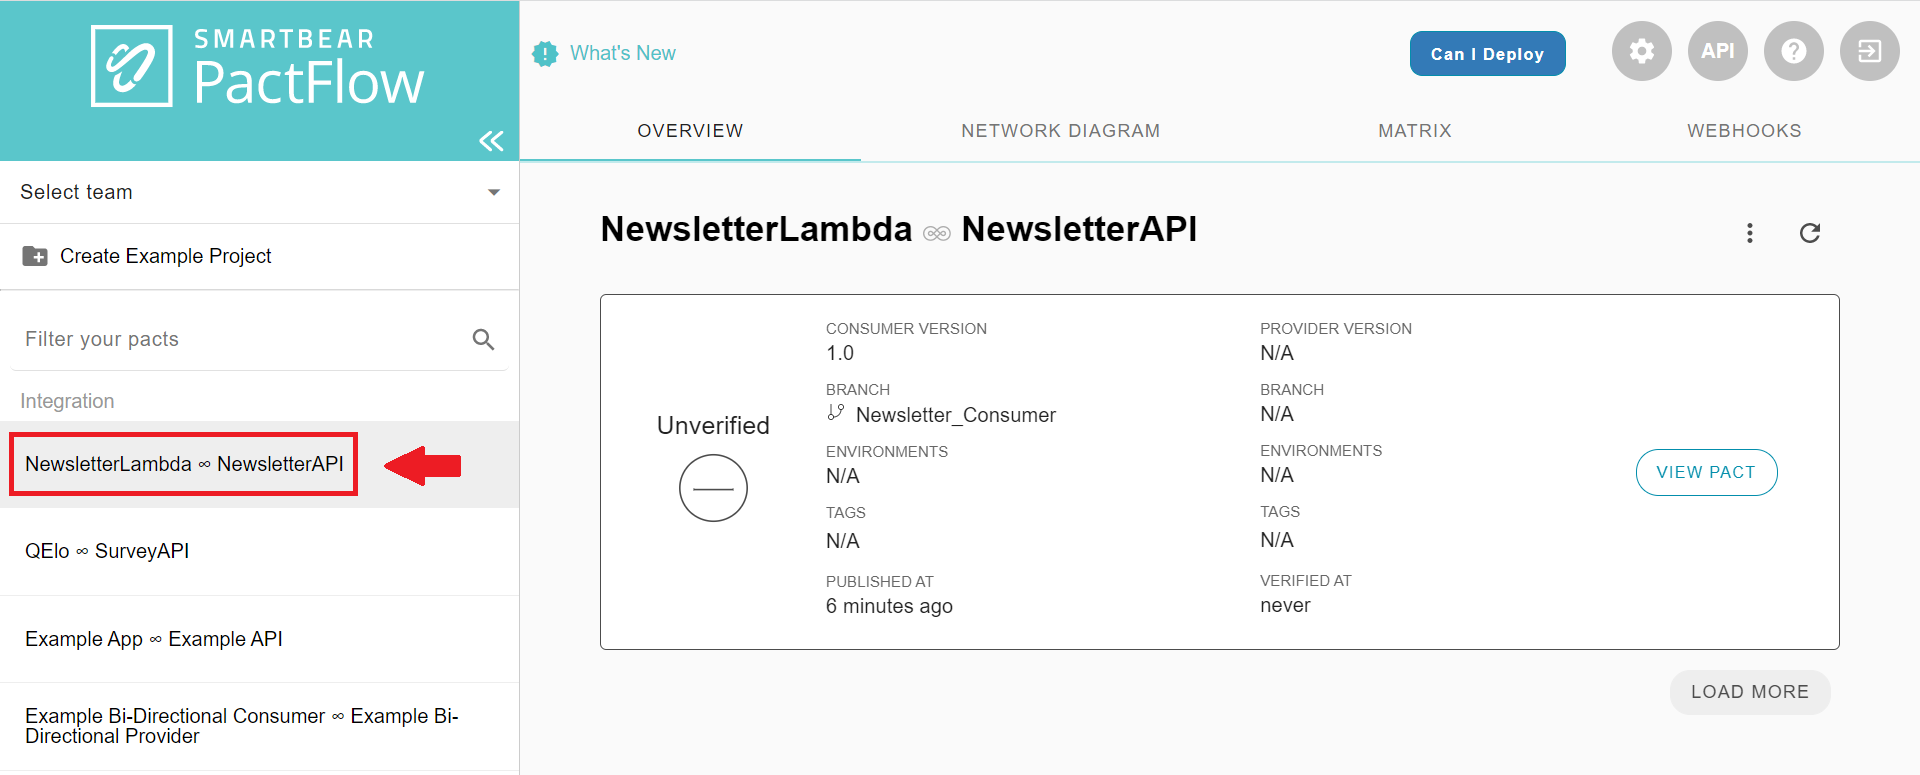
4. Login to your PactFlow server. You should be able to see a new Pact created with the name of the Consumer and Provider that you had specified in your Contract.
Now, that we have our Consumer contract uploaded, let’s see what goes on in the Provider end.
Getting Provider Contract
In the Provider end, we first need to get a Provider Contract. This contract is an OpenAPI documentation for our Provider API. If you don’t have it already , you can modify your Provider codebase using tools like APIFlask to generate an OpenAPI documentation. In our case we already have an OpenAPI documentation for the Newsletter Automation API provider, which will be our Provider contract. We have named this file as newsletter_automation_oas.json
1. Let’s see the specification for the API endpoint that we will be testing in the documentation
        "/api/articles": {
            "post": {
                "parameters": [],
                "responses": {
                    "200": {
                        "content": {
                            "application/json": {
                                "schema": {}
                            }
                        },
                        "description": "Successful response"
                    }
                },
                "summary": "To add articles through api endpoints"
            }
} |
2. We need to modify the above specification by adding an expected request and also define the schema for the expected response. Tools like Schemathesis would use this API specification to generate test cases.
        "/api/articles": {
            "post": {
                "parameters": [],
                "requestBody": {
                    "content": {
                        "application/x-www-form-urlencoded": {
                            "schema": {
                                "additionalProperties": false,
                                "type": "object",
                                "properties": {
                                    "url": {
                                        "type": "string",
                                        "minLength": 15,
                                        "pattern": "\\Awww[.]contract-test-[0-9][.]com\\Z"
                                    },
                                    "category_id": {
                                        "type": "integer",
                                        "minimum":1,
                                        "maximum":5
                                    },
                                    "article_editor":{
                                        "type": "string",
                                        "minLength": 5,
                                        "pattern":"\\APact-tester\\Z"
                                    }
                                },
                                "required": [
                                    "article_editor",
                                    "category_id",
                                    "url"
                                ]
                            }
                        }
                    },
                    "required": true
                },
                "responses": {
                    "200": {
                        "content": {
                            "application/json": {
                                "schema": {
                                    "additionalProperties": false,
                                    "type": "object",
                                    "properties": {
                                        "message": {
                                            "type": "string"
                                        }
                                    },
                                    "required": [
                                        "message"
                                    ]
                                }
                            }
                        },
                        "description": "Successful response"
                    }
                },
                "summary": "To add articles through api endpoints"
            }
} |
3. As you can see in the above JSON file, we have added the expected request to the API specification using the requestBody block. We have defined the content-type and schema properties for the request body. Tools like Schemathesis would use these details to automatically generate different request bodies(test cases).
4. We have also defined the properties of the response body schema. The test would use this to compare if the actual response received from the provider by passing the expected request, matches with the expected response body that we have defined.
Now that we have defined our OpenAPI specification, let’s see how we can validate this specification against the Provider.
Verifying the Provider Contract Against the Provider
In order to validate the authenticity of our Provider Contract, we need to test this contract against the Provider.
1. In this case, we will be using Schemathesis to write a simple test to validate the documentation of the API endpoint that the Consumer uses.
2. We will be writing the test using Python. So, let’s start off by installing the required libraries.
pip install schemathesis hypothesis pytest
3. Next create a new Python file. Lets name it newsletter_automation_schema_test.py
4. Now, lets import the required libraries in our Python test
import os import schemathesis from hypothesis import settings |
5. Next, lets pass the OpenAPI documentation and the URL of our Provider API to schemathesis.
schema = schemathesis.from_path("newsletter_automation_oas.json", base_url="http://127.0.0.1:5000") |
6. Now, we are all set to write our test function to validate the openAPI documentation against our Provider API.
@settings(max_examples=20) @schema.parametrize(endpoint="/api/articles\\Z") def test_newsletter_api(case): """ Test the Newsletter API for retrieving articles. Args: case: Test case generated by schemathesis. """ case.call_and_validate(headers={"x-api-key": os.environ.get("API_KEY")}) |
In the above code we use @settings(max_examples=20) to automatically generate 20 random test cases based on the specification provided in the opneAPI documentation. These test cases are passed as an argument to the test function. schema.parametrize is used to set the API endpoint to run our test against. And finally, the call_and_validate method is used to send the auto-generated request to the Provider API and validate if the response received matches with the response specified in the OpenAPI documentation.
7. Our complete code should look similar to this:
""" This module contains a test for the Newsletter Automation API. The test validates the API's endpoint for retrieving articles ie. '/api/articles', against the OpenAPI documentation. It uses schemathesis and hypothesis libraries for test case generation and validation. """ import os import schemathesis from hypothesis import settings schema = schemathesis.from_path("newsletter_automation_oas.json", base_url="http://127.0.0.1:5000") @settings(max_examples=20) @schema.parametrize(endpoint="/api/articles\\Z") def test_newsletter_api(case): """ Test the Newsletter API for retrieving articles. Args: case: Test case generated by schemathesis. """ case.call_and_validate(headers={"x-api-key": os.environ.get("API_KEY")}) |
8. Run the test using command:
pytest newsletter_automation_schema_test.py --junitxml=newsletter_automation_api_test_result.xml |
The above command runs the test and stores the test results in newsletter_automation_api_test_result.xml file.
Now that we have our test results ready, lets see how we can upload the Provider contract and test results to PactFlow.
Uploading Provider Contract to PactFlow
We will use the Pact Broker Client standalone executable, the same tool that we used to upload the Consumer contract, to upload the Provider Contract as well.
1. The following command is used to upload the Provider contract
<path-to-your-pact-standalone-folder>/pactflow.bat publish-provider-contract <Path-to-your-Provider-contract> --broker-base-url <Pact-Broker-URL> --broker-token <PactFlow-Read/write-API-token> --provider <Provider-name> --provider-app-version <Provider-version> --branch <Provider-branch-name> --content-type <content-type-of-Provider-contract> --verification-results <path-to-test-result-file> --verifier <tool-used-to-verify> --verification-results-content-type <content-type-of-test-results-file> --verification-exit-code <status-of-test> |
Example:
/d/pact/bin/pactflow.bat publish-provider-contract newsletter_automation_oas.json --broker-base-url="https://test-qxf2.pactflow.io" --broker-token dummytoken --provider NewsletterAPI --provider-app-version 1.0 --branch Newsletter_Provider --content-type application/json --verification-results newsletter_automation_api_test_result.xml --verifier schemathesis --verification-results-content-type xml --verification-exit-code=0 |
Note: Make sure the Provider name matches with the name of the Provider specified in the Consumer contract.
2. On successful publication of the contract, your terminal output would look similar to this:

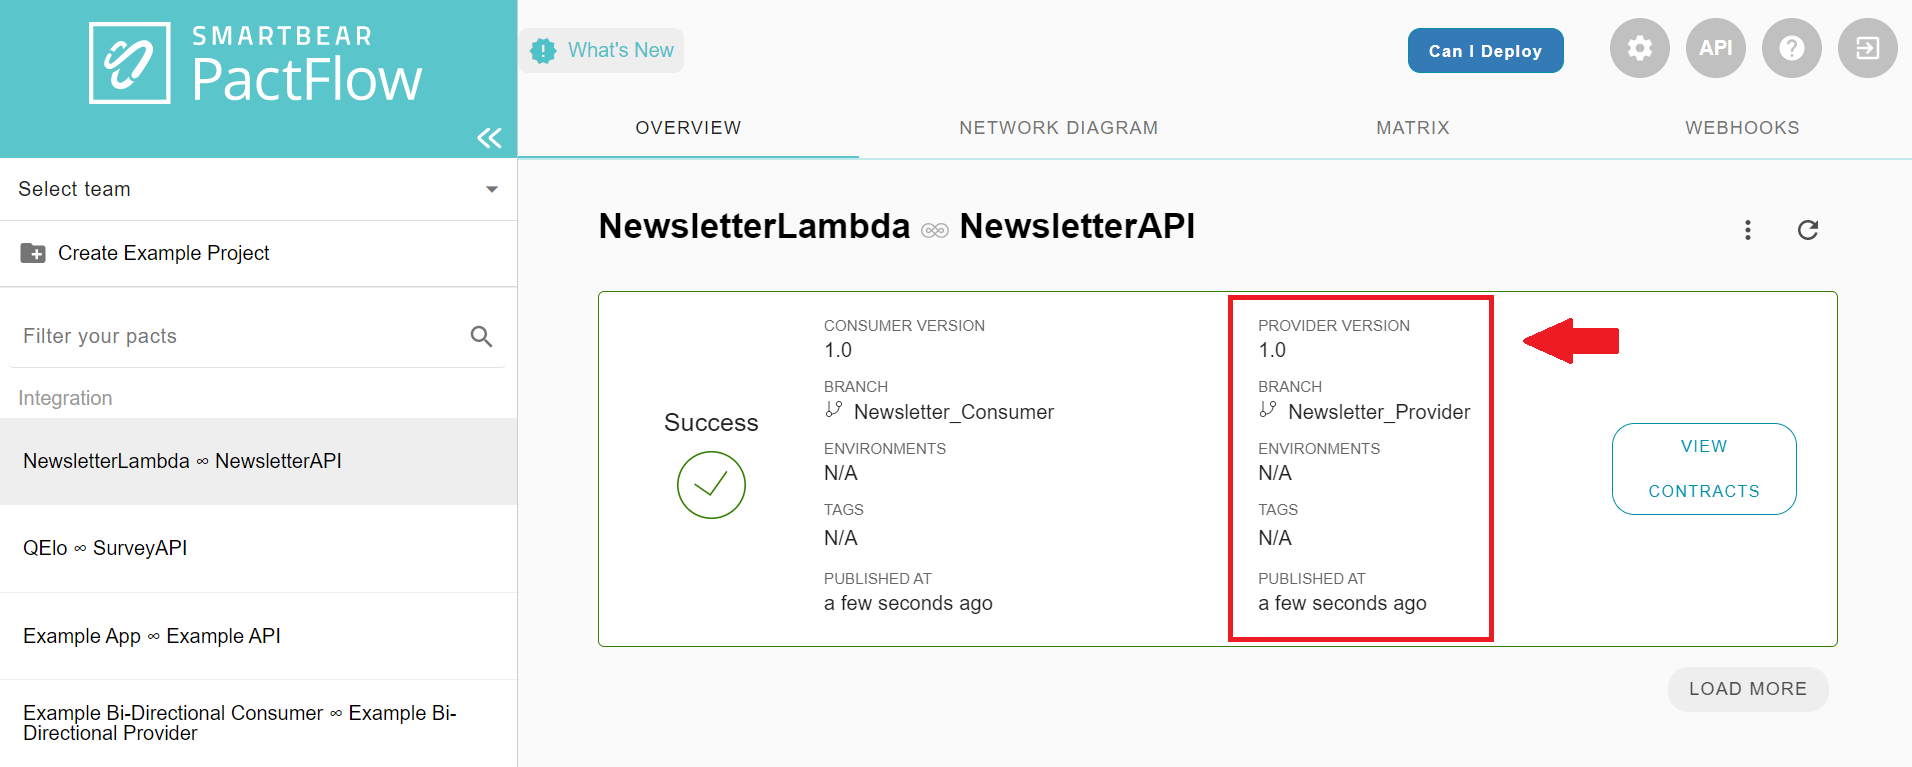
3. Next, login back to your PactFlow server. You would notice that the Provider contract details would be displayed now alongside the Consumer contract
Viewing Test Results on PactFlow
PactFlow compares the Consumer contract with the Provider contract to check if the Consumer contract is a valid subset of the Provider contract. The verification results are then published.
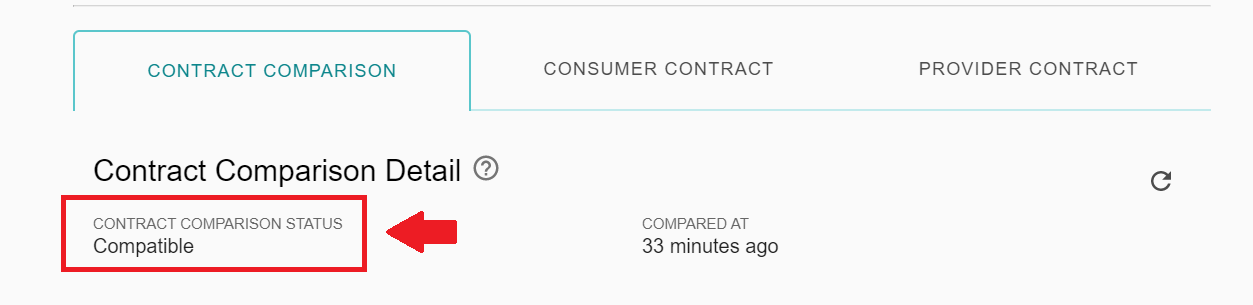
1. You would be able to see if the verification was successful or not in the overview page itself.
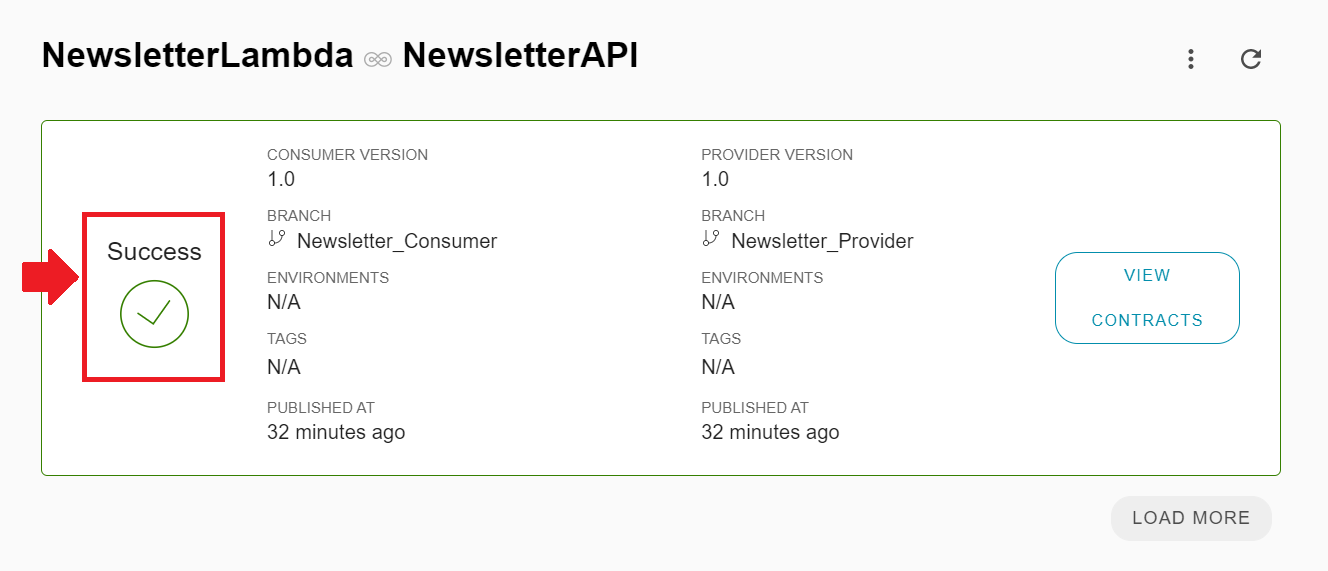
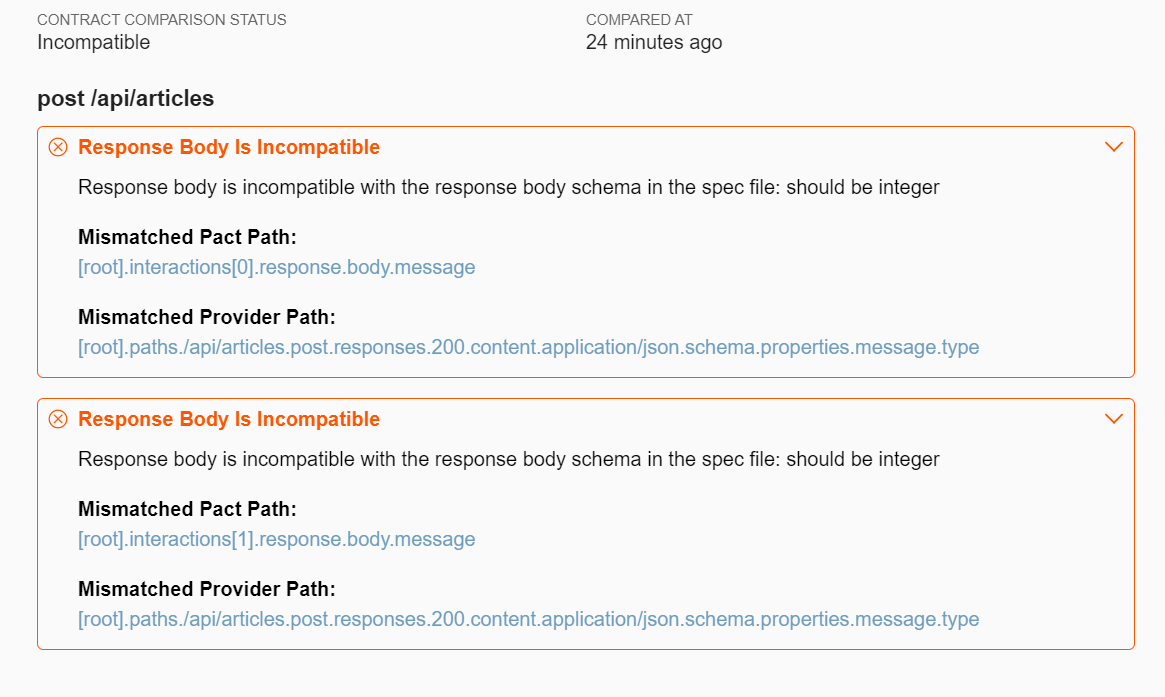
2. In our case, the verification was successful. However, if the verification fails, you can click on View Contracts option to check the details of what went wrong. You would be redirected to a contract comparison page where you can see the details of the failures if any.
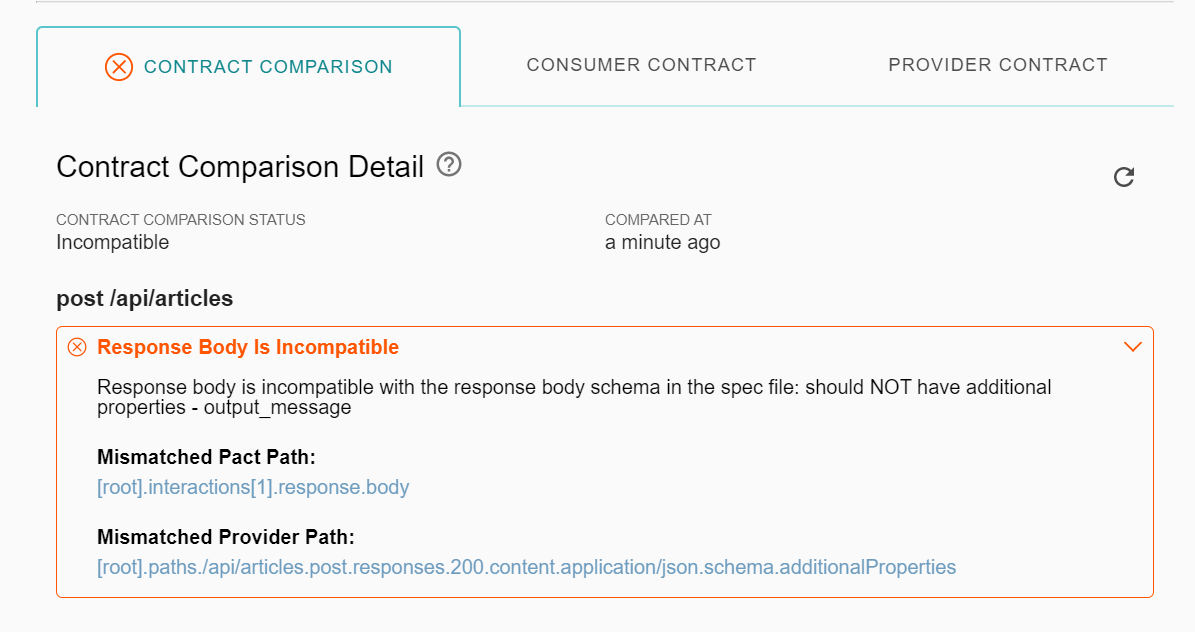
3. Let’s take a look at the error we get when the response body in the Consumer contract does not match with the response specified in the Provider contract.
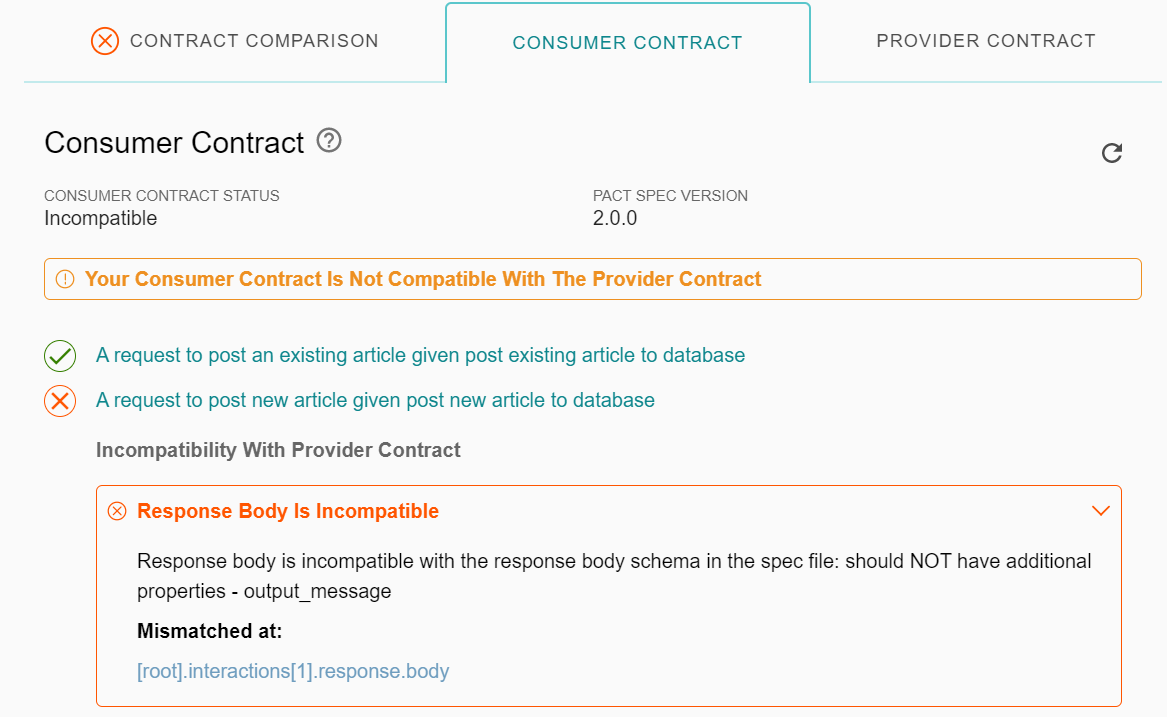
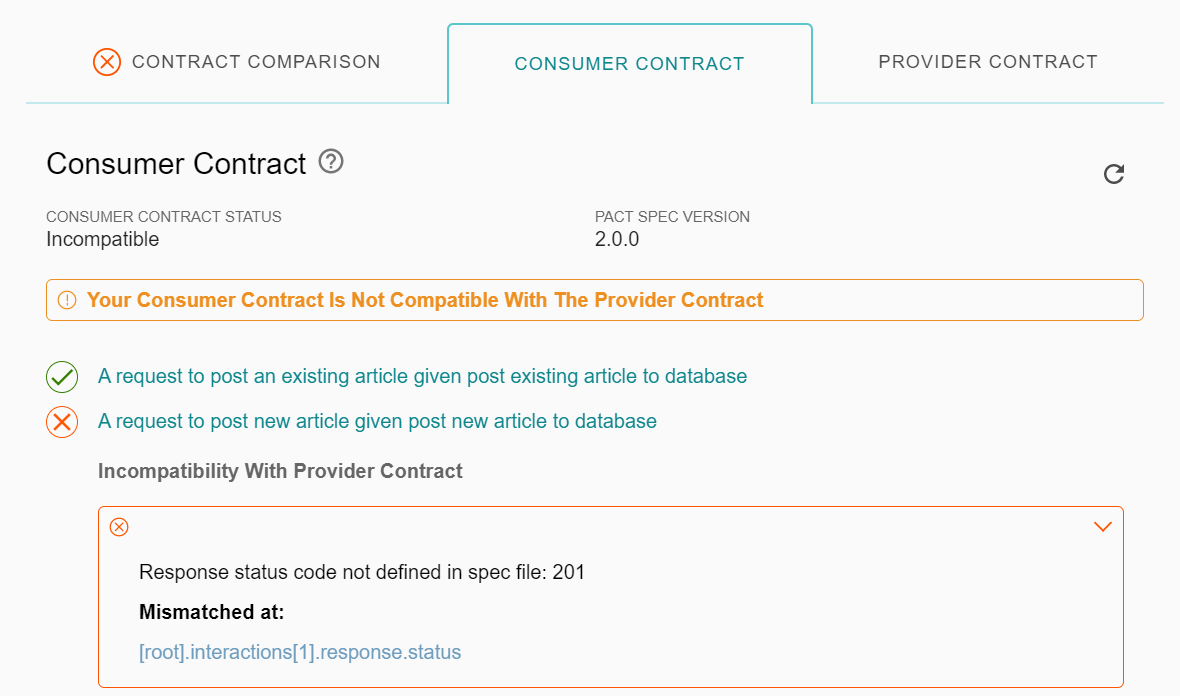
4. To know the specific interaction that failed, click on the Consumer Contract tab.
5. Similarly. lets take a look at the error we get when there is a mismatch in the response status code.
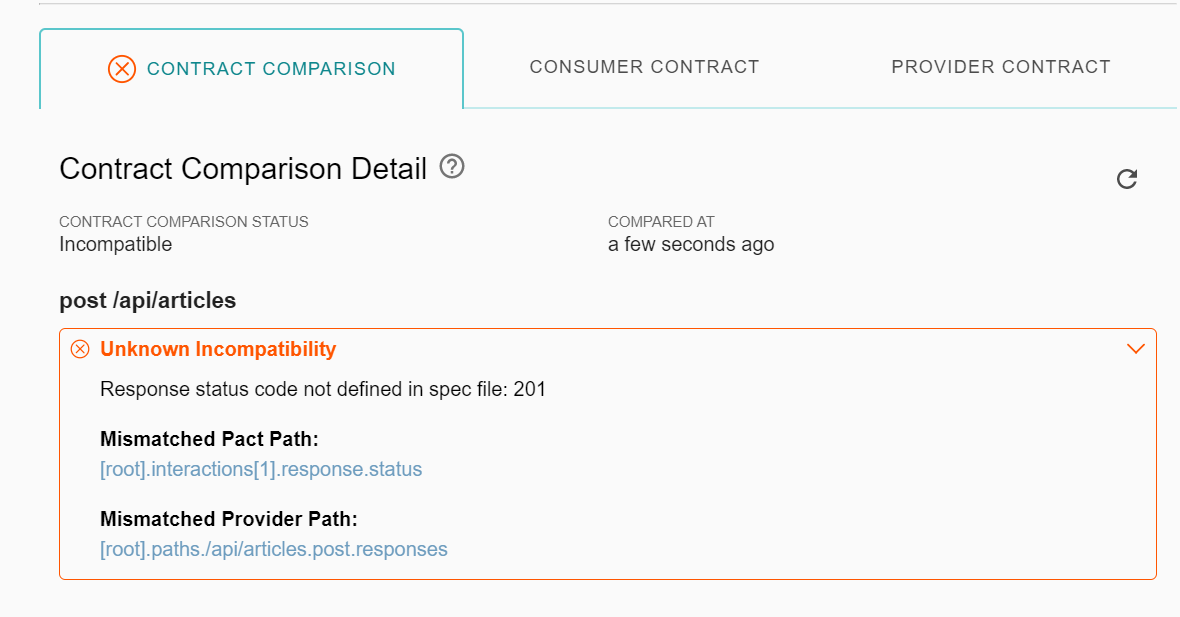
6. And to know the interaction that failed, let’s go to the Consumer Contract tab.
7. Finally, lets also take a look at the error response we get when there is a mismatch in response type.
8. We have given you just a few examples of failures that result in contract incompatibility. There are numerous other instances of failures which causes incompatibilities between contracts.
Final thoughts
As seen in the above example , Bi-Directional Contract Testing is an excellent way to get started with contract testing. It leverages the existing tests and specifications, as a result enabling us to get our contracts uploaded and verified pretty easily. Bi-Directional contract Testing is still a fairly new concept as of now. As Pact expands its support for various tools and specification standards, the popularity of Bi-Directional Contract testing is expected to rise.
Qxf2’s Technical Testing Expertise
Qxf2 brings you the technical testing expertise your company needs. Our team of experienced testers possesses in-depth knowledge of testing methodologies and cutting-edge technology. We seamlessly integrate with small engineering teams, collaborating closely to deliver high-quality results. With a flexible approach, we adapt to various tech stacks, ensuring our testing capabilities align with your unique requirements. Trust Qxf2 to empower your software testing initiatives and drive success. Contact us today!

I am a QA Engineer. I completed my engineering in computer science and joined Qxf2 as an intern QA. During my internship, I got a thorough insight into software testing methodologies and practices. I later joined Qxf2 as a full-time employee after my internship period. I love automation testing and seek to learn more with new experiences and challenges. My hobbies are reading books, listening to music, playing chess and soccer.

