It is useful to be able to view your Selenium tests running within a Docker container. This can help you to debug issues better and have more confidence in your tests. We found the ability to look at the tests especially useful when performing some complex actions like drawing, dragging, dropping, etc. To view the Docker container’s display, we setup up good old VNC in the container and used VNC viewer to see the display of Docker container. This blog will help you in case you too want to setup VNC Server and VNC Viewer and view the Container display.
NOTE: If you are totally new to Docker, please consider reading our previous post first.
Steps to setup with VNC and view container display:
For our demo, we will use the Qxf2-pom-essential docker base image and Qxf2 public page object model which we have discussed as part of our previous post. Below are the steps involved to get set up with VNC.
- Setup and enable VNC server on the Container
- Setup VNC viewer on your local system
- Connect to VNC server using IP and Port Address
Step 1: Setup and enable VNC server
To setup and enable VNC server, we need to
a) Install VNC server
b) Expose port to connect and share display data with VNC Viewer
c) Enable VNC server along with the password and display arguments details.
For this post, we are going to use a Docker file and a shell script file. This will help us to clone our Qxf2 public page object model into the container using git, install VNC server, expose port, enable VNC and run the test.
NOTE: For the demo, we will use git to get our open source code inside the container. Ideally, we would prefer to use Docker volume feature to get the code inside the container. Avoid git in case you are using a private repository due to security reasons.
The Dockerfile below will run Qxf2 POM tests and view the test running across Chrome/Firefox using VNC viewer. For more details about how to use our Qxf2-pom-essential image for running Selenium tests refer to the blog post here.
Pay special attention to the lines that:
a) installs VNC (using apt-get)
RUN pip install --upgrade pip \
        && apt-get update \
&& apt-get install -y git x11vnc |
b) open up port 5920
#Expose port 5920 to view display using VNC Viewer EXPOSE 5920 |
Our entire Dockerfile looks like this:
#Content of the entire Dockerfile #Dockerfile built to run Qxf2 POM tests and view the test running across chrome/firefox using VNC viewer FROM qxf2rohand/qxf2_pom_essentials MAINTAINER Qxf2 Services #Upgrade pip, install Git & VNC RUN pip install --upgrade pip \ && apt-get update \ && apt-get install -y git x11vnc # Add entrypoint.sh and other available files to image ADD . /usr/qxf2_pom #Change directory and clone Qxf2 Public POM repo RUN cd /usr/qxf2_pom \ && git clone https://github.com/qxf2/qxf2-page-object-model.git #Set envirnmental variable for display ENV DISPLAY :20 #Set working directory WORKDIR /usr/qxf2_pom/qxf2-page-object-model #Install requirements using requirements.txt RUN pip install -r requirements.txt #Provide read, write and execute permissions for entrypoint.sh and also take care of '\r' error which raised when someone uses notepad or note++ for editing in Windows. RUN chmod 755 /usr/qxf2_pom/entrypoint.sh \ && sed -i 's/\r$//' /usr/qxf2_pom/entrypoint.sh #Expose port 5920 to view display using VNC Viewer EXPOSE 5920 #Execute entrypoint.sh at start of container ENTRYPOINT ["/usr/qxf2_pom/entrypoint.sh"] |
The shell script file i.e. entrypoint.sh file below will help to configure and run the VNC server along with starting the xvfb, pulling the code from git and then running the test.
#!/bin/bash # entrypoint.sh file for starting the xvfb with better screen resolution, configuring and running the vnc server, pulling the code from git and then running the test. export DISPLAY=:20 Xvfb :20 -screen 0 1366x768x16 & x11vnc -passwd TestVNC -display :20 -N -forever & cd /usr/qxf2_pom/qxf2-page-object-model/ git pull pytest -B chrome -s -v > pytest_report.log wait |
To create an image using above dockerfile, you need to save both files at same directory and use the following command:
docker build -t new-image-name Path/to/Dockerfile |
Step 2. Setup VNC viewer on your local machine
VNC server sends/transmit display data information over a specified port. To catch and read that data, we need to get setup with VNC viewer which acts as a client. VNC viewer is available for multiple platforms, you can download it for your platform from RealVNC and install it.
Step 3. Connect to the VNC server using IP and Port Address
To connect VNC viewer to VNC server, you need to know the IP address and port address.
Get IP Address: You need to use the following command to get IP Address.
docker-machine ip |
NOTE: docker-machine ip command won’t work on Linux. Use host name i.e. ‘localhost’ instead of IP address.
Get PORT address: Port address will depend on ‘docker run’ command. In step 1, we built an image which includes VNC server and our Qxf2 public pom code. When we create Docker container using the following command, it will enable display along with Xvfb, VNC server and run the test across chrome.
docker run -it -p 5920:5920 image-name-which-provided-in-step-1 |
Above command connects/maps local host port 5920 to container port 5920 and to view the running tests on display, you need to connect with VNC server quickly because once test run gets finished it will show you only black screen.
Now, we know both IP and port address. Next, we need to connect with VNC viewer using both IP and port address. To connect with VNC Viewer, you need to follow following steps.
- Open VNC Viewer: Look at VNC Viewer IDE in following Fig. 1.

Fig. 1 VNC Viewer IDE - To connect with VNC Server, enter IP Address/hostname and port address in search bar. IP Address/hostname and port address must be separated using ‘:’. For example:
For windows: docker-machine ip: port numberXXX.XXX.XX.XXX:5920
For Linux: local host ip/ hostname: port numberlocalhost:5920
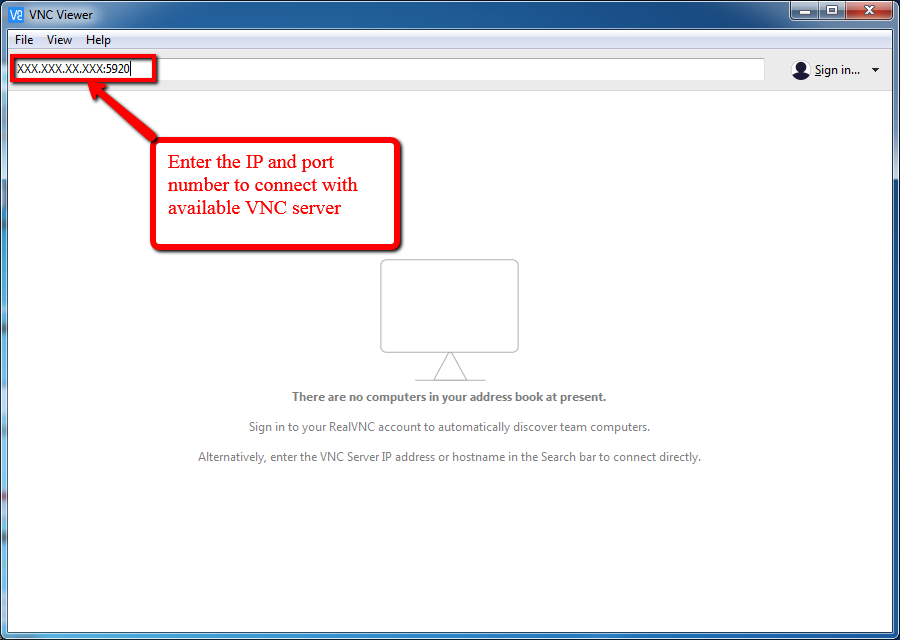

Fig. 2 Enter IP address and Port number to connect with VNC server - After entering IP and Port number, you will come across following encryption window shown in fig 3.
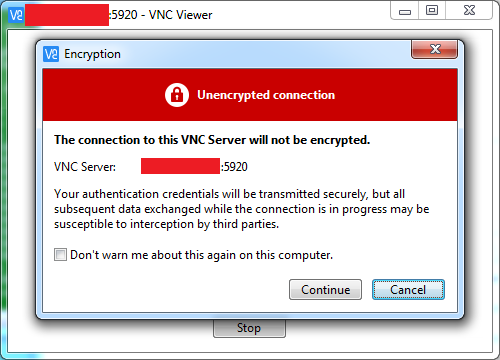

Fig. 3 Encryption Window
Click on ‘Continue’ button on window to move ahead. - Click on ‘Continue’ button, you will visit following window shown in fig 4.
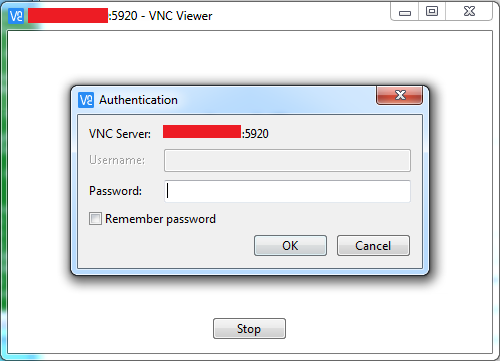

Fig. 4 Enter Password to connect and view display
Enter password here to connect with VNC server and view docker container display. For above dockerfile, the password to connect VNC server is ‘TestVNC’. You can change the password by editing entrypoint.sh file before building the image. - Once you get connected with VNC server successfully, you can the view the docker container dispaly your tests running on chrome as shown in fig 5.
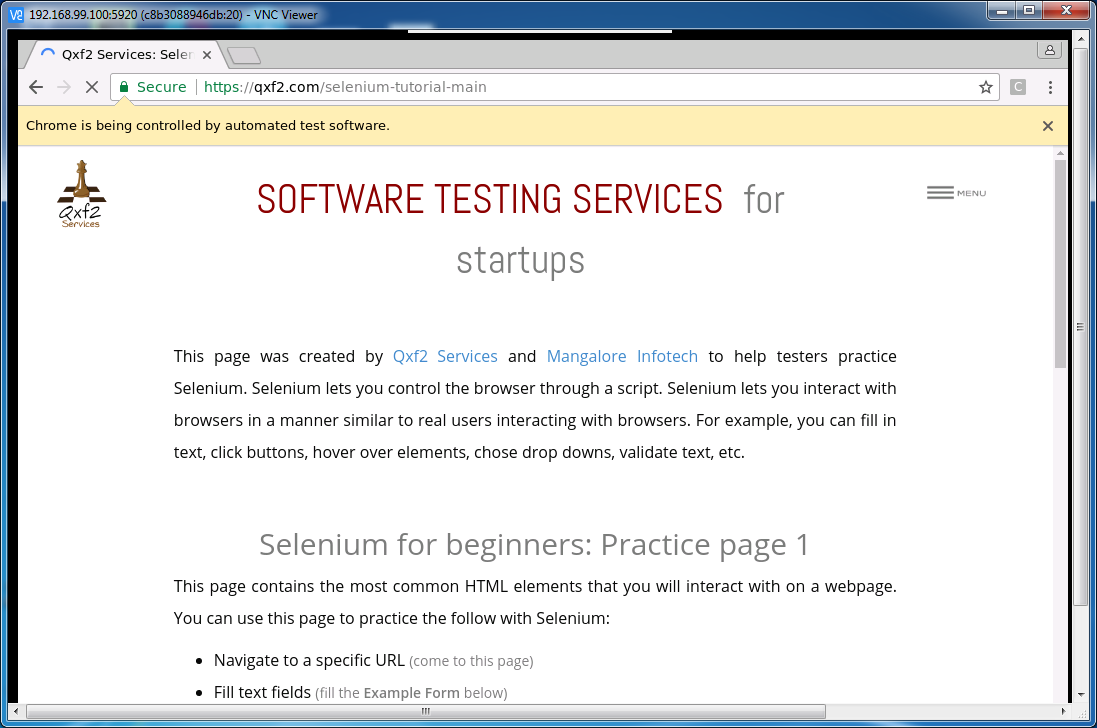

Fig. 5 Docker Container Display
Hope you enjoyed this post. To know more about the different ways to get your code inside the container, please stay tuned. We will post it soon.
If you are a startup finding it hard to hire technical QA engineers, learn more about Qxf2 Services.
QA services for startups and early-stage products by Qxf2 Services
This article is courtesy of Qxf2’s commitment to sharing what we learn. We are among the rare breed of testers who continually learn, evolve and share our learning with the larger testing community. Expert testers who are technical as well are worth their weight in gold. They elevate any software team that works with them. In addition to top-notch technical testers, Qxf2 provides many excellent software testing services geared towards startups that are usually not found in the market. Like front-loaded QA, fractional QA, specialized roles, catch-up services for startups that have taken on too much testing debt, etc. If you are a startup looking for QA, we encourage you to visit our website and get in touch.

I love technology and learning new things. I explore both hardware and software. I am passionate about robotics and embedded systems which motivate me to develop my software and hardware skills. I have good knowledge of Python, Selenium, Arduino, C and hardware design. I have developed several robots and participated in robotics competitions. I am constantly exploring new test ideas and test tools for software and hardware. At Qxf2, I am working on developing hardware tools for automated tests ala Tapster. Incidentally, I created Qxf2’s first robot. Besides testing, I like playing cricket, badminton and developing embedded gadget for fun.


After Mentioning vnc running port to 5920 in entrypoint , it got worked ..
x11vnc -rfbport 5920 -passwd TestVNC -display :1 -N -forever &
yes, adding the resolution option worked for me also.