This post will help you in modifying the Qxf2’s open-sourced test automation framework to use with your new project. In this post, you will learn about the files and folders to edit and delete so you can use the framework to write tests for your web or mobile application.
If you want to read more before you start
Here is a quick refresher on the various framework components. The framework (based on the page object pattern) essentially consists of the following components:
- Driver Factory – returns appropriate drivers for the browser.
- Page Factory – returns page objects.
- Base Page – consists of wrappers around common selenium operation.
- Fixtures – since we run tests with pytest, there are useful fixtures added in the conftest file.
- Conf files- every page has its conf files.
If you want a more detailed introduction to our test automation framework, you can read our framework’s wiki.
Overview
The rest of this post will show you:
1. Setup
2. Cleanup (deletions)
3. Edits
1. Setup
We assume you have already gotten setup with our framework, run the sample tests it comes with, evaluated it and then decided to implement it in your project. If not, please:
a) Click the Use This Template button on the Qxf2’s Page Object Model framework that uses python.
b) follow the setup instructions in the readme.md on GitHub
c) run one of the existing tests to ensure you are fully setup (pytest-k example_form)
2. Cleanup
Note: There is also a clean-up script clean_up_repo.py is available under utils folder, which can be used to delete all the files mentioned in the above section.
Please follow these steps to clean up(delete examples and related files).
- Delete all test files under the tests folder, don’t delete init.py.
- test_boilerplate.py can be edited and used to write your tests. This holds the skeleton to start writing tests quickly.
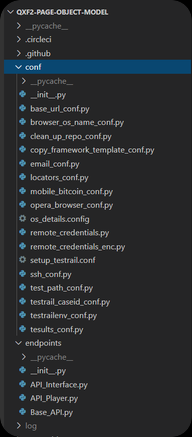
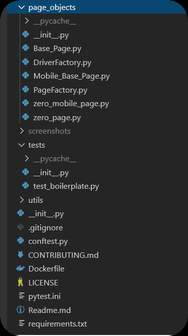
Then, delete files mentioned in the table below:
| conf folder | page_objects folder | endpoints folder |
|---|---|---|
|
|
|
- After cleanup, the folder structure should look similar to the image below :
3. Edits
You will have to make a few edits to let the framework know about your web or mobile application. You will also have to remove a couple of lines of code that refer to the example that we ship with.
- conf/base_url_conf.py holds the reference to the entry point to the app. Hence mention the base URL of the web application under test.
- page_objects/PageFactory.py file holds references to the pages being used in your application. Remove the imports and if-else conditions related to our example. Import the new pages you have added to your project.
- conf/locators_conf.py file has locators that apply to our example. You can delete the locators and replace them with the locators used in your application.
- The Readme file explains how the framework can be used. We suggest you can edit the readme as per your usage for easy collaboration among your team members.
Now you can add new tests and implement the test cases using our framework. Tests can be run with pytest. Hope by following this blog, you are able to quickly start using our framework. Happy testing!

I started my career as a Dotnet Developer. I had the opportunity of writing automation scripts for unit testing in Testcomplete using C#. In a couple of years, I was given the opportunity to set up QA function for our in-house products and that’s when I became full-time Tester. I have an overall 12 years of experience. I have experience in Functional – Integration and Regression Testing, Database, Automation testing and exposure to Application Security and API testing. I have excellent experience in test processes, methodologies and delivery for products in Information security and Pharma domain. On the Personal side, I love playing with kids, watch Football, read novels by Indian Authors and cooking.

