This post aims to help testers create a test environment for practicing testing microservice-based architecture. A lot of testers would like to learn how to test applications that are loosely coupled microservices. But testing these applications generally require access to cloud based infrastructure. So the most common way professional testers first test such applications is at their day job. This is not ideal. At Qxf2, we built out a simple application (called newsletter generator) that lived in AWS land and used it to practice testing loosely coupled microservices.
We are now open-sourcing this application, so you can set it up yourself and practice your testing skills. Since many of you might be new to cloud-based DevOps, we have greatly simplified the deployment process. Using Terraform, you can quickly deploy the newsletter generator app. With just a few configuration changes, you can build and use the app for testing.
Note: You do need your AWS account to be able to deploy and work with this application.
The rest of this post is structured as follows:
1. Brief overview of the newsletter application
2. Setup the configuration
3. A step by step guide to deploy the application
4. How to perform a quick test
You do not need to know anything about Terraform in order to follow along with this post. We have made it beginner friendly. And if you are stuck, please post a comment below and one of us will help you out.
1. Introduction to Newsletter:
The newsletter generator helps Qxf2 create it’s weekly newsletter. If you have not signed up for it yet, now is a good time. The web app itself comprises a straightforward CRUD web application that stores received URLs. Then, it lets users aggregate these URLs into a newsletter and schedules the same in MailChimp. The good part about this application is that it is sufficiently complex for a tester to gain some hands on experience. But it is also small enough that it will not overwhelm a beginner.
What testing techniques you can practice is limited only by your imagination. You can attempt to test the lambda, write end to end tests, or focus on just the single API call, maybe practice UI automation or perhaps redo the virtualized Mailchimp instance and so on.
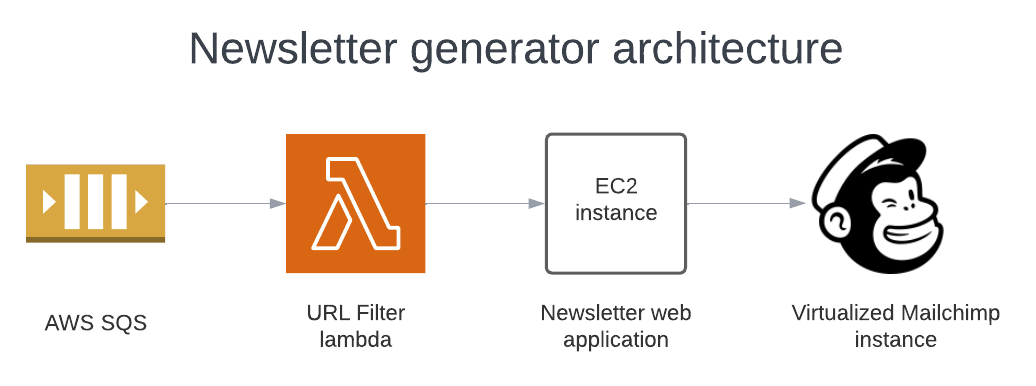
The AWS SNS-SQS reads all articles posted on the Skype channel. Then, a Lambda function filters them to decide if they should go in the newsletter. After sorting, the articles are sent to the newsletter app. Every week, the newsletter goes out to Qxf2 subscribers through Mailchimp.
Our focus is on deploying the newsletter on AWS using Terraform. We’ll set up resources like an EC2 instance, a Lambda function, and an SQS queue on AWS. Team Qxf2 setup a virtualized instance of Mailchimp and configured the application to use it. So you do not need to signup for Mailchimp.
2. Understanding Terraform Configuration Files:
Note: Read through this section only if you are interested in the infrastructure side of things. You can safely skip this section and still proceed with the installation.
When the Terraform commands are executed from the root directory(/newsletter_automation/terraform) the configuration files will start provisioning resources like
A) an EC2 instance
B) a Lambda
C) an SQS Queue
EC2:
The EC2 configuration code sets up an EC2 instance and handles security through several steps.
Firstly, it generates a secure key pair for the EC2 instance and stores it locally. Then, it configures the EC2 instance with a 30GB volume size and installs Docker. Next, it retrieves the Docker image from a GitHub repository and runs the newsletter app using Nginx.
After using the instance, it cleans up by deleting the private key, folder, and zip file to maintain cleanliness and security.
Furthermore, the configuration files “ami-datasource.tf” and “newslettersg.tf” facilitate the creation of the EC2 instance. They identify the latest Ubuntu AMI and establish a security group named “External resources” for the newsletter automation app. This security group enables traffic to flow out to external resources and permits incoming traffic on ports 22 (SSH) and 80 (HTTP) from any IP address. Lastly, they set up a local variable for the security group ID.
AWS Lambda:
The Lambda configuration files performs various tasks regarding the setup and deployment of a Lambda function. It executes a command to clone a GitHub repository containing the Lambda function’s code and then archives the code into a zip file for deployment.
Furthermore, it creates the Lambda function itself with various configurations, such as its name, handler, runtime, and environment variables. These variables includes keys, user IDs, and URLs essential for the function’s operation.
Additionally, it establishes an IAM role for the Lambda function, enabling it to assume specific permissions, including accessing SQS queues required for message handling.
Lastly, it attaches a policy to the IAM role, specifying the permissions granted to the Lambda function for interacting with SQS queues.
An SQS Queue:
The SQS configuration file creates an SQS (Simple Queue Service) queue named “newsletter_sqs” and lambda_trigger_sqs with different settings, including delay time, message size, and retention period. Moreover, it binds a policy to the queue, detailing permissions for Lambda functions. This policy enables Lambda functions to send, receive, delete messages, and obtain queue attributes from the SQS queue.
3. Step-by-Step instructions:
In this section, we provide a step by step guide to install the application. We made this section beginner friendly since most testers do not have much DevOps experience. Testers familiar with Terraform can simply skim through the instructions and proceed on their own.
3.1 Prerequisites:
a) AWS Account:
Create an AWS free tier account to manager your AWS resources in AWS.
b) IAM User:
First, create an IAM (Identity and Access Management) user in your AWS account. Next, go to the AWS Identity and Access Management Console and navigate to IAM -> Users -> Create user. Then, grant this user permissions to create, access, and manage IAM policies (IAM Full Access), an EC2 instance (AmazonEC2FullAccess), a Lambda (AWSLambda_FullAccess), and an SQS (AmazonSQSFullAccess). After that, save the user’s AWS_ACCESS_KEY_ID and AWS_SECRET_ACCESS_KEY from the Security Credentials section. Finally, use these credentials when configuring the AWS CLI.
c) AWS CLI:
The AWS Command Line Interface (CLI) lets you manage AWS services directly from the command line. First, follow the official documentation to install the AWS CLI. Then, configure it according to your needs. Provide the above saved (in step b) AWS_ACCESS_KEY_ID and AWS_SECRET_ACCESS_KEY as part of AWS CLI configuration along with region, output format and profile name. For example, I set the region to ‘us-east-1’, output format to JSON and the profile name to ‘qxf2’. If you don’t specify a profile name, it will use ‘default’.
d) Terraform:
An Infrastructure tool to provision infrastructure through code on any cloud provider like AWS cloud. Follow the official Terraform documentation to install and configure.
3.2 Steps to deploy app:
a) Cloning the newsletter repo:
Clone the Newsletter Automation repo.
b) Change Directory:
Change Directory(cd) to `/newsletter_automation/terraform`.
c) Modify Default Values:
Modify the default values for variable `region` and the `profile` as per your configurations in variable.tf file. In my case I have configured for region:'us-east-1' and profile:'qxf2'.
d) Don’t Modify the Lambda default values:
Keep as is the other default values of variables in variable.tf configuration file.
3.3 Running Terraform Commands
In this section (3.3) you need to run Terraform commands to deploy the application. These commands can run on the same terminal you used to install the newsletter application. If not, you can open a new terminal, cd to newsletter_automation/terraform and run these commands.
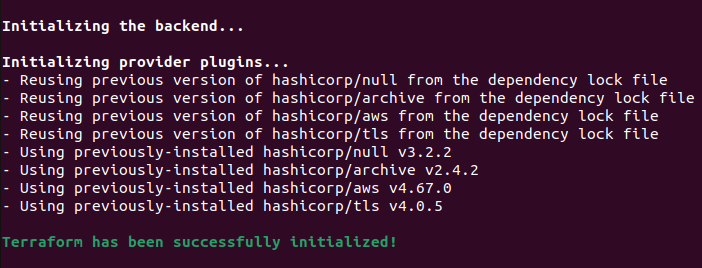
a) terraform init: Run this command to Initialize the working directory(terraform dir) and to download the necessary provider plugins, modules and setting up the backend for storing your infrastructure’s state(*.tfstate). The successful run of the command shows the output like below.
b) terraform fmt --check: Run this command to rewrite Terraform configuration files into a canonical format and style. As the command completes successfully, it outputs a list of files formatted according to Terraform standards and language style conventions.

c) terraform validate: First, run this command to validate the Terraform configuration files. This step ensures the structure of the files is correct, attributes and values are used appropriately, and the configuration adheres to basic Terraform rules. Additionally, it verifies the providers specified in the code. Once the command completes successfully, it will display the output as shown below.

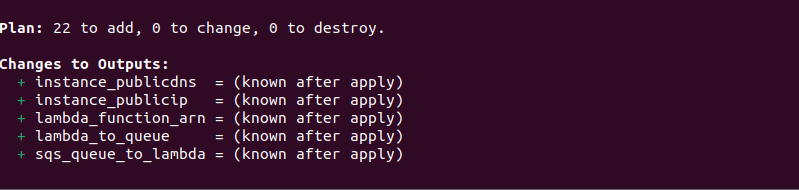
d) terraform plan: This command creates and displays a plan of action without implementing it. First, it examines the existing state of your remote infrastructure. Then, it identifies the differences between the current and previous states and suggests potential changes. If there are no differences, it indicates that no action is needed. A successful run of the command shows the number of AWS resources it’s adding and also displays the outputs based on the output.tf file configuration.
e) terraform apply: Use this command to apply changes to your infrastructure. After running “terraform apply,” Terraform creates a state file named terraform.tfstate in the same directory. This file contains JSON-formatted mappings of the resources. Running this command ensures your infrastructure reaches the desired state described in the code. Additionally, it compares the current state of your infrastructure with the desired state and applies the necessary changes.
At this point you should have the application deployed. Please proceed to section 4 to validate the deploy before coming back to point f) of this section.
f) terraform destroy: First, complete your testing practice. Then, run the “terraform destroy” command. This command deletes all resources, such as the EC2 instance, security groups, keys, Docker installation, Nginx configuration, SQS queue, Lambda function, IAM role, and policies. Consequently, this action ensures the removal of all resources created by Terraform, maintaining a clean and secure environment.
4. Testing the Application Deployment:
To validate the deployment in this section, we will perform one action per component of the pipeline and verify the output. Since we are testing a pipeline, this approach ensures each part functions correctly. To follow along, you need to know how to navigate the AWS web console. For testers unfamiliar with AWS, these tests resemble acceptance level tests for the deployment rather than tests for the application itself.
In our testing, we will verify the deployment of the following components:
A) The web application
B) SQS queue by sending a message
C) Triggering a test event for the Lambda
For Point A we will use the curl command to make an API call to add an article. For Point B and C, we will use AWS console to run tests to ensure the newsletter application deployed correctly and works as expected.
Adding an article by making an API call:
Get the Public IP from the AWS console and launch the newsletter application. Navigate to AWS console -> EC2 -> Instances and select the ‘Newsletter_Automation’ instance.
Use the `curl` command to perform an initial test.
Command:
Execute the provided command. If successful, access the newly added article by using the “Manage Article” menu option.
curl -X POST http://<PublicIP>/api/articles -H 'X-API-KEY: test' -F 'url=https://dev.to/dev_kiran/meet-codiumate-your-coding-agent-47ie' -F 'category_id=5' |
In the `curl' command update the Public IP of your EC2 instance.
Output:

By Sending a Message from a SQS Queue:
Send the below provided message from the `AWS Console -> Services -> Messaging -> SQS -> urlfilterlambda-trigger-queue -> Click Send and receive messages`.
{ "Message" : "{\"user_id\": \"blah\", \"chat_id\": \"[email protected]\", \"msg\": \"https://stackoverflow.blog/2024/05/13/why-do-only-a-small-percentage-of-genai-projects-actually-make-it-into-production\"}"} |
Output:
The output of the successful message prompts in AWS Console. This can be verified by launching newsletter application and selecting the menu option `Manage Article’ to check the newly created article.

By Triggering Test Event from the Lambda:
Trigger the below provided message from the Lambda Test event. `AWS Console -> Services -> Lambda -> Access your Lambda function -> Test`
{
  "Records": [
    {
      "body": "{\"Message\":\"{\\\"msg\\\": \\\"https://docs.aws.amazon.com/AWSEC2/latest/UserGuide/monitoring-system-instance-status-check.html \\\", \\\"chat_id\\\": \\\"[email protected]\\\", \\\"user_id\\\":\\\"blah\\\"}\"}"
    }
  ]
} |
Output:

5. Conclusion:
This Terraform configuration automates setting up and deploying the essential resources for the newsletter automation application. By using Terraform, users can quickly and effectively provision AWS infrastructure like EC2 instances, security groups, SQS queues, Lambda functions, and more. Additionally, IAM roles and policies ensure secure access control, allowing the Lambda function to interact with SQS queues. Overall, this Terraform configuration simplifies establishing and managing the newsletter automation application infrastructure. Users can focus on their main tasks, knowing their infrastructure is reliable and secure.
Hire QE from Qxf2
Qxf2 has a long history of helping the testing community. We open-source our internal tools, develop applications to help testers, conduct training programs, share our experience and knowledge on this blog and so much more. We are able to do this despite being a small professional services firm because our testers are highly experienced folks dedicated to the craft of testing. If you need excellent testers with a technical mindset for your project, don’t hesitate to reach out to us.

I have total of 18+ years of industry experience and worked in all the phases of project lifecycle. My career started as a manual tester, Test Lead and Program Test Manager. Recently I shifted to new company Qxf2, which provides testing services to startups. From Qxf2 joined one of the Qxf2 client where I got to know about Infrastructure as code. My hobbies are reading Telugu books, watching cricket and movies.

