Generating realistic test data is often a challenging task in the software industry. However, Rust’s fake crate provides a simple solution to this problem. By using the fake crate, data generation in Rust becomes effortless, allowing users to generate mock data for testing purposes or any other requirements. This blog post delves into the utilization of the Fake crate in Rust for the generation of fabricated data, providing clear and accessible examples for readers to follow along.
Note: Qxf2 is exploring Rust. As part of our learning, we are writing utilities in Rust that we would anyway write with some other language.
Overview
The fake crate is useful for creating mock data for different types of data without having to write a lot of code. For instance, if you wish to evaluate your program’s performance with different inputs or need illustrative examples, this crate allows you to generate authentic-looking data for said purposes. This crate is built on top of the rand crate and provides more functionality and convenience for generating fake data. It uses the rand crate as a dependency and implements the Dummy and Fake traits for many common types, as well as providing the faker module with various helpers for generating fake values in different formats and locales. Additionally, it also provides macros and functions for creating collections and custom types with fake value. We’ll go through each of these with examples in this post.
Context
Me and my colleague Archana have collaborated on this project to show how to get started with using fake crate. We have taken the scenario of a social media app, generating fake data for testing certain features of the app. The examples are built around this. We have kept the examples simple and straightforward showing how to generate fake data for scenarios that can be beneficial. For instance, we tried to mimic specific example use cases through functions and then generate synthetic data to test the functionality of those functions. For simplicity, we’ve placed the functions within the same code as the one generating fake data to test these functions. In a real-world scenario, however, these components might exist in separate modules. In the upcoming section, we’ve provided an explanation for each example along with its corresponding code snippet.
Examples
The fake crate provides two main traits for generating fake data: the Dummy trait and the Fake trait. The Fake trait lets you generate a random value of any type that implements the Dummy trait, while the Dummy trait lets you define how to generate a random value of your type from a random number generator. The Fake trait is automatically implemented for any type that implements the Dummy trait. This means you only need to implement the Dummy trait for your type, and you can use the Fake trait to create random values of your type.
We will look at these in more detail below. The code for these examples is present in this GitHub repo.
Example1: Basic Usage of Fake Trait
The fake crate in Rust offers a generic trait named Fake, allowing users to implement it for various types. By implementing the Fake trait for a specific type, we can generate random or fake instances of that type.
Here is an example of generating data using the Fake Trait.
/* Example program showing the basic usage of generating fake data using Fake Trait. It generates fake data related to a social media platform. For the sake of simplicity, this example utilizes tuple of values. However, in a real-world scenario, a struct would typically be used. */ use fake::Fake; fn generate_fake_social_media_data() -> (u32, u16, String, String) { let likes_count = (1..1000).fake::<u32>(); let shares_count = (1..500).fake::<u16>(); let post_text = (20..50).fake::<String>(); let caption_text = (5..15).fake::<String>(); (likes_count, shares_count, post_text, caption_text) } // An example function that categorizes a post based on the number of likes it has. fn categorize_post(likes_count: u32) -> String { if likes_count >= 800 { "popular".to_string() } else if likes_count >= 500 { "average".to_string() } else { "normal".to_string() } } // Generate fake social media data and categorize the post based on the number of likes. fn main() { let (likes_count, shares_count, post_text, caption_text) = generate_fake_social_media_data(); let post_category = categorize_post(likes_count); println!("Likes: {}\nShares: {}\nPost: {:?}\nCaption: {:?}\nCategory: {:?}", likes_count, shares_count, post_text, caption_text, post_category); } |
What it does
First, we start by importing the fake crate to use its ‘Fake’ trait. Next, we define a function called generate_fake_social_media_data that creates a tuple with random values. Since we want to generate data for social media app, we create likes_count, shares_count, post_text and caption_text. For each of these, we use the fake trait to generate synthetic data. For instance, likes_count generates a random unsigned 32-bit integer between 1 and 1000 to simulate the number of likes a post might receive in a social media scenario. Similarly, we define shares_count with a random unsigned 16-bit integer. The post_text and caption_text are generated using String respectively, creating random text within specified length ranges.
Now, imagine the social media app has a feature to categorize posts based on their popularity. By using the generate_fake_social_media_data function, we can simulate various scenarios with synthetic data, allowing us to test how the categorize_post function performs under different conditions. This way the generated fake data enables us to assess the accuracy and reliability of the app features in a controlled testing environment.
Finally, in the main function, we print the generated data.
Here’s a sample run:
Example2: Using faker Module
The faker module provides various helpers for generating fake values in different formats and locales. It contains submodules for different categories of data, such as address, phone number, internet, etc. These types are called fakers and they are defined in the faker module. Each submodule has a raw module that requires a locale as an argument. Besides, there are other modules that provide convenient functions for specific locales.
We can use the .fake() method on any faker to create random value of desired type. Let us look at a simple example below.
/* Example program showing the the usage of 'faker' module to generate fake data for specific formats and locales. It simulates a social media platform that offers personalized content recommendation to its users based on their profile. */ use fake::faker::address::raw::CityName; use fake::faker::internet::raw::FreeEmail; use fake::faker::phone_number::raw::CellNumber; use fake::uuid::UUIDv1; use fake::{locales::{EN, FR_FR}, Fake}; use uuid::Uuid; // UserProfile struct represents a profile of a user #[derive(Debug)] pub struct UserProfile { pub user_id: Uuid, pub email: String, pub city: String, pub phone_number: String, pub city_category: String, pub recommended_content: String, } // Function to generate a fake user profile pub fn generate_fake_user_profile() -> UserProfile { let user_id: Uuid = UUIDv1.fake(); let email: String = FreeEmail(EN).fake(); let city: String = CityName(FR_FR).fake(); let phone_number: String = CellNumber(EN).fake(); // Categorize the city and recommend content based on the category let (city_category, recommended_content) = categorize_city_and_recommend_content(&city); // Return a UserProfile with the generated data UserProfile { user_id, email, city, phone_number, city_category, recommended_content, } } // Function to categorize a city and recommend content based on the category pub fn categorize_city_and_recommend_content(city: &str) -> (String, String) { let city_category = if city.contains("Paris") || city.contains("Lyon") || city.contains("Marseille") { "major".to_string() } else { "smaller".to_string() }; // Recommend content based on the city category let recommended_content = match city_category.as_str() { "major" => "global news and events".to_string(), "smaller" => "local news and events".to_string(), _ => "no content available".to_string(), }; // Return the city category and the recommended content (city_category, recommended_content) } fn main() { // Generate a fake user profile. let user_profile = generate_fake_user_profile(); // Print the information of the user profile println!( "User ID: {}\nEmail: {}\nCity: {}\nPhone Number: {}\nCity Category: {}\nRecommended Content: {}", user_profile.user_id, user_profile.email, user_profile.city, user_profile.phone_number, user_profile.city_category, user_profile.recommended_content ); } |
What it does
First, we begin by importing the required fake libraries, including generators like CityName, CellNumber and FreeEmail. Then, we define the UserProfile struct to represent a user profile with attributes such as user_id, email, city, phone_number, city_category, and recommended_function. To generate a fake user profile, we use the generate_fake_user_profile function. We pass the necessary arguments where required; for example, we specify the EN locale for email in English and the FR_FR locale for French domain types for city. These arguments are crucial while using the .fake() method.
Let’s say our app has a feature that categorizes cities and suggests recommendations based on the category. The fake data we generate using the generate_fake_user_profile function can be useful for testing this functionality.
Finally, we print the user profile to observe the generated data.
Here’s a sample run:
Example3: Using Dummy Trait
The Dummy trait is a feature that lets you create random values for different kinds of data, such as numbers, strings, or your own custom types. It allows us to specify how to generate fake values for each field of our data structure using the #[dummy] attribute and the faker module. The faker module as we saw earlier contains various helpers for generating fake values in different formats and locales. It works like the From trait which lets you convert one type of data into another, but the Dummy feature also needs a source of randomness to make the values. Here, we have taken the example of showing how to generate data for custom struct.
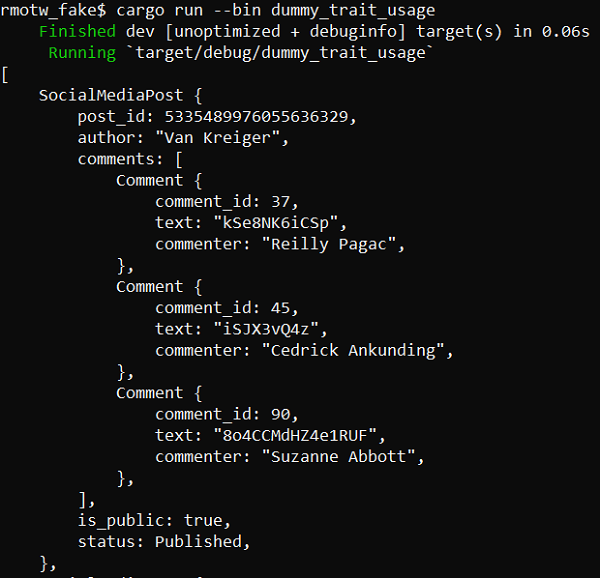
/* Example program demonstrates the usage of the 'Dummy' trait to generate fake data. It defines a social media structure with posts and comments and populates these with realistic-looking test data. */ use fake::faker::boolean::en::Boolean; use fake::faker::name::en::Name; use fake::Dummy; use fake::Faker; #[derive(Debug, Dummy)] pub enum PostStatus { Published, Draft, } // SocialMediaPost is a struct representing a post on social media. #[derive(Debug, Dummy)] pub struct SocialMediaPost { #[dummy(faker = "1000..")] pub post_id: usize, #[dummy(faker = "Name()")] pub author: String, #[dummy(faker = "(Faker, 3..5)")] pub comments: Vec<Comment>, #[dummy(faker = "Boolean(80)")] pub is_public: bool, pub status: PostStatus, } #[derive(Debug, Dummy)] pub struct Comment { #[dummy(faker = "1..100")] pub comment_id: usize, pub text: String, #[dummy(faker = "Name()")] pub commenter: String, } // function to generate fake posts by accepting number of posts to be generated pub fn generate_fake_post(num_posts: usize) -> Vec<SocialMediaPost> { fake::vec![SocialMediaPost; num_posts] } pub fn main() { let posts = generate_fake_post(2); println!("{:#?}", posts); } |
What it does
First, we define a struct ‘SocialMediaPost’ with five fields: post_id, author, comments, is_public, and status. Then we derive the Debug and Dummy traits for it. We use the #[dummy] attribute to specify how to generate fake values for each field using the faker helpers. For example, #[dummy(faker = “1000..”)] means that the post_id field will be a random number starting from 1000, and #[dummy(faker = “Name()”)] means that the author field will be a random name in English. Then, for the status, we define an enum ‘PostStatus’ with two variants: Published and Draft. The Dummy trait will generate a random variant for each instance of PostStatus picking any of these two values.
Next, we want to elaborate comments further. So we define another struct Comment with three fields – commend_id, text and commenter. Here too we use the #[dummy] attribute and specify the type of random values we want. For example, comment_id will be a number, commenter will be random name in English. Note that the text field does not have dummy attribute, so it will use default fake value for String which is a random string of 8 to 20 characters.
Finally, we define a function generate_fake_post that creates specified number of fake social media posts. It utilizes the fake::vec! macro, which is a shorthand for using a tuple config list to generate a vector with a length range and a specific faker for the element.
This approach can be extended to generate a large number of profiles, making it suitable for performance and load testing scenarios.
Here’s a sample run:
Example4: Seed functionality
The Fake crate’s seed feature enables the creation of consistent fake data by utilizing a set seed for the random number generator. A seed, in this context, dictates the sequence of random numbers generated by the random number generator. Opting for a fixed seed guarantees the replication of fake data with each program run, proving beneficial for testing or debugging purposes.
To employ the seed functionality in the Fake crate, we utilize the fake_with_rng method instead of the fake method. And pass a reference to a random number generator implementing the rand::Rng trait. Choose any random number generator from the rand crate, like StdRng or SmallRng, and initialize it with a fixed seed using the from_seed or seed_from_u64 functions.
Let us look at an example.
//Example to show how seed works use fake::{Dummy, Faker, Fake}; use fake::faker::name::en::Name; use fake::faker::address::en::StreetName; use fake::faker::phone_number::en::PhoneNumber; use fake::faker::internet::en::SafeEmail; use fake::faker::company::en::CompanyName; use rand::rngs::StdRng; use rand::SeedableRng; #[derive(Debug, Dummy)] pub struct Profile { #[dummy(faker = "Name()")] pub name: String, #[dummy(faker = "18..80")] pub age: usize, #[dummy(faker = "StreetName()")] pub address: String, #[dummy(faker = "PhoneNumber()")] pub phone_number: String, #[dummy(faker = "SafeEmail()")] pub email: String, #[dummy(faker = "CompanyName()")] pub company: String, } fn dummy_profile(rng: &mut StdRng) { let profile: Profile = Faker.fake_with_rng(rng); let output = format!( "Name: {}\nAge: {}\nAddress: {}\nPhone Number: {}\nEmail: {}\nCompany: {}\n", profile.name, profile.age, profile.address, profile.phone_number, profile.email, profile.company ); println!("{}", output); } fn main() { let seed = [ 0, 0, 0, 0, 0, 0, 0, 0, 3, 1, 0, 0, 2, 3, 0, 0, 0, 0, 0, 0, 0, 0, 0, 0, 0, 0, 0, 0, 0, 0, 0, 0, ]; let mut rng = StdRng::from_seed(seed); for _ in 0..2 { dummy_profile(&mut rng); } } |
What it does
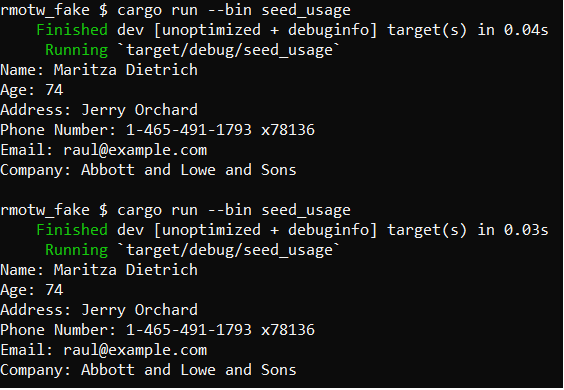
Begin by importing necessary modules from the fake and rand crates, which includes Dummy, Faker, Fake, and related modules for random number generation. Define a Profile struct through the dummy trait, featuring fields such as name, age, address, phone_number, email, and company. Annotate each field with a specific faker function that dictates the generation of fake data for that field. Create the dummy_profile function, which takes a mutable reference to a StdRng random number generator (rng). Generate a fake Profile using Faker.fake_with_rng(rng) and print the profile.
In the main function, define a seed array as [0, 0, 0, …, 0]. Utilize this seed array to initialize the random number generator (StdRng) with StdRng::from_seed(seed). Implement a loop that runs twice, calling the dummy_profile function each time with the same random number generator. This ensures consistency in the generated profiles across multiple calls due to the set seed.
Here’s a sample run:
Example5: Using Optional Struct
The fake crate in Rust provides support for optional fields in structs. It is a way of defining a struct that has some fields that are optional and some that are mandatory. An optional struct can be useful for modeling data that may have missing or default values for some fields, such as configuration or user profile. The Option type is an enumeration that has two variants: Some and None. The Some variant represents a value that is present, while None variant represents a value that is absent.
Here’s an example of creating a fake Profile struct with optional fields using the Optional trait and the Opt faker
//Example program that shows how to use optional struct while generating fake data use fake::{Dummy, Fake, Faker}; use fake::faker::name::en::Name; #[derive(Debug, Dummy)] pub struct Profile { #[dummy(faker = "Name()")] pub name: String, #[dummy(faker = "0..=80")] pub age: Option<u64>, #[dummy(faker = "0..=200")] pub following: Option<u64>, #[dummy(expr = "Some((0..=200).fake())")] pub followers: Option<u64>, #[dummy(faker = "0..=200")] pub posts: Option<Option<u64>>, } pub fn print_profile(profile: Profile) { println!("Profile {{\nname: \"{}\",\nage: {:?},\nfollowing: {:?},\nfollowers: {:?},\nposts: {:?}\n}}", profile.name, profile.age, profile.following, profile.followers, profile.posts); } fn main() { let profile: Profile = Faker.fake(); print_profile(profile) } |
What it does
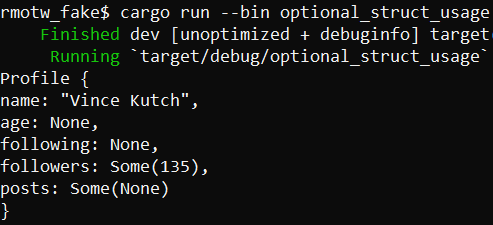
First, we define the Profile struct with fields for name, age, followers, following and posts. And derive the Dummy trait for the Profile struct, indicating its capability to be filled with fake data. Accordingly, we import the essential traits and modules from the fake crate which includes Dummy, Fake, Faker, Opt, Optional, and a specific faker for English names (fake::faker::name::en::Name). Then, we populate the name field with a fake name using the Name() faker. For the age field, we define it to be of type Option, signifying its potential to have a Some(u64) value or be None.
Similar to the age field, the following field is of type Option. We implement the Opt(0..=200) faker for the following field, indicating it to be filled with a random value between 0 to 200. Similarly, the followers field is also of type Option. Here, we utilize a custom expression, Some((0..200).fake()), to generate the value for followers. This expression guarantees that the followers field is consistently Some(u64) with a value within the range of 0 to 200.
Here’s a sample run:
Example6: Using Collections
The fake crate provides various macros for generating collections with fake values such as vec!, vec_deque!, vec_hash_map! etc. These macros allow us to specify the type, length and faker of the elements in the collection and they will create a collection with random values.
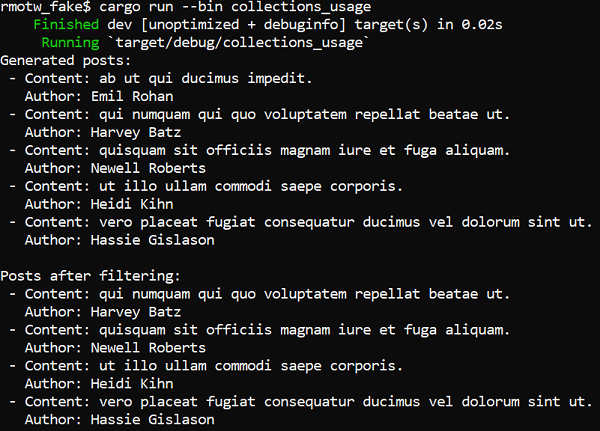
Below is an example of using vec_deque where we manage a list of authors and content associated with them. Say, our app has a feature where it filters posts based on the length of their content to help maintain the quality of user-generated content. In this case, we generate data to help test the scenario.
/* Example program to demonstrate the use of Rust collections to generate fake data. It uses an example to create a double ended queue to manage a list of authors and posts associated with them. */ use fake::{self, Dummy}; use std::collections::VecDeque; use fake::faker::lorem::en::Sentence; use fake::faker::name::en::Name; // Define a 'Post' struct with content and author fields that will be filled with fake content #[derive(Debug, Dummy)] pub struct Post { #[dummy(faker = "Sentence(5..10)")] content: String, #[dummy(faker = "Name()")] author: String, } // Function to filter out posts shorter than certain length fn filter_posts(posts: VecDeque<Post>, min_length: usize) -> VecDeque<Post> { posts.into_iter().filter(|post| post.content.len() >= min_length).collect() } fn main() { // Generate a VecDeque of fake 'Post' objects let posts: VecDeque<Post> = fake::vec_deque![Post; 5]; println!("Generated posts:"); for post in &posts { println!(" - Content: {}\n Author: {}", post.content, post.author); } // Filter out posts that are shorter than a certain length let min_length = 30; let filtered_posts = filter_posts(posts, min_length); println!("\nPosts after filtering:"); for post in &filtered_posts { println!(" - Content: {}\n Author: {}", post.content, post.author); } } |
What it does
First, we perform the necessary import (std::collections::VecDeque), providing a double-ended queue data structure. Next, we create a ‘Post’ struct with a ‘content’ field filled with fake data using the ‘Sentence’ generator and an ‘author’ field filled with a fake name using the ‘Name’ generator.
To test our filter posts feature, we define a function ‘filter_posts’ that takes a VecDeque of posts and a minimum content length as arguments. This function filters out posts containing content shorter than the specified length, returning a new VecDeque with the filtered posts.
Finally, in the main function, we generate a VecDeque of fake ‘Post’ objects using the ‘fake::vec_deque![Post; 5]’ macro and print the generated posts.
This example aims to illustrate how the ‘fake’ crate can be combined with Rust collections to simulate and manipulate data, proving useful for scenarios like testing and experimentation.
Here’s a sample run:
Conclusion
In conclusion, this blog post showed how the fake crate simplifies data generation in Rust. It’s a handy tool for creating realistic test data without much hassle. By teaming up with the rand crate, it becomes even more powerful, offering developers a convenient way to generate mock data for testing or illustrative purposes. The examples, based on a social media app scenario, make it easy to see how to use the fake crate in practical situations. We hope this post helped you get started with using the fake crate.
Hire Qxf2!
Qxf2 has a culture of doing, learning and sharing. All our engineers like to stay ahead of the curve when it comes it testing and technical trends in the market. As you can see from this post, we have begun to move to Rust well before the rest of the testing world. And we are not learning Rust passively. We are combining our testing expertise and looking for practical testing solutions using Rust. If you want to work with proactive test engineers who are constantly learning new things, get in touch with Qxf2 today.
I have been in the IT industry from 9 years. I worked as a curriculum validation engineer at Oracle for the past 5 years validating various courses on products developed by them. Before Oracle, I worked at TCS as a Manual tester. I like testing – its diverse, challenging, and satisfying in the sense that we can help improve the quality of software and provide better user experience. I also wanted to try my hand at writing and got an opportunity at Qxf2 as a Content Writer before transitioning to a full time QA Engineer role. I love doing DIY crafts, reading books and spending time with my daughter.


One thought on “%1$s”