At Qxf2, we’ve been using BrowserStack for a long time and have also integrated it with our automation framework. We noticed that there aren’t many guides on how to upload logs to BrowserStack and update the test run status in a BrowserStack session. In our previous post, we explained how to upload test logs to a BrowserStack session. Now, in this post, we’ll show you how to update the BrowserStack session status.
Importance of updating BrowserStack session status:
Updating BrowserStack sessions with test run status is crucial for several reasons. First, it helps you track whether each test passed or failed, making it easy to understand which tests are working and which ones need attention. If a test fails, updating the status allows you to quickly go back and check the logs, screenshots, or video recordings to figure out what went wrong. This makes debugging much faster and more efficient.
For teams working on projects, updating the test status ensures that everyone can easily see the results without confusion. It eliminates the need for re-running tests or guessing whether they passed or failed. In environments where continuous integration and continuous deployment (CI/CD) are used, updating the test status in BrowserStack is essential. It helps automated systems decide the next steps in the workflow, such as whether to proceed with deployment or to stop and fix issues.
Additionally, keeping track of test statuses in BrowserStack contributes to better reporting. Teams can generate clear reports showing how many tests passed, failed, or need attention. This is especially important for larger projects with multiple contributors, as it ensures that everyone stays on the same page and can maintain a high standard of quality in their testing efforts.
How to Update BrowserStack Session Status:
There are several ways to update the BrowserStack session status to show if a test passed or failed. In this post, we’ll explain two simple and recommended methods:
- Run JavaScript using WebDriver
- Use the BrowserStack REST API
Update BrowserStack Session Status by Executing JavaScript Using WebDriver:
We recommend using this method to update the BrowserStack session status. It is a very simple, quick, and reliable way to update the status. It works well even when running tests in parallel. Make sure to run the following script at the end of the test. You need to pass the test status and reason in the script.
If the test passed, run the script below. You can update the reason based on your needs.
driver.execute_javascript('browserstack_executor: {"action": "setSessionStatus", "arguments": {"status":"passed", "reason": "All test cases passed"}}') |
If the test failed, run the script below. You can update the reason based on your requirements.
driver.execute_javascript('browserstack_executor: {"action": "setSessionStatus", "arguments": {"status":"failed", "reason": "Test failed. Look at terminal logs for more details"}}') |
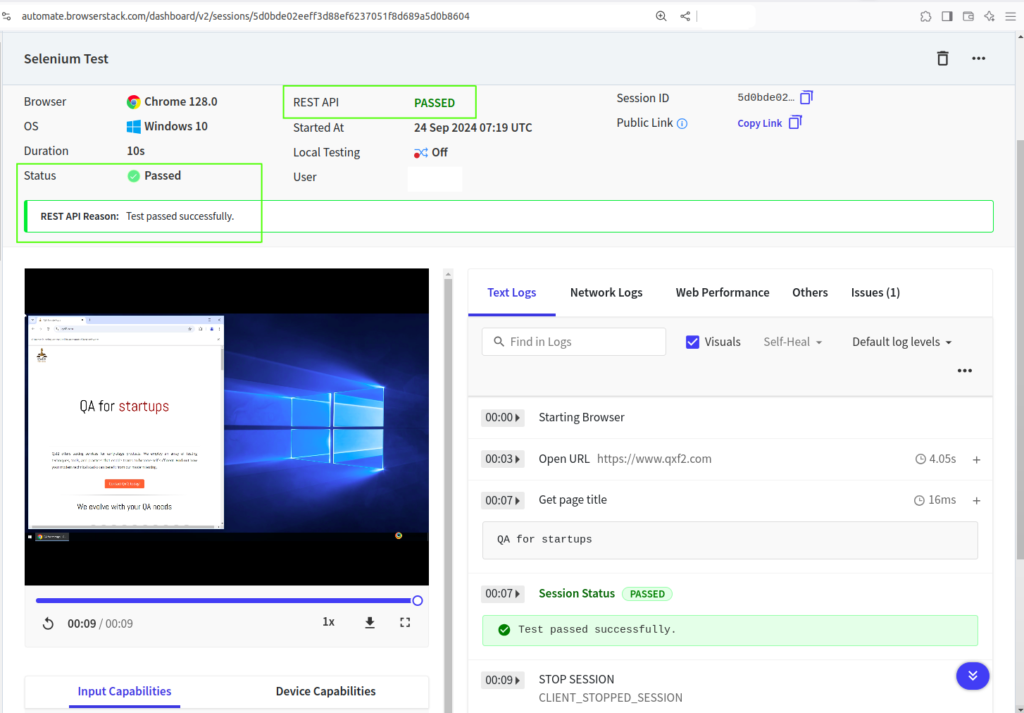
See the sample test below, which shows how to update the BrowserStack session status. The test navigates to our website and checks the title.
Note: This is highly simplified code to make this post easier to understand. We do not use this quality of code for clients.
# This is highly simplified code to make this post illustrative. # We do not use this quality of code at clients. from selenium import webdriver from selenium.webdriver.chrome.options import Options # BrowserStack credentials BROWSERSTACK_USERNAME = 'YOUR_USERNAME' BROWSERSTACK_ACCESS_KEY = 'YOUR_ACCESS_KEY' # Configure options for browser and platform options = Options() # Add capabilities options.set_capability('browser', 'Chrome') options.set_capability('browser_version', 'latest') options.set_capability('os', 'Windows') options.set_capability('os_version', '10') options.set_capability('name', 'Selenium Test') # Set your test name here # Initialize WebDriver with options driver = webdriver.Remote( command_executor=f'https://{BROWSERSTACK_USERNAME}:{BROWSERSTACK_ACCESS_KEY}@hub-cloud.browserstack.com/wd/hub', options=options) # Construct the session URL session_url = f"https://automate.browserstack.com/dashboard/v2/sessions/{driver.session_id}" print(f"BrowserStack Session URL: {session_url}") try: driver.get("https://www.qxf2.com") #Navigate to Qxf2 website print("Navigated to url: https://www.qxf2.com") if "QA for startups" in driver.title: # Mark test as passed using JavaScript driver.execute_script('browserstack_executor: {"action": "setSessionStatus", "arguments": {"status":"passed", "reason": "Test passed successfully."}}') else: # Mark test as failed driver.execute_script('browserstack_executor: {"action": "setSessionStatus", "arguments": {"status":"failed", "reason": "Title mismatch."}}') finally: driver.quit() |
Navigate to the session URL that the test prints to see the test run and the BrowserStack session status. Check the attached screenshot for reference.

Update BrowserStack Session Status Using BrowserStack’s REST API:
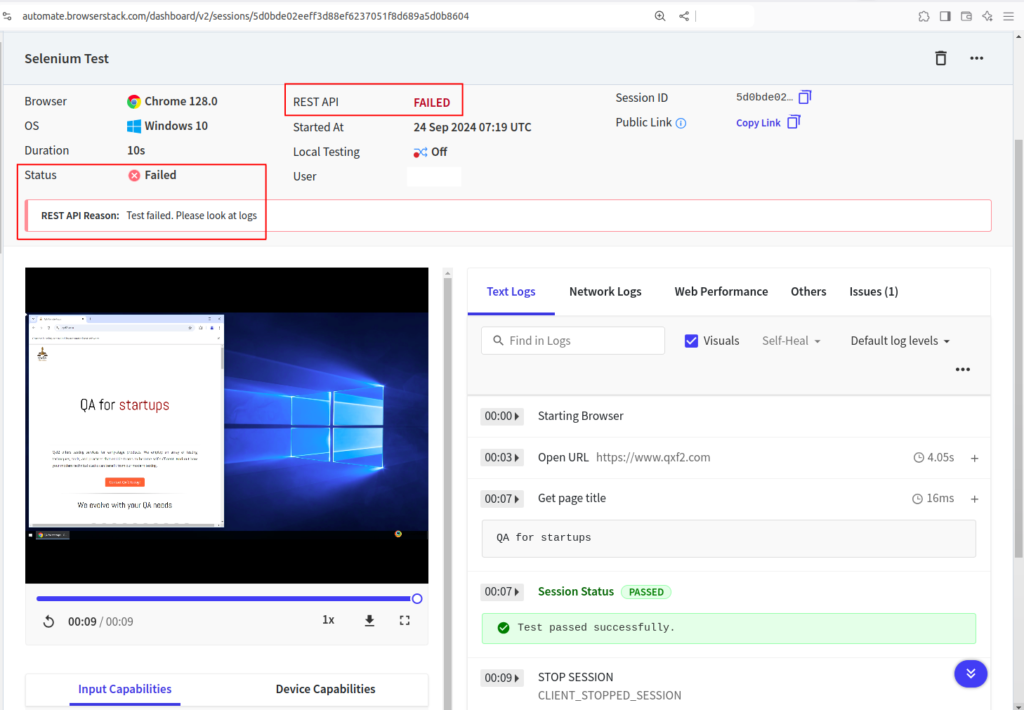
This method is helpful when your WebDriver session is inactive or out of scope. It requires the session ID to update the BrowserStack session status. After the test execution, you need to make a PUT request using the session ID, test status, reason, and your BrowserStack credentials. You can add this call to pytest hooks like “pytest_terminal_summary” or “pytest_sessionfinish”, which run at the end of the test.
See the sample code below:
Note: This is highly simplified code to make this post easier to understand. We do not use this quality of code for clients.
# This is highly simplified code to make this post illustrative. # We do not use this quality of code at clients. import requests def update_browserstack_session_status(session_id, status, reason, username, access_key): "Update the status of a BrowserStack session using the REST API." url = f'https://api.browserstack.com/automate/sessions/{session_id}.json' # Prepare payload payload = { "status": status, "reason": reason } # Make the PUT request to update session status response = requests.put(url, data=payload, auth=(username, access_key)) # Check the response if response.status_code == 200: print(f"Session {session_id} updated successfully.") else: print(f"Failed to update session {session_id}. Response: {response.content}") #---USAGE EXAMPLES if __name__=='__main__': update_browserstack_session_status( session_id="your_session_id_here", # Replace with your session ID status="test_status", # Replace with desired status: "passed" or "failed" reason="your_reason_here", # Replace with test status reason username="your_username_here", # Replace with your BrowserStack username access_key="your_access_key_here" # Replace with your BrowserStack access key ) |
As a demonstration, I updated the same BrowserStack session mentioned in the previous method using the code provided above. Check the attached screenshot for reference.

I hope this post helps you better understand why updating the test run status on a BrowserStack session is important. It not only keeps track of your test results but also helps with debugging and improving your tests. This post also explains the different methods you can use to update the session status, so you can choose the one that works best for you.
Hire QA from Qxf2:
Qxf2 provides custom QA services for startups and early-stage products. Our offerings are unique in the industry and cater to the specific and varying QA demands of startups. To learn more about services like periodic testing, foundational testing, AI/ML specific testing and more, get in touch today.

I love technology and learning new things. I explore both hardware and software. I am passionate about robotics and embedded systems which motivate me to develop my software and hardware skills. I have good knowledge of Python, Selenium, Arduino, C and hardware design. I have developed several robots and participated in robotics competitions. I am constantly exploring new test ideas and test tools for software and hardware. At Qxf2, I am working on developing hardware tools for automated tests ala Tapster. Incidentally, I created Qxf2’s first robot. Besides testing, I like playing cricket, badminton and developing embedded gadget for fun.
