Problem: Maintaining infrastructure for automated Selenium cross browser tests is time consuming.
At Qxf2 Services, we use Selenium and Python for UI testing of web applications. Recently, we began using Sauce Labs to run our automated tests against different browsers. Sauce Labs cloud testing platform allows you to test web applications on 200+ browsers and platforms. They support the major browsers like Firefox, Internet Explorer, Google Chrome, Safari, and Opera on different operating systems – Windows, Linux, Android and Mac. Sauce Labs cloud testing platform supports Selenium automation testing using different languages like Java, Python, Ruby, C#, PHP etc.
Why we chose Sauce Labs
Prior to using Sauce Labs, we were writing our own test harness and maintaining virtual machines for different versions of different browsers. We felt the maintenance work was an extra overhead on our testers and took away time from what our testers do well – thinking and testing software. Given that Sauce Labs has worked out reasonably well for Qxf2 Services, we plan to write a series of blog posts helping you get started with Sauce Labs and integrating it with your current suite of automated Selenium tests.
Aside: Sauce Labs is co-founded by Jason Huggins – the creator of Selenium.
Getting started with Sauce Labs.
We are assuming you already have at least one Selenium test written. This section will show you how to run them on Sauce Labs cloud testing platform. In future blog posts we will show you how to modify your tests so they run across different browsers in parallel.
1. Sign up for a Sauce Labs account
2. Get your Access Key
3. Choose a test you want to run on the cloud
4. Add a method to your test that initializes the browser, version and platform
5. Run the test
6. Check the result
A step by step guide
STEP 1: Sign up for a Sauce Labs account.
You can sign up for a free 14-day trial. The Sauce Labs team is good at following up with emails full of helpful resources.
STEP 2: Get your Access Key
Your access key is listed on this page: https://saucelabs.com/account. Currently its in the bottom left corner. We will be using this access key in combination with your username to interact with Sauce Labs.
STEP 3: Choose a test you want to run on the cloud
Qxf2 Services loves using Python. For this example we are going to execute a Selenium test that visits http://www.python.org and search for the module BeautifulSoup. Here is the code snippet:
import logging, unittest from selenium import webdriver from selenium.webdriver.common.keys import Keys class Selenium2OnSauce(unittest.TestCase): def setUp(self): self.driver = webdriver.Firefox() def test_search_in_python_org(self): #Go to the URL self.driver.get("http://www.python.org") #Assert that the title is correct self.assertIn("Python", self.driver.title) #Identify the xpath and send the string you want elem = self.driver.find_element_by_xpath("//input[@id='id-search-field']") print "About to search for the string BeautifulSoup on python.org" elem.send_keys("BeautifulSoup") elem.send_keys(Keys.RETURN) def tearDown(self): self.driver.quit() if __name__ == '__main__': unittest.main() |
STEP 4: Add a method to your test that initializes the browser, version and platform
The magic occurs in this step. Change your setup method to look like the code below, where $USERNAME is your username and $ACCESS_KEY is the access key you obtained in Step 2.
def setUp(self): desired_capabilities = webdriver.DesiredCapabilities.FIREFOX desired_capabilities['version'] = '24' desired_capabilities['platform'] = 'Windows 7' desired_capabilities['name'] = 'Testing Search functionality in Python website using Python at Sauce' self.driver = webdriver.Remote( desired_capabilities=desired_capabilities, command_executor="http://$USERNAME:[email protected]:80/wd/hub" ) self.driver.implicitly_wait(30) |
STEP 5:Run the test
You can run the test script the normal way you do. We run it via the command prompt.
STEP 6: Check the result
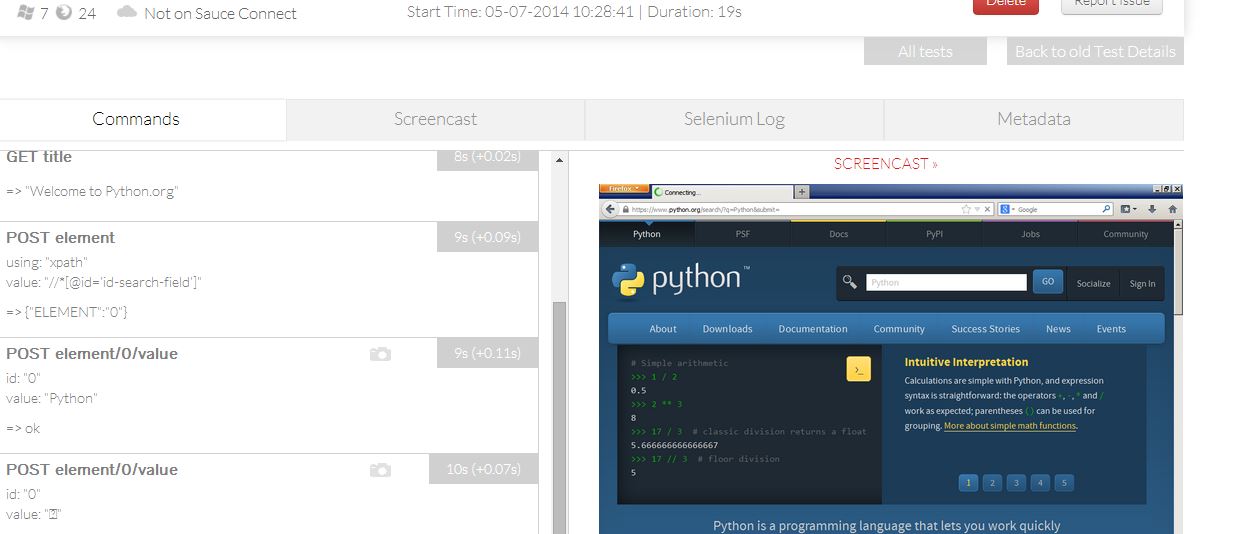
You can see the results on your web account. Login to your Sauce Labs account and you should see a result table like the screen shot below.
![]()
![]()
Once the test is completed, you can also look at the detailed results as well as a screencast. To dive in to the details of the test run, click on the Session
There you have it! A whirlwind tour of getting started with Sauce Labs.
I want to find out what conditions produce remarkable software. A few years ago, I chose to work as the first professional tester at a startup. I successfully won credibility for testers and established a world-class team. I have lead the testing for early versions of multiple products. Today, I run Qxf2 Services. Qxf2 provides software testing services for startups. If you are interested in what Qxf2 offers or simply want to talk about testing, you can contact me at: [email protected]. I like testing, math, chess and dogs.


Incase we are running the test through a tunnel does it connect to a tunnel
Mani,
Yes Sauce connect runs a tunnel endpoint in sauce labs cloud, and one in the machine running Connect, such that requests made from sauce machines will appear to come from your computer. For more details to set up Sauce connect refer https://wiki.saucelabs.com/display/DOCS/Setting+Up+Sauce+Connect
very useful and nice article to learn how to test cross browser testing in Sauce labs