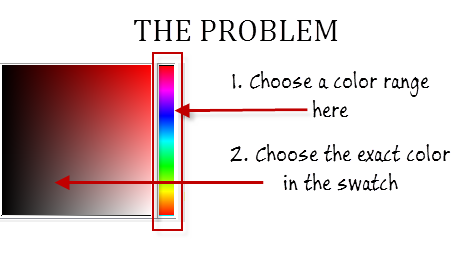
I recently used a neat solution that involved JavaScript evaluate() and XPaths as part of an automated GUI check. I am good with Python and writing XPaths for locators but not so good with JavaScript. I needed to locate an element in the DOM and then change a specific attribute. The solution was simple enough that I did not have to learn a lot of JavaScript. Instead I could rely on Python and XPath to do the heavy lifting and yet automate a fairly complex interaction.
I was trying to select a specific color from a swatch. The application used a gradient to choose a color range and then used a swatch to choose the exact color. Think of it as choosing a coarse color followed by fine tuning your choice to one specific choice. To choose a color range, I first needed to click on a gradient wheel. There was no clear mapping between the color range and relative position on the gradient wheel. But I noticed that clicking on the gradient wheel would update the ‘left’ attribute of the div element representing the gradient.
Using JavaScript evaluate() to solve our problem
I used JavaScript to update the left attribute of the gradient wheel and then checked if the color I wanted was visible on the swatch or not. If the color I wanted was not visible, I kept clicking a little higher up on the gradient wheel and checking again till I saw the color I wanted on my swatch. Here are the code snippets
1. Locating an element using JavaScript and XPath
To locate an element with JavaScript and XPath, you can use the document.evaluate() method.
linear_gradient_wheel = "xpath of the linear gradient wheel" color_range_chooser_js = 'elem = document.evaluate("%s", document, null, XPathResult.FIRST_ORDERED_NODE_TYPE, null).singleNodeValue;'%linear_gradient_wheel |
2. Modifying the element style
Once you have located an element, you can change its style like this:
elem_style_change_js = 'elem.style.left="%d%%";' |
3. Logic to choose an appropriate color range
This is the logic I use to choose a color range that contains the exact color I want.
for i in range(5,100,10): driver.execute_script(color_range_chooser_js%(linear_gradient_wheel,i)) if is_visible(driver,color_chooser%color): click_element(driver,color_chooser%color) result_flag = True break |
4. Putting it all together
Here is my complete method.
#This is pseudo-code intended to be illustrative #You will need to clean it up before you using it in your projects def select_color(driver,color): "Select a color" result_flag = False #We want to return a True/False at the end of this method linear_gradient_wheel = "xpath of the linear gradient wheel" color_chooser = "xpath of the color" #E.g.: "//div[@style='background:#%s;']" color_range_chooser_js = 'elem = document.evaluate("%s", document, null, XPathResult.FIRST_ORDERED_NODE_TYPE, null).singleNodeValue; elem.style.left="%d%%";' for i in range(5,100,10): driver.execute_script(color_range_chooser_js%(linear_gradient_wheel,i)) if is_visible(driver,color_chooser%color): click_element(driver,color_chooser%color) result_flag = True break return result_flag #Where: # is_visible is a method that does: driver.find_element_by_xpath() and then does element.is_displayed() # click_element is a method that does: driver.find_element_by_xpath() and then does element.click() #PS: Notice the two %% in the JS code ... that is to escape the % sign in Python when using string formatting |
And that was how I managed to execute a fairly complex operation for GUI automation with just a dozen lines of Python code.
I want to find out what conditions produce remarkable software. A few years ago, I chose to work as the first professional tester at a startup. I successfully won credibility for testers and established a world-class team. I have lead the testing for early versions of multiple products. Today, I run Qxf2 Services. Qxf2 provides software testing services for startups. If you are interested in what Qxf2 offers or simply want to talk about testing, you can contact me at: [email protected]. I like testing, math, chess and dogs.

