In our previous post, we explored how to use Windows Inspector (Inspect.exe) to inspect UI elements in desktop applications. It’s a great starting point, especially when you want to understand how your app exposes properties like AutomationId, Name, and ClassName. But if you’ve tried automating desktop apps using Appium or WinAppDriver, you might have noticed a few limitations with Windows Inspector. For instance, it doesn’t always make it easy to visualize your UI hierarchy in real-time or test if your selectors actually work. That’s where Appium Inspector comes in handy. It lets you connect to a running Appium or WinAppDriver session, explore the app’s UI, and directly verify your locators, all from a clean, interactive interface.
In this post, we will show you how to use Appium Inspector alongside Windows Inspector to get the best of both worlds:
- Windows Inspector for understanding element properties, and
- Appium Inspector for writing and validating selectors in action.
By the end, you’ll know exactly when to use which tool and how they complement each other during desktop automation development.
1. Why Use Both Tools Together?
If you’ve worked on desktop automation for a bit, you’ve probably realized that no single inspector tool gives you everything you need. Both Windows Inspector and Appium Inspector are powerful, but they serve slightly different purposes.
Let’s look at how they complement each other.
Windows Inspector – Great for element discovery
Windows Inspector (Inspect.exe) is excellent when you want to:
- Explore the app’s UI hierarchy.
- Find hidden attributes like AutomationId, ClassName, and ControlType.
- Understand how legacy desktop apps expose UI elements to accessibility tools.
It gives you raw, reliable details straight from the Windows UI Automation layer.
Appium Inspector – Great for validation
Appium Inspector, on the other hand, shines when:
- You already have a running Appium or WinAppDriver session.
- You want to validate selectors live (e.g., test your XPath or AutomationId).
- You need to view screenshots, interact with elements, or build locators visually.
- You need to investigate absolute path of element
It essentially shows how Appium sees your app which might differ slightly from what Windows Inspector shows.
Why use both?
Using both tools together gives you a complete picture:
- Use Windows Inspector to discover and understand elements.
- Use Appium Inspector to verify your selectors and make sure they actually work in automation.
When you pair them, you can move faster:
- Find the right element properties using Windows Inspector.
- Test and validate those selectors directly in Appium Inspector.
This approach saves time, reduces trial-and-error, and helps you write more stable locators.
2. Prerequisites:
Before we start using Appium Inspector and Windows Inspector together, make sure you have the following tools installed and working correctly on your system.
Follow the steps below:
- Install Windows App Driver (WinAppDriver):
Download WinAppDriver from the official Microsoft WinAppDriver Releases page.
Choose the latest stable version and install it like any standard Windows application.
WinAppDriver acts as the bridge that allows Appium to communicate with Windows desktop apps. - Install Node.js and npm:
Download the Node.js installer from the official Node.js website.
npm is included automatically, and it is required for installing and running Appium Server. - Install Appium Server:
Install Appium globally using npm by following the steps in the Appium Quickstart Guide.
This installs the Appium command-line server used for managing automation sessions. - Install the Appium Windows Driver:
After the Appium Server is installed, add support for Windows desktop apps by running:
appium driver install windows - Verify the Windows driver installation:
Check that the Windows driver is installed and listed by running:
appium driver list
You should see the Windows driver listed as installed.
3. Setting Up Appium Inspector for Desktop Apps:
Once you have Appium, WinAppDriver, and the other prerequisites ready, let’s get Appium Inspector up and running.
This tool lets you visually inspect your app’s UI and test selectors in real time, something Windows Inspector can’t do on its own.
Step 1: Download and Install Appium Inspector
Appium Inspector is available as a standalone desktop app. You can download it from the official GitHub releases page:
- Download the latest version for your operating system (Windows, macOS, or Linux).
- Install it using the downloaded installer (for Windows, it’ll be a .exe file).
- Once installed, Turn on windows developer mode from windows settings
- Now, launch Appium Inspector.
When you open it, you’ll see a configuration screen, this is where you set up your Appium session.
Step 2: Start Appium Server
Before connecting Appium Inspector to your app, make sure Appium is running.
Open a new terminal and run:
appium
If it starts correctly, you’ll see a message like:
[Appium] Appium REST http interface listener started on http://0.0.0.0:4723
[Appium] You can provide the following URLs in your client code to connect to this server:
        http://192.168.0.101:4723/
        http://127.0.0.1:4723/ (only accessible from the same host)
Look at the screenshot below.
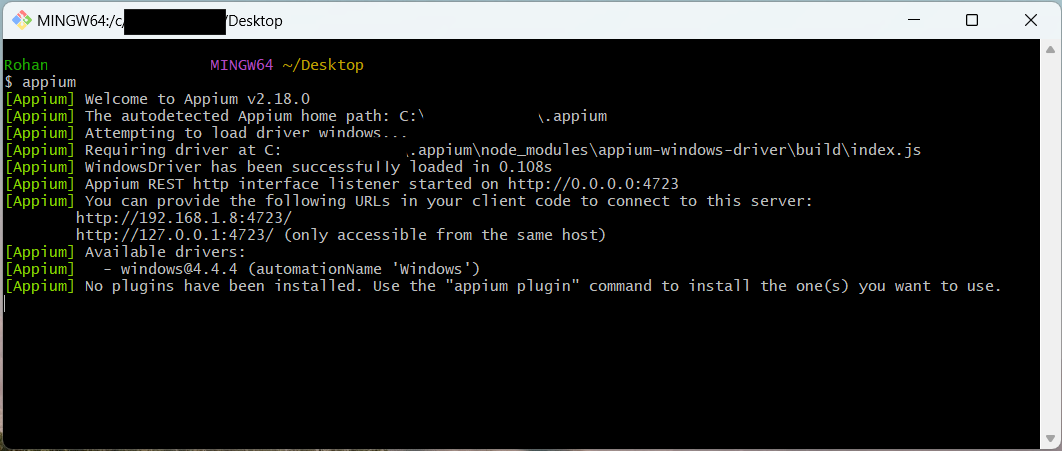
Keep this terminal open while using Appium Inspector.
Step 3: Configure Desired Capabilities
Now that Appium is running, switch back to Appium Inspector. Here, you’ll configure the Desired Capabilities. This tells Appium which app to connect to and how.
While Appium can launch apps directly, we at Qxf2 often prefer attaching to an already running app. It’s faster, avoids repeated app launches, and perfect for debugging or inspecting specific screens that require prior navigation or login.
Recommended Approach: Attach to a Running App
If your app is already open, you can connect Appium Inspector to it using the window handle provided by Windows Inspector.
Here’s how:
- Open your desktop app manually.
- Launch Windows Inspector (Inspect.exe).
- Hover your mouse over your app’s main window (such that it points full window). Look at below screenshot.
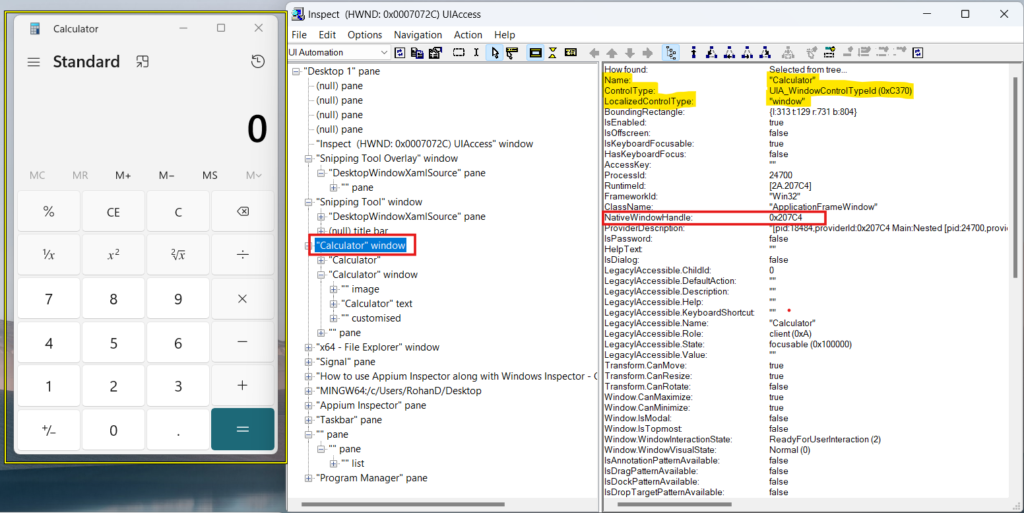

Fig. 2 Get native windows handle of the Calculator app using Windows Inspector - In the Properties pane, look for:
NativeWindowHandle: 0x207C4
The value (0x207C4 in this example) is already in hexadecimal format, so you can use it directly. - Enter your desired capabilities in Appium Inspector:
{ "platformName": "Windows", "appium:deviceName": "WindowsPC", "appium:automationName": "Windows", "appium:appTopLevelWindow": "0x207C4" } - Set your Remote Host to:
http://127.0.0.1:4723Look at Appium Inspector configuration in below screenshot.


Fig. 3 Appium Inspector Configuration to connect to the Calculator session - Click Start Session.

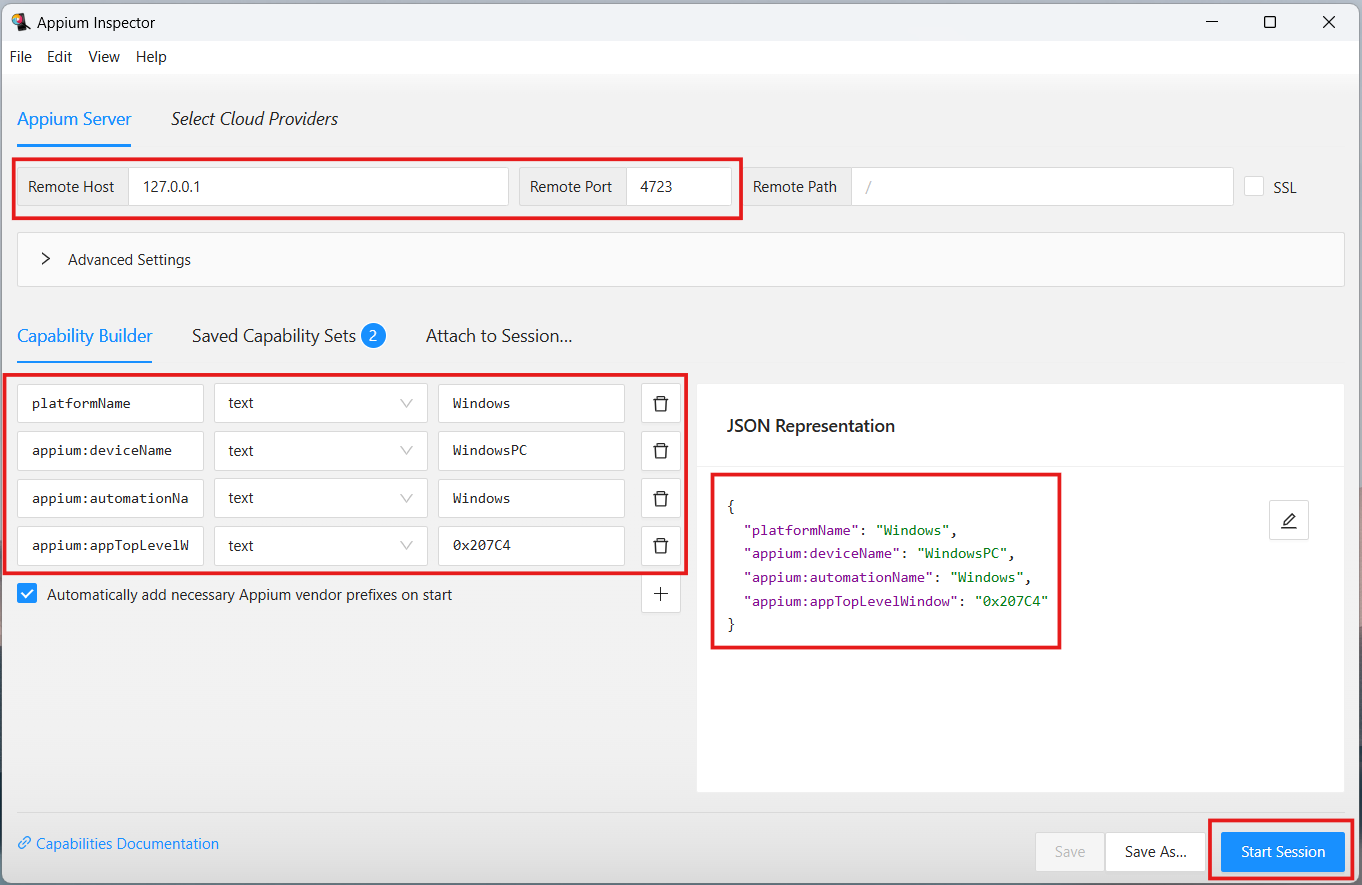
If everything is configured correctly, Appium Inspector will connect to your running app instantly without relaunching it.
This approach is especially useful for:
- Debugging complex apps that require login or setup steps.
- Inspecting modal windows or nested screens.
- Testing state-dependent workflows.
Alternative Approaches (Optional)
If you prefer to let Appium launch the app itself, you can use one of the following configurations:
- Option 1: UWP (Modern Windows) Apps
For UWP apps like Calculator or Alarms, you can use their package-based App ID.- To find it:
Open PowerShell. - Run:
get-appxpackage *calculator* | select Name, PackageFamilyName - Combine the results:
Microsoft.WindowsCalculator_8wekyb3d8bbwe!App
Example:
{ "platformName": "Windows", "appium:deviceName": "WindowsPC", "appium:automationName": "Windows", "app": "Microsoft.WindowsCalculator_8wekyb3d8bbwe!App" } - To find it:
- Option 2: Classic Win32 (.exe) Apps
- Left panel: A live screenshot of your application.
- Middle panel: The UI hierarchy tree, listing all visible elements in a structured format.
- Right panel: Detailed attributes and properties of the selected element such as AutomationId, Name, ClassName, ControlType, and generated XPath.
- Highlight that element visually, and
- Display its corresponding attributes in the right panel.
- AutomationIds were not unique
- Name and Value fields were missing
- Same ClassName used for multiple fields without any unique property
- The Windows Inspector UI tree was difficult to navigate
- Often had to depend on complex or absolute XPath
- Displays a cleaner, easier-to-read XML tree
- Directly generates XPath for any selected node
- Allows instant testing and validation of XPath
- Makes navigating deep hierarchies simpler
- Capture the NativeWindowHandle
- Cross-check attributes when Appium Inspector does not expose something clearly
- Exploring the full UI hierarchy
- Building complex or absolute XPath
- Validating XPath instantly
- Identifying stable parent/anchor elements
- AutomationId values were not unique
- Name and Value fields were not exposed
- The UI hierarchy was deeply nested
- Complex or absolute XPath was often necessary
- xpath
- automationId (if available)
- name
- className
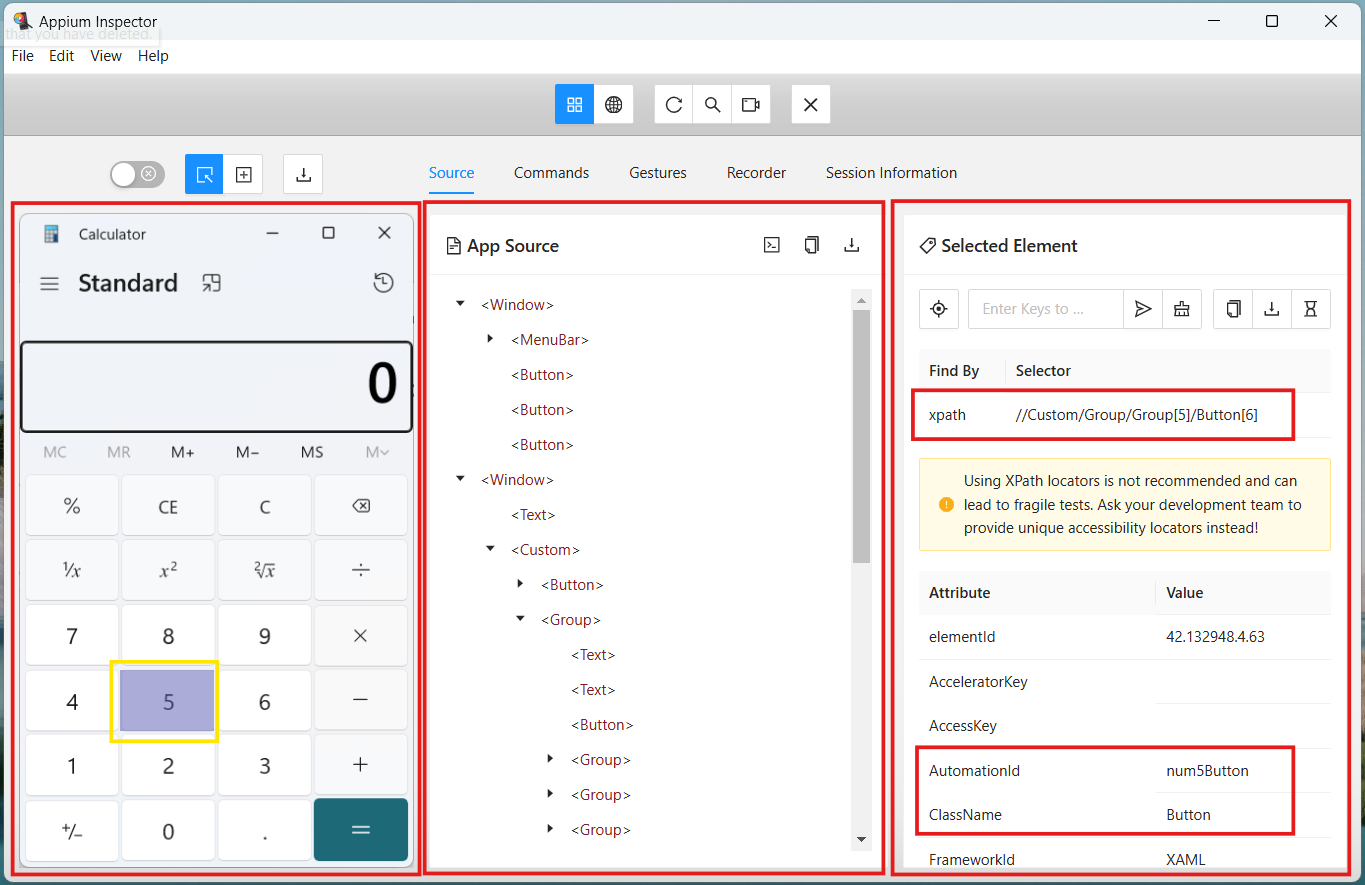
- automationId: num5Button
- name: Five
- className: Button
- Suggested XPath –
//Custom/Group/Group[5]/Button[6] - See the full XML structure
- Click any node to highlight it
- Test XPath instantly
- Validate whether it uniquely identifies the element
- Inspect the same element in Windows Inspector
- Check ClassName, ControlType, or bounding rectangle
- Confirm whether the control belongs to a different window
- Identify Win32, WPF, or WinForms-based widgets
- Test thoroughly in Appium Inspector
- Document/comment about why it’s needed
- Revisit periodically in case app UI changes
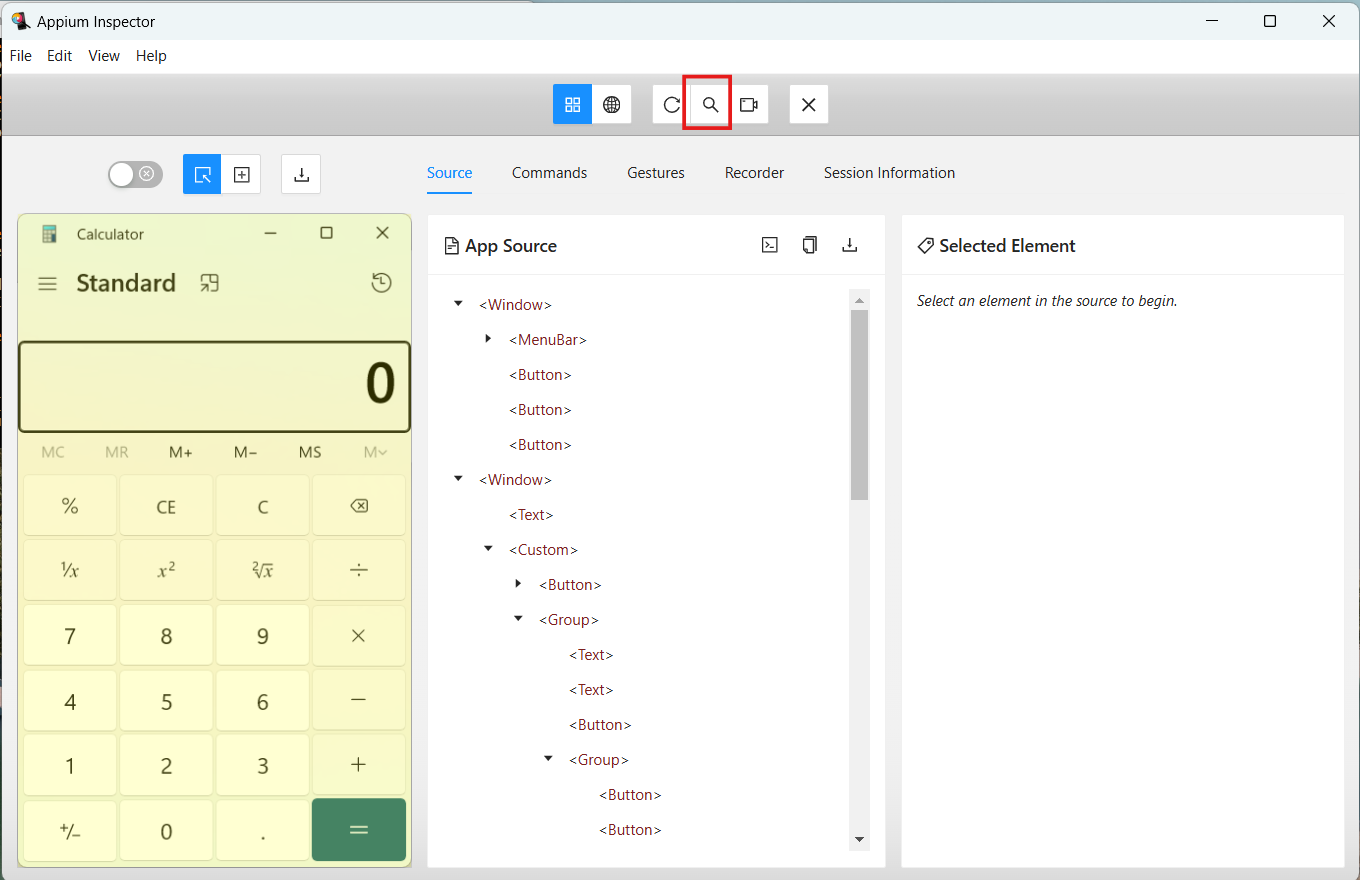
- Click the Search icon at the top of Appium Inspector.


Fig. 5 Appium Inspector – Search button
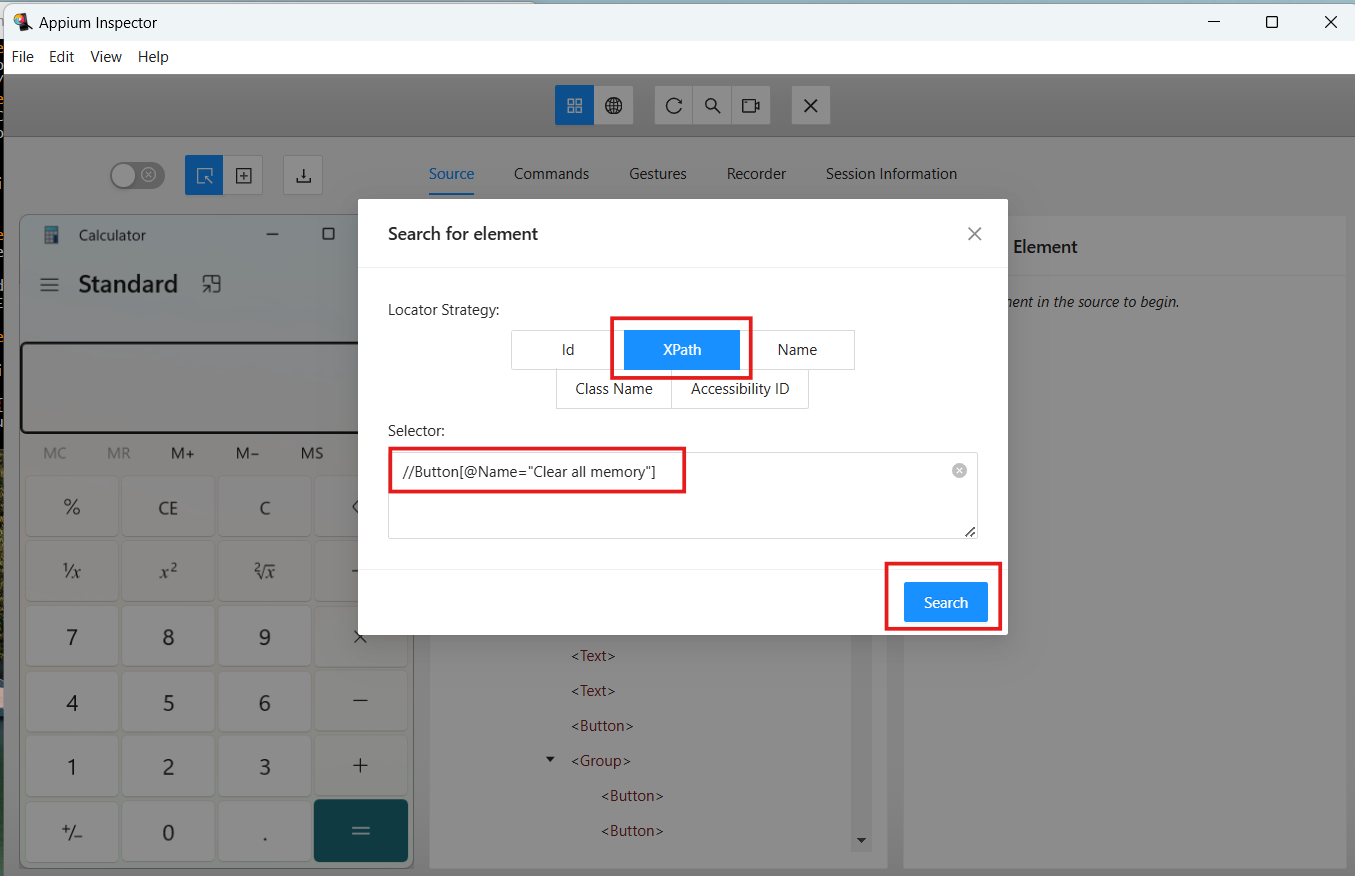
This opens the Search for element pop-up window. - Choose your locator strategy.
Click on the strategy options to select strategy. Here we are selecting XPath for demonstration. - Paste your XPath into the Selector field.
- Click the Search button.


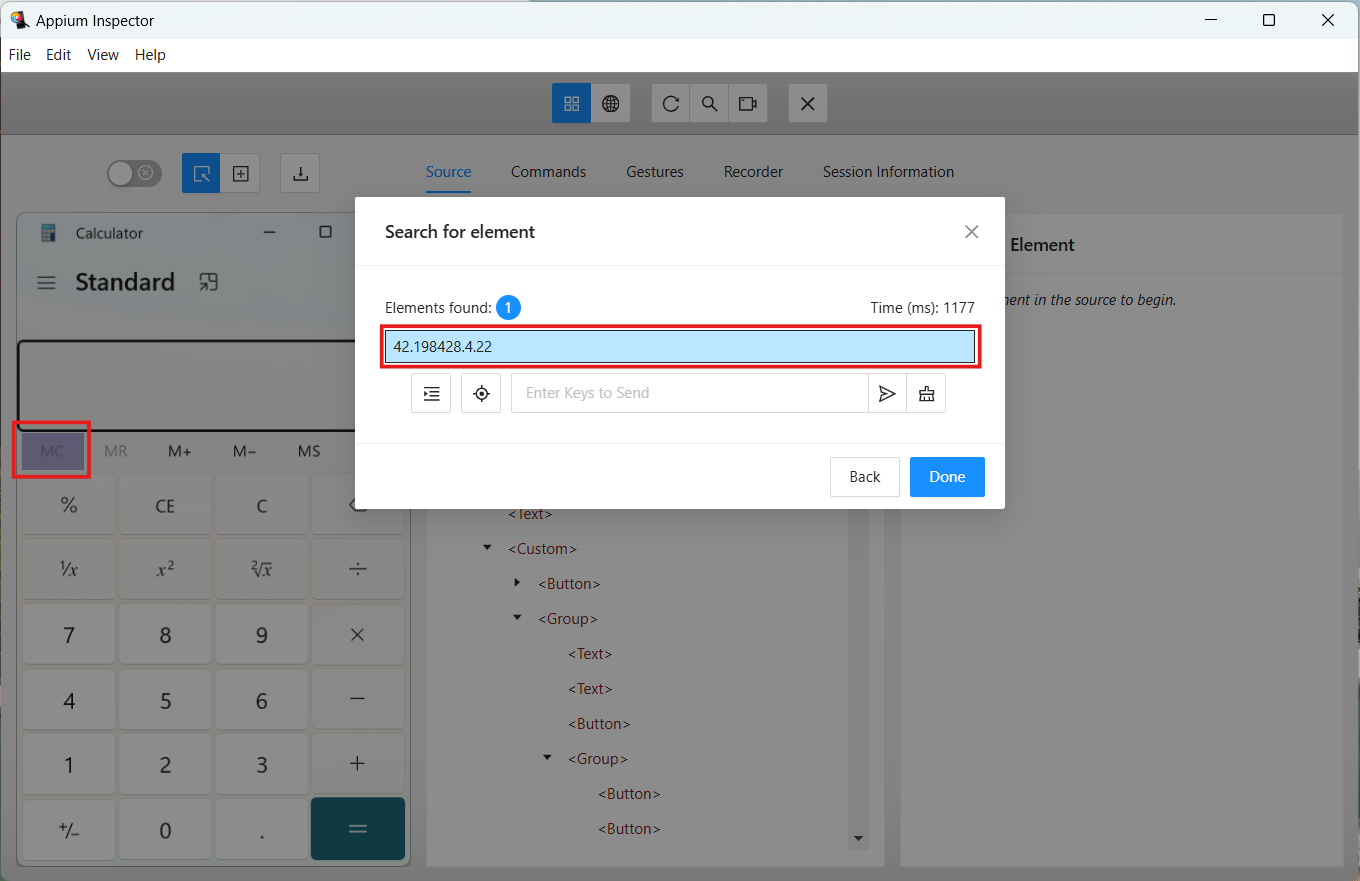
Fig. 6 Appium Inspector – Search for element window - Appium Inspector shows the found elements. When you click on found element, it will highlight the matching element in app screenshot on left panel. Look at the below screenshot.
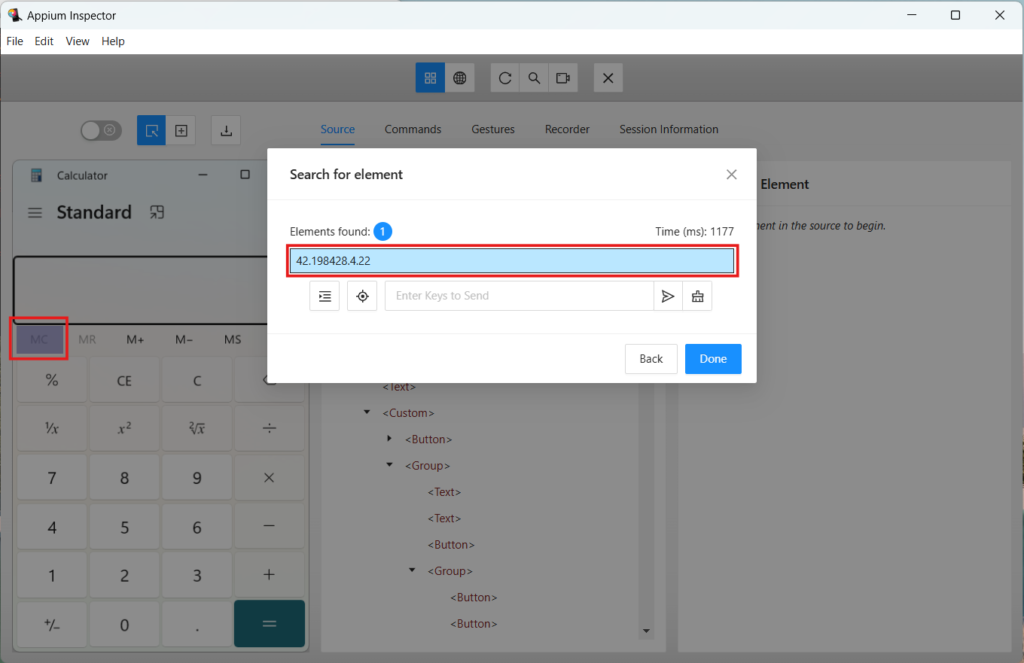
Fig. 7 Appium Inspector – Element found - If xpath is not valid, it shows “Could not find any elements”. Then, you can refine your XPath and search again until you get a reliable match.
For traditional or custom desktop apps, use the full path to the executable:
{
  "platformName": "Windows",
  "appium:deviceName": "WindowsPC",
  "appium:automationName": "Windows",
  "app": "C:\\Windows\\System32\\notepad.exe"
}
Note: Use double backslashes (\\) in JSON to avoid escape character issues.
Step 4: Verify the Connection
Once the session starts successfully, Appium Inspector will attach to your app and display its interface details in three panels:
You can click any element in the screenshot or hierarchy tree, and Appium Inspector will:
This layout makes it easy to visually locate UI elements and test different locator strategies on the fly.
That’s it! You now have Appium Inspector connected and ready.
In the next section, we’ll see why and when Appium Inspector is more useful.
4. Using Appium Inspector Along with Windows Inspector
After connecting Appium Inspector to your running desktop app using the NativeWindowHandle, Appium Inspector becomes the primary tool you will rely on for locator work. Windows Inspector plays a small, supporting role.
4.1 Why Appium Inspector Becomes More Useful
Based on our experience with a legacy applications:
In these situations, Appium Inspector provided a much better inspection experience because it:
4.2 When to Use Each Tool
Windows Inspector:
Use it only to:
Appium Inspector:
Use it for:
In short:
Windows Inspector = handle + cross-check
Appium Inspector = real locator development + verification
This combination works especially well for legacy desktop apps where metadata is inconsistent or limited.
Now that we understand how Appium Inspector and Windows Inspector complement each other and why Appium Inspector becomes the primary tool for locator work. Let’s move on to the practical part. In the next section, we’ll look at how to actually write selectors using Appium Inspector.
5. Writing Selectors Using Appium Inspector
For the hands-on demonstration in this section, we are using the Windows Calculator app because it’s simple and available on every Windows machine. However, the locator strategies explained here come from real experience working with a large legacy desktop application, where:
The Calculator app helps demonstrate the same concepts in a clean, reproducible way.
5.1 Start with Appium Inspector’s Suggested Locator
When you click any element in Appium Inspector, it displays:
Refer Fig. 4 Appium Inspector connected to the Calculator app. We clicked on number “5” button in Appium Inspector.
You’ll see:
A unique automationId exists, so the best locator is:
driver.find_element("accessibility id", "num5Button")
In many legacy apps, this simplicity is rare. AutomationIds may be missing, duplicated, or meaningless. That’s where XPath becomes necessary.
5.2 Build XPath When Simple Locators Are Missing
Appium Inspector makes XPath development easier because you can:
Example xpath with a visible attribute:
//Button[@Name="Equals"]
When Name is missing:
//Pane[@ClassName="Border"][1]//Button[2]
Note: As you can see, this would be an extremely brittle XPath that relies on indexes. Not something we would recommend unless it is the only option available to testers.
When nothing is unique (typical in legacy apps):
//Window//Pane[3]//Pane[2]//Text[1]
Note: This XPath is even more brittle. Not only are we using indexes but we are also assuming a chain of elements in the DOM the hierarchy. Don’t do this unless you have no other option available.
Appium Inspector’s built-in XPath search helps confirm whether the locator is correct.
5.3 Cross-check Elements Using Windows Inspector (Only if Needed)
If the hierarchy looks confusing or an element appears “invisible” in Appium Inspector:
This avoids writing XPath for the wrong element.
5.4 Use Absolute XPath Only as a Last Resort
Some legacy UI elements expose no reliable attributes at all.
In those cases, absolute XPath becomes unavoidable:
/Window/Pane/Pane[1]/Pane[2]/Edit[3]
If you must use absolute XPath:
In short,
Windows Inspector → use for handle + occasional attribute verification
Appium Inspector → main tool for building and validating selectors
This workflow helps you create stable locators even for complex legacy desktop applications.
6. Verifying Your XPath in Appium Inspector
Appium Inspector makes it easy to test and validate your locator before using it in your automation code. This is especially useful when working with desktop applications that require complex or absolute XPaths.
Follow these steps to verify your locator:
This fast feedback loop helps you fine-tune your locator strategy, confirm element visibility, and ensure your XPath will behave consistently when used in your tests.
Now that you have seen how to attach to a running desktop app using the NativeWindowHandle and explore its elements, it becomes clear why many teams rely on Appium Inspector during real-world automation work. For complex or legacy applications where attributes like AutomationId or Name are missing or duplicated, writing reliable XPaths can be challenging. Appium Inspector helps in these situations by presenting a cleaner UI hierarchy and allowing you to validate XPaths instantly, something that is harder to do with Windows Inspect.exe alone. Using both tools together gives you a balanced and effective workflow. Windows Inspector helps you identify the right window and understand how elements are exposed, while Appium Inspector helps you refine and verify selectors with confidence. With practice, this combined approach will make your desktop automation more stable, predictable, and easier to maintain.
Happy automating!
Hire Qxf2 for your desktop automation needs
Desktop automation is not common anymore. Qxf2 still does it. Our open-source framework already supports Windows desktop tests and works well for messy UI flows. If you need help setting up solid desktop tests, we are happy to jump in.

I love technology and learning new things. I explore both hardware and software. I am passionate about robotics and embedded systems which motivate me to develop my software and hardware skills. I have good knowledge of Python, Selenium, Arduino, C and hardware design. I have developed several robots and participated in robotics competitions. I am constantly exploring new test ideas and test tools for software and hardware. At Qxf2, I am working on developing hardware tools for automated tests ala Tapster. Incidentally, I created Qxf2’s first robot. Besides testing, I like playing cricket, badminton and developing embedded gadget for fun.

