Do you want to connect Pi to available WiFi without Ethernet cable and seamlessly move across networks? Please read along.
I was a part of an interesting IoT project called water-cooler-talks at QXf2, for which I had to set up my Raspberry Pi device. I wanted to set up my Raspberry Pi in headless mode and tried to connect the device to my home network using the Ethernet cable. However, I was unable to find the IP address of the device in order to help me SSH into it. The device was not getting listed in my router’s DHCP table. On looking at the WiFi properties on my Windows 10 machine, there was no option to select ethernet under Internet Connection Sharing settings to make my Raspberry Pi device share the home WiFi network with my laptop. Took a while for me to find a way out and hence decided to share it to make life easier for someone hitting a similar issue.
How to connect your Raspberry Pi device directly to a WiFi network?
-
1.a) Re-format the Micro SD card with a SD card formatter software, to erase out data completely(considering you have already flashed the OS and stuck like me.) and burn the Raspbian Buster OS image afresh into it. You could refer our previous blog Setup Raspberry Pi headlessly using Ethernet cable, if you are not familiar with the SD card formatter tool or the OS download.
1.b) If you are starting afresh with the device setup, then skip 1.a) Rather directly burn the Raspbian Buster OS image into the MicroSD card and proceed.
2. Add a conf file named ‘wpa_supplicant.conf’ in the boot partition of the SD card and add the WiFi network credentials namely (SSID, Password and County codes) into it. I have entered “IN” as in INDIA. You could replace it with your country code. Also, remember to keep the “wpa_supplicant.conf” as a text file. That is, as “wpa_supplicant.conf.txt” until you edit and then you could rename it as “wpa_supplicant.conf”.
Contents of wpa_suppliant.conf:
   ctrl_interface=DIR=/var/run/wpa_supplicant GROUP=netdev
   country=IN
   update_config=1

   network={
      ssid="Enter name of your wireless LAN"
      psk="Enter password for your wireless LAN"
   }
3. Add an empty file named ‘ssh’ (without any extension) in the boot partition of the SD card. This will ensure SSH is enabled and the device connects to the specified WiFi network on booting.
4. Insert the MicroSD card into Pi and turn on Pi by connecting it to the adapter or laptop.

5. On booting the Raspberry Pi device, you should be able to find the device listed on the router’s DHCP table(booting can take a couple of minutes).
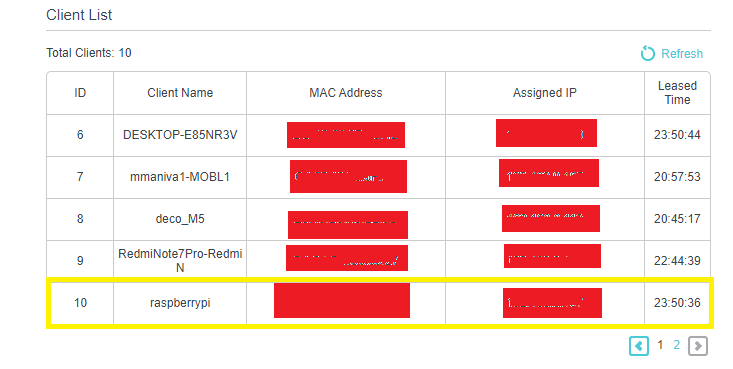
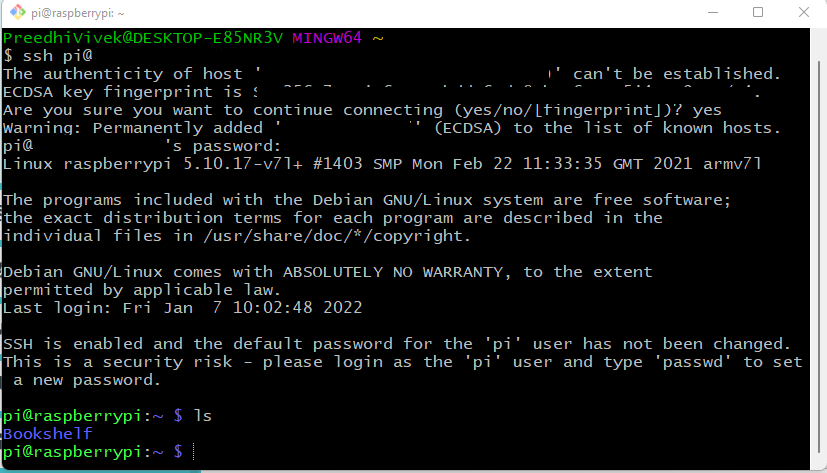
Get your Raspberry Pi’s IP and ssh into your device.
What if you want to change to a different network?
There are times when you would want to work with your Pi on a fall-back network or would want to edit the credentials of your primary network. You could seamlessly move to different networks by doing the following.
-
1. SSH into your Pi and edit the wpa_supplicant.conf file. It would now exist under the /etc/wpa_supplicant directory
`sudo nano /etc/wpa_supplicant.conf`
2. Add your alternate network credentials in wpa_supplicant.conf file. Sample file for your reference. You could add as many networks as you would want to switch over your Pi to.
   ctrl_interface=DIR=/var/run/wpa_supplicant GROUP=netdev
   country=IN
   update_config=1

   network={
      ssid="Enter name of primary network"
      psk="Enter password for primary network"
   }

   network={
      ssid="Enter name of secondary network"
      psk="Enter Password for secondary network"
   }
3. Save the file and exit nano. Reboot the Pi device.
Now you should be able to seamlessly work across the networks that you have added to the conf file. Pi on booting would detect the available network and connect to it.
Hope this post helps you to connect Pi to available WiFi without Ethernet cable and seamlessly move across networks.
Happy exploring Raspberry Pi!
I have done my Masters in Software Engineering. I am very passionate about testing and I’ve had the opportunity to work in different phases of the software life cycle. Have built and tested various applications. My curiosity drives me to explore, learn and keep myself updated. Qxf2 keeps me constantly challenged with interesting work and encourages me into blogging about it. I love music, reading and staying fit!


Is it possible that whenever wifi is not available, pi turns to hotspot so that programs can be updated. And can again turn to wifi mode
Hi,
Do you want to have your
Raspberry Piconnect to a secondary network when the primary goes down?I ran a Google search, this might be useful