This post will cover how to create a custom microVM using Firecracker. We will add a simple Flask app to the microVM. By doing so, you will learn how to install custom packages to your own microVM. This post assumes that you have used Firecracker and tried out a basic example already.
Why this post?
AWS Lambda stands out as one of our preferred AWS services at Qxf2 Services. We use it to develop event-driven applications for internal use, such as sending reminders on our team channel for upcoming holidays, conducting weekly surveys to monitor our technological exposure, and checking for Personal Time Off (PTO) messages on a channel, etc. While we have tested/explored a few aspects of Lambdas, we had been curious about how serverless environment for AWS Lambda was built.
Firecracker is a open source virtualization technology built by AWS to optimize running Lambdas, it is a virtual machine monitor that uses Linux Kernel-based Virtual Machine(KVM) to create and manage microVMs.
We decided to explore Firecracker by building a microVM, when we set out on our task, we referred multiple posts to build the microVM, we hit a few issues when configuring network interface for the VM, while debugging we found out the issues were caused by the different commands we were using from different posts. We later identified an useful resource in the Firecracker repo and realised with a few changes to a couple of scripts we will be able to create a microVM to suit our purpose in no time, this post is a documentation of how we went about it.
Creating our custom microVM
In this section, we will add our custom Flask application into the microVM. The app chosen is cars-api. There is nothing particularly special about the application itself. We are simply using it to illustrate how to:
1. Create a custom ext4 filesystem
2. Build a kernel
to add your own applications into a microVM and then run it using Firecracker.
The microVM recipe:
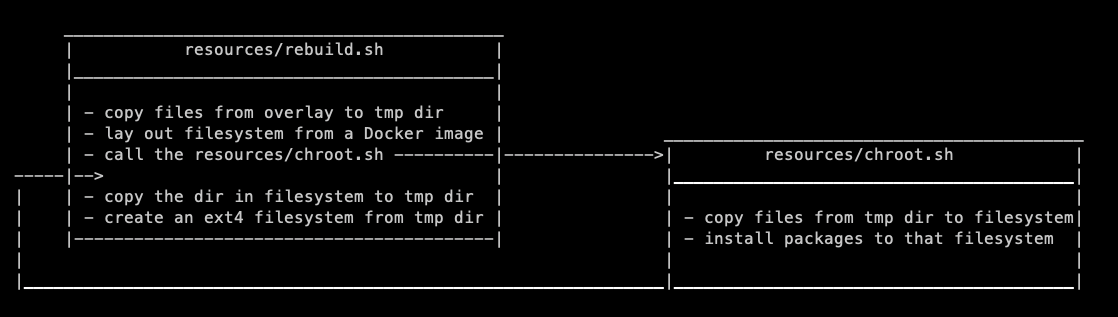
We used the recipe provided by Firecracker to create a microVM, the scripts that form the recipe simplifies building a microVM, in a brief summary: the resources/rebuild.sh script copies the contents of the overlay to a temporary directory then lays out the filesystem from public.ecr.aws/ubuntu/ubuntu:jammy docker image and calls the resources/chroot.sh script, the chroot.sh script then copies the contents of the temporary directory to the filesystem and installs a few packages on it and cedes control back to the resources/rebuild.sh script which then copies the filesystem to the temporary directory and builds an ext4 filesystem image from that directory and then finally builds Linux kernels from source based on these configs.
Note:If you wish to create a microVM from the ground up instead of using a recipe, refer the instructions in Creating Custom rootfs and kernel Images.
Modifications to the recipe to build our customVM:
a. Adding packages required:
Firecracker is able to boot the microVM really fast by including only packages that are absolutely necessary to run the VM, to run the cars-api service we needed python3.10-venv & python3-pip & git packages installed on the VM.
We modified the resources/chroot.sh file to include these packages
packages="udev systemd-sysv openssh-server iproute2 curl socat python3-minimal python3.10-venv python3-pip git iperf3 iputils-ping fio kmod tmux hwloc-nox vim-tiny trace-cmd linuxptp" |
b. Creating a Python3.10 virtualenv:
We modified the resources/chroot.sh file to add steps to create a Python3.10 virtualenv
# Create a venv mkdir -p /home/venv python3 -m venv /home/venv/cars_api |
c. Cloning the cars-api repo and installing the Python packages from requirements file on to the virtualenv:
We modified the resources/chroot.sh file again to add steps to create a new projects directory and clone the Test automation repo inside it
# Clone cars API repo mkdir -p /home/projects git clone https://github.com/qxf2/cars-api.git /home/projects/cars-api source /home/venv/cars_api/bin/activate python -m pip install -r /home/projects/cars-api/requirements.txt deactivate |
d. Adding cars-api as a systemd service:
We added a cars-api systemd service file:
[Unit] Description=A Cars API service After=local-fs.target [Service] ExecStart=/usr/local/bin/cars_api.sh StandardOutput=inherit KillMode=process Restart=always RestartSec=3 [Install] WantedBy=multi-user.target |
and its corresponding script – cars_api.sh:
#!/bin/bash source /home/venv/cars_api/bin/activate python /home/projects/cars-api/cars_app.py |
to the overlay directory.
e. Setting up internet access:
The fcnet systemd service executes fcnet-setup.sh script to assign the IP address – 172.16.0.2 to the microVM based on the MAC address – 06:00:AC:10:00:02. The MAC address is set when we start the microVM. We modified the fcnet-setup.sh script to set gateway and nameserver for the microVM.
# Add default gateway ip route add default via 172.16.0.1 dev eth0 # Set nameserver echo "nameserver 8.8.8.8" > /etc/resolv.conf |
You can find the updated script here – fcnet-setup.sh
f. Increasing the size of the microVM to accomadate the new changes:
The default size of the microVM created using the recipe is 300M to accommodate the new packages installed we modified the resources/rebuild.sh file to increase the size of the VM, increase the size to 400M
# Default size for the resulting rootfs image is 300M, increase the size to 400M local SIZE=${3:-400M} |
Building the filesystem & kernel
To build the custom filesystem capable of running the cars-api at startup & kernel we ran the resources/rebuild.sh script.
xxxxx@yyyyyyy:/home/xxxxx/projects/firecracker# ./resources/rebuild.sh ... ... [4.0K] /home/xxxx/projects/firecracker/resources/aarch64 ├── [1.8M] initramfs.cpio ├── [400M] ubuntu-22.04.ext4 ├── [2.5K] ubuntu-22.04.id_rsa ├── [5.7K] ubuntu-22.04.manifest ├── [ 60M] ubuntu-22.04.squashfs ├── [6.0M] vmlinux-4.14.336 ├── [ 47K] vmlinux-4.14.336.config ├── [ 16M] vmlinux-5.10.208 ├── [ 56K] vmlinux-5.10.208.config ├── [ 16M] vmlinux-6.1.74 └── [ 62K] vmlinux-6.1.74.config 1 directory, 11 files |
The resources/rebuild.sh script took ~2.5 hours to complete, it built a ubuntu 22.04 ext4 filesystem & kernels of three different versions by default, to prevent building redundant kernels(we need only one) and to reduce the time it takes for the build script to complete we modified the script to support CLI params to build filesystem or kernel on demand.
xxxxx@yyyyyyy:/home/xxxxx/projects/firecracker# ./resources/rebuild.sh -h Usage: h : Help f : Build Ubuntu-22.04 filesystem k <ver> : Build kernel of version <ver>, supports only 4.14, 5.10, 6.1 for now xxxxx@yyyyyyy:/home/xxxxx/projects/firecracker# ./resources/rebuild.sh -f -k 6.1 ... ... [4.0K] /home/xxxx/projects/firecracker/resources/aarch64 ├── [1.8M] initramfs.cpio ├── [400M] ubuntu-22.04.ext4 ├── [2.5K] ubuntu-22.04.id_rsa ├── [6.4K] ubuntu-22.04.manifest ├── [ 87M] ubuntu-22.04.squashfs ├── [ 16M] vmlinux-6.1.74 └── [ 62K] vmlinux-6.1.74.config 1 directory, 7 files +07:51:26 getopts :hfk: option |
You can find the updated script here resources/rebuild.sh that support CLI params
How to run the new microVM
Running a microVM entails these 2 steps:
1. Setting up network interface
2. Staring microVM using config file
Note: This section assumes you already have Firecracker binary in your system path
1. Setting up network interface on the host:
Firecracker supports only TUN/TAP network, we created a tap device to route traffic from/to the microVM. A tap is a virtual network interface(like an ethernet card), it exposes file descriptor to an application to send/receive packets, we followed the steps here network-setup to create a tap device tap0 and together with a few iptable rules we were able to route the packets written to tap0 to eth0 – the primary network interface on the host.
We had created a network script to help us setup the tap device before running the microVM every time. This is how the script looks:
#!/bin/bash # https://github.com/firecracker-microvm/firecracker/blob/main/docs/getting-started.md set -eux TAP_DEV="tap0" TAP_IP="172.16.0.1" MASK_SHORT="/30" # Setup network interface sudo ip link del "$TAP_DEV" 2> /dev/null || true sudo ip tuntap add dev "$TAP_DEV" mode tap sudo ip addr add "${TAP_IP}${MASK_SHORT}" dev "$TAP_DEV" sudo ip link set dev "$TAP_DEV" up # Enable ip forwarding sudo sh -c "echo 1 > /proc/sys/net/ipv4/ip_forward" # Set up microVM internet access sudo iptables -t nat -D POSTROUTING -o eth0 -j MASQUERADE || true sudo iptables -D FORWARD -m conntrack --ctstate RELATED,ESTABLISHED -j ACCEPT \ || true sudo iptables -D FORWARD -i tap0 -o eth0 -j ACCEPT || true sudo iptables -t nat -A POSTROUTING -o eth0 -j MASQUERADE sudo iptables -I FORWARD 1 -m conntrack --ctstate RELATED,ESTABLISHED -j ACCEPT sudo iptables -I FORWARD 1 -i tap0 -o eth0 -j ACCEPT |
You can find this script here – setup_tap.sh
This scripts creates a tap0 interface on the host and assigns 172.16.0.1 IP address to that device.
2. Starting microVM using config file:
With the ubuntu ext4 filesystem and a kernel at our disposal, the next step is to start the microVM. There are couple of ways to start a microVM:
a. run the firecracker binary & create a unix socket and then run subsequent API requests to set VM configuration values
b. run the firecracker binary with a JSON with VM configuration values
We used the JSON config file approach, we set the rootfs – ubuntu-22.04.ext4 we created, network interface – eth0, MAC – 06:00:AC:10:00:02 with a few other values in the JSON file.
this is the JSON configuration file we had used:
{
  "boot-source": {
    "kernel_image_path": "vmlinux-6.1.72",
    "boot_args": "ro console=ttyS0 noapic reboot=k panic=1 pci=off"
  },
  "drives": [
    {
      "drive_id": "rootfs",
      "path_on_host": "ubuntu-22.04.ext4",
      "is_root_device": true,
      "is_read_only": false
    }
  ],
  "network-interfaces": [
      {
          "iface_id": "eth0",
          "guest_mac": "06:00:AC:10:00:02",
          "host_dev_name": "tap0"
      }
  ],
  "machine-config": {
    "vcpu_count": 2,
    "mem_size_mib": 1024
  }
} |
You can find the config file here – vmconfig.json
With the filesystem – ubuntu-22.04.ext4 and kernel – vmlinux-6.1.72 images in the same directory as the vmconfig.json, the following command starts the microVM:
firecracker --config-file vmconfig.json |
We waited a couple of secs to have a functional VM on our hands.
Ubuntu 22.04.3 LTS ubuntu-fc-uvm ttyS0 ubuntu-fc-uvm login: root (automatic login) Welcome to Ubuntu 22.04.3 LTS (GNU/Linux 5.10.208 aarch64) * Documentation: https://help.ubuntu.com * Management: https://landscape.canonical.com * Support: https://ubuntu.com/advantage This system has been minimized by removing packages and content that are not required on a system that users do not log into. |
We were able to validate that the cars_api.service was running inside the microVM:
root@ubuntu-fc-uvm:~# journalctl -u cars_api -f Jan 22 07:03:59 ubuntu-fc-uvm systemd[1]: Started A Cars API service. Jan 22 07:04:02 ubuntu-fc-uvm cars_api.sh[537]: * Serving Flask app 'cars_app' Jan 22 07:04:02 ubuntu-fc-uvm cars_api.sh[537]: * Debug mode: off Jan 22 07:04:02 ubuntu-fc-uvm cars_api.sh[537]: WARNING: This is a development server. Do not use it in a production deployment. Use a production WSGI server instead. Jan 22 07:04:02 ubuntu-fc-uvm cars_api.sh[537]: * Running on all addresses (0.0.0.0) Jan 22 07:04:02 ubuntu-fc-uvm cars_api.sh[537]: * Running on http://127.0.0.1:5000 Jan 22 07:04:02 ubuntu-fc-uvm cars_api.sh[537]: * Running on http://127.0.0.1:5000 Jan 22 07:04:02 ubuntu-fc-uvm cars_api.sh[537]: Press CTRL+C to quit |
We were able to fire API queries against the cars_api service running on localhost in port 5000 inside the microVM from the host:
xxxxx@yyyyyyy:/home/xxxxx/projects# curl -I http://172.16.0.2:5000 HTTP/1.1 200 OK Server: Werkzeug/3.0.1 Python/3.10.12 Date: Mon, 22 Jan 2024 07:09:02 GMT Content-Type: text/html; charset=utf-8 Content-Length: 10625 Connection: close |
To exit the VM run reboot inside it.
root@ubuntu-fc-uvm:~# reboot [ OK ] Removed slice Slice /system/modprobe. [ OK ] Stopped target Graphical Interface. [ OK ] Stopped target Multi-User System. ....... [ 751.225980] reboot: Restarting system 2024-01-22T07:16:28.274015407 [anonymous-instance:fc_vcpu 0] Received KVM_SYSTEM_EVENT: type: 2, event: 0 2024-01-22T07:16:28.274107593 [anonymous-instance:main] Vmm is stopping. 2024-01-22T07:16:28.275004801 [anonymous-instance:main] Vmm is stopping. 2024-01-22T07:16:28.285907182 [anonymous-instance:main] RunWithApiError error: MicroVMStopped without an error: Ok Error: RunWithApi(MicroVMStoppedWithoutError(Ok)) |
How to re-run the microVM
To re-run the microVM, delete the unix socket file – /run/firecracker.socket the Firecracker binary created last time the microVM was started using the config file
rm /run/firecracker.socket |
Now to start the microVM against, use the same command as last time:
firecracker --config-file vmconfig.json |
There you go, a functional micoVM created using the recipe in minutes.
Hire technical testers from Qxf2
This post was written by an experienced tester. Surprised? Qxf2 hires technical testers that continually evolve and keep themselves up to date. Our testers go well beyond traditional “manual” or “automation” testing. We dive deep into things and gel well with engineering teams. If you are looking to hire technical testers and get a fresh perspective on testing, contact us.
My expertise lies in engineering high-quality software. I began my career as a manual tester at Cognizant Technology Solutions, where I worked on a healthcare project. However, due to personal reasons, I eventually left CTS and tried my hand at freelancing as a trainer. During this time, I mentored aspiring engineers on employability skills. As a hobby, I enjoyed exploring various applications and always sought out testing jobs that offered a good balance of exploratory, scripted, and automated testing.
In 2015, I joined Qxf2 and was introduced to Python, my first programming language. Over the years, I have also had the opportunity to learn other languages like JavaScript and Shell scripting (if it can be called a language at all). Despite this exposure, Python remains my favorite language due to its simplicity and the extensive support it offers for libraries.
Lately, I have been exploring machine learning, JavaScript testing frameworks, and mobile automation. I’m focused on gaining hands-on experience in these areas and sharing what I learn to support and contribute to the testing community.
In my free time, I like to watch football (I support Arsenal Football Club), play football myself, and read books.

