Why this post?
In this post, we are going to look into, how to test an iOS app with Python-based testing framework using appium. This is a step by step procedure, right from building an app, writing a test for iOS app in Python using Qxf2 test automation framework and then actual testing of app with Appium on Mac OS using an iOS Simulator.
Tools we need for iOS testing
Step 1. Install node.js and npm
We need node.js for running Appium Server.
brew install node |
Step 2. Install Appium
Appium can be installed through command line or through the link given below:
npm install -g appium |
Install Appium Desktop.
Step 3. Install Python and Python client Library for Appium
pip install Appium-Python-Client |
Step 4. XCode
Xcode is the development and debug environment for Mac. It provides required tools, files for dev/automation for Mac and iOS apps. You can get XCode from the App Store.
Step 5. Install XCode command-line tools
run the following command:
xcode-select --install |
Step 6. Create Apple ID
To develop, test or run applications on Mac, you need a free Apple ID. You can create the same, using this link. You can add this Apple ID to Xcode as below:
Goto Xcode – preferences – account, Add Apple ID
Step 7. Carthage
In order to launch WebDriverAgent, your macOS will need to have Carthage installed.
brew install Carthage |
In case you need more information on the installation of tools for iOS testing you can refer to one of our previous Blogs. Also, in case you want to refer to videos for installation, this link will be useful.
Creating an App with Xcode
We will create a simple app in Swift with Xcode which has two input fields for email and phone number and has a Submit button. To start open Xcode and follow the steps below:
1. Select a new project from the File menu.
2. From iOS Click on “Single View app”, Click “Next”.
3. Enter the “Product Name” as the name of the app you want to create
4. Enter the “Team” and “Organization Name”.
5. With all the above details “Bundle Identifier” will be generated. We need a “Bundle Identifier”, for running the test, keep that handy.
6. Enter the language with which we want to create the app, in our case it is Swift.
7. Select the “User Interface” as Storyboard.
8. If you want to include Unit tests and UI tests, you can tick those options and Click on Next.
9. Then select the workspace where we want this app to be created.
10. One will be then redirected to workspace for an app, we need to create.
11. One can find many files/folders getting created.
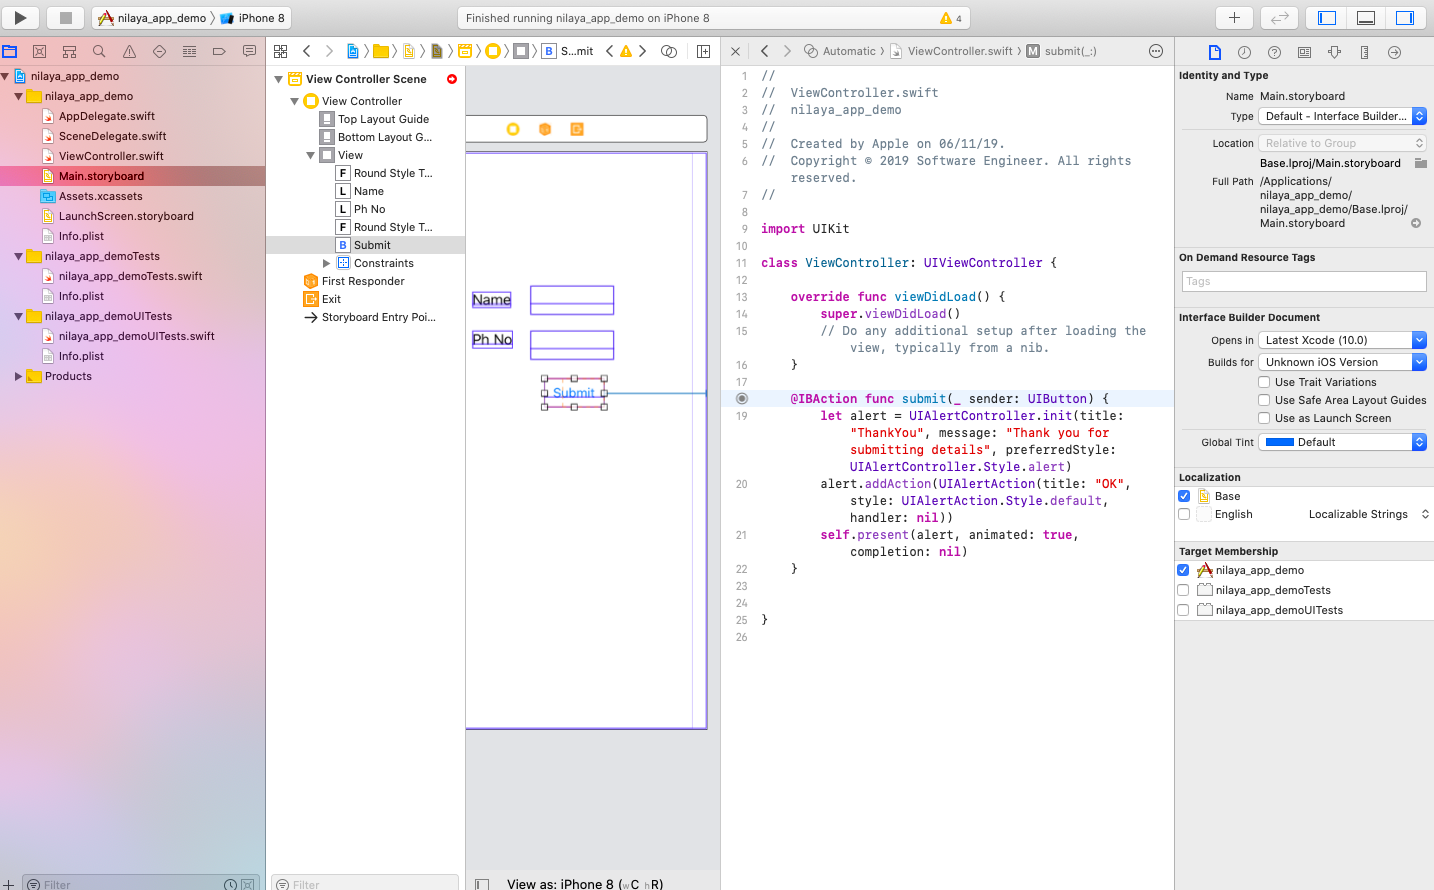
12. To create an app, in “ViewController.swift” file we have to write code to define what action needs to be taken after entering the details in the app. In our app, once the user enters the details like mail and phone number and clicks on “Submit” a flash message should display as “Thanks for entering the details”.
import UIKit

class ViewController: UIViewController {

    override func viewDidLoad() {
        super.viewDidLoad()
        // Do any additional setup after loading the view, typically from a nib.
    }

    @IBAction func submit(_ sender: UIButton) {
        let alert = UIAlertController.init(title: "ThankYou", message: "Thank you for submitting details", preferredStyle: UIAlertController.Style.alert)
        alert.addAction(UIAlertAction(title: "OK", style: UIAlertAction.Style.default, handler: nil))
        self.present(alert, animated: true, completion: nil)
    }


} |
13. Then comes the design of the app layout. So for this, there is a “storyboard” file called “Main.storyboard”. Click on the same, users can draw here the basic layout of their app. There is an option Library. It has several options to pull for an app to be built. On the right-hand side of the screen, there is an option “+”. Click on the same. Click on the required Object and pull it to Storyboard. In this case, we need “Text Field”, “Label” and “Button”.
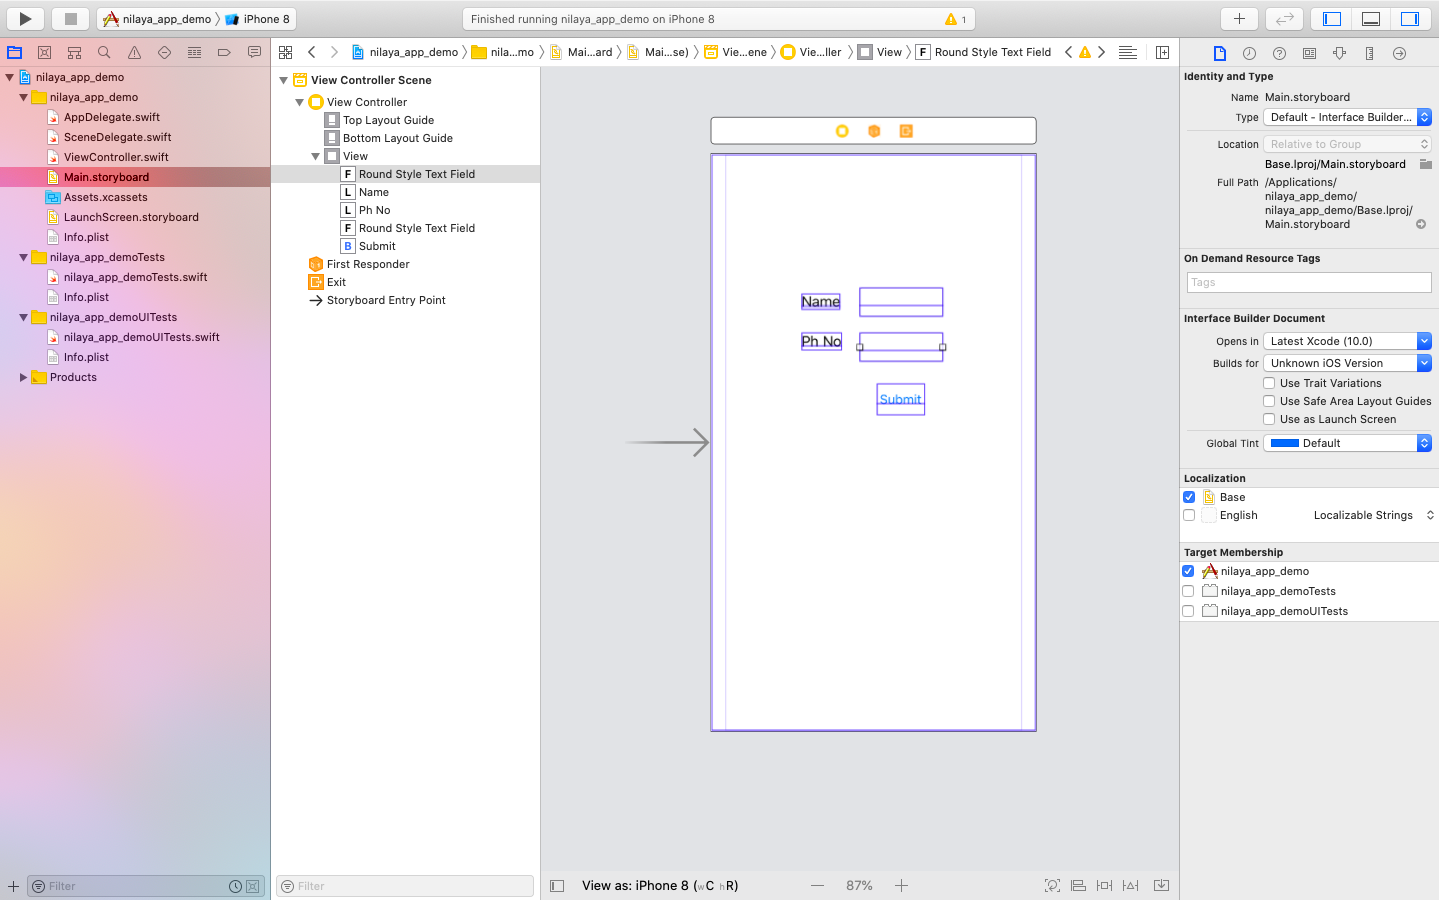
14. Linking of an app, UI with viewcontroller.swift. In this app after entering details like email and phone number and clicking on Submit button a flash message on the screen should be displayed. So we need to link the viewcontroller.swift to main.storyboard, “Submit” button.
15. Now it is time to build an app. From the tab, “Product”, there is an option, “Build”. On clicking this option, the build process gets initiated. If no issues are seen, “Build succeeded” is flashed on the screen. Then on the left pane, under the “Products” folder, the user can find .app file.
Writing Code to test an app with Qxf2 Framework
For testing the app we built, let’s have a look at how to write a test for this app.
The Mobile test case is as below:
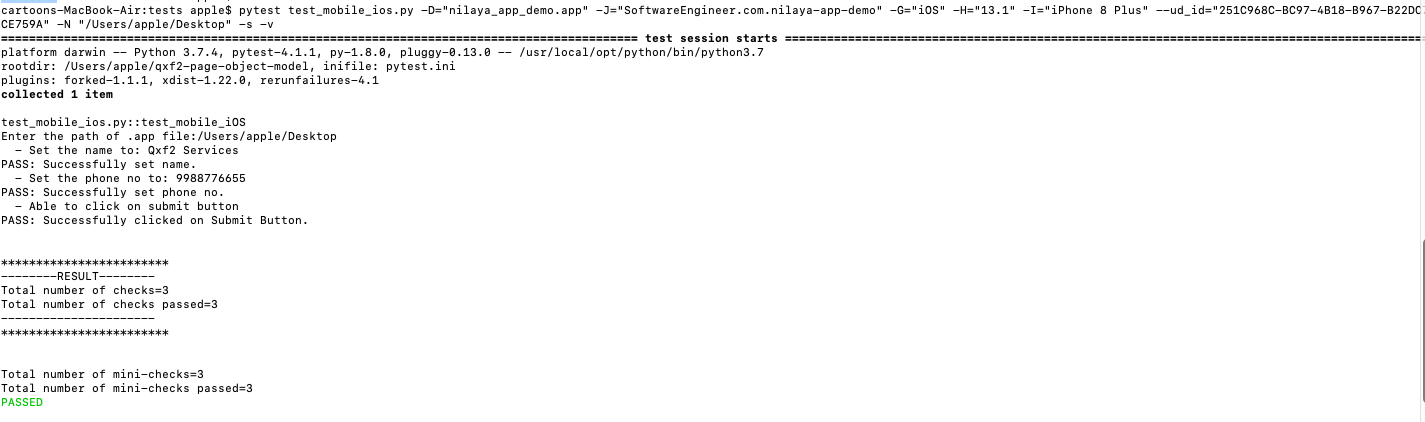
import os, sys, time sys.path.append(os.path.dirname(os.path.dirname(os.path.abspath(__file__)))) from page_objects.PageFactory import PageFactory from utils.Option_Parser import Option_Parser import conf.mobile_ios_conf as conf import conf.testrail_caseid_conf as testrail_file def test_mobile_iOS(mobile_os_name, mobile_os_version, device_name, app_package, app_activity, remote_flag, device_flag, testrail_flag, tesults_flag, test_run_id,app_name,app_path,ud_id,org_id,signing_id,no_reset_flag): #def test_mobile_iOS(mobile_os_name, mobile_os_version, device_name, app_package, app_activity, remote_flag, device_flag, testrail_flag, tesults_flag, test_run_id, app_name,app_path, ud_id, org_id, signing_id, no_reset_flag): "Run the test." #try: # Initalize flags for tests summary. expected_pass = 0 actual_pass = -1 #1. Create a test object. test_obj = PageFactory.get_page_object("avinash demo main page") #Get the path of the .apk file app_path = input('\nEnter the path of .app file:') #2. Setup and register a driver start_time = int(time.time()) #test_obj.register_driver(mobile_os_name,mobile_os_version,device_name,app_package,app_activity,remote_flag,device_flag,app_name,app_path,ud_id,org_id,signing_id,no_reset_flag) test_obj.register_driver(mobile_os_name,mobile_os_version,device_name,app_package,app_activity,remote_flag,device_flag,app_name,app_path,ud_id,org_id,signing_id,no_reset_flag) #3. Get the test details from the conf file name = conf.name phone = conf.phone_no #4. Set the name in the demo app. result_flag = test_obj.set_name_input(name) test_obj.log_result(result_flag, positive="Successfully set name.", negative="Failed to set name.") #5. Set the phone no in the demo app. result_flag = test_obj.set_phone_input(phone) test_obj.log_result(result_flag, positive="Successfully set phone no.", negative="Failed to set phone no.") #6. Click on submit button. result_flag = test_obj.click_submit() test_obj.log_result(result_flag, positive="Successfully clicked on Submit Button.", negative="Failed to click on Submit Button") #7. Print out the results. test_obj.write_test_summary() #8. Teardown and Assertion. test_obj.wait(3) expected_pass = test_obj.result_counter actual_pass = test_obj.pass_counter test_obj.teardown() #except Exception as e: print ("Exception when trying to run test:%s" % __file__) print ("Python says:%s" % str(e)) assert expected_pass == actual_pass,"Test failed: %s"%__file__ # ---START OF SCRIPT if __name__ == '__main__': print ("Start of %s" % __file__) # Creating an instance of the class. options_obj = Option_Parser() options = options_obj.get_options() # Run the test only if the options provided are valid. if options_obj.check_options(options): test_mobile_iOS(mobile_os_name = options.mobile_os_name, mobile_os_version = options.mobile_os_version, device_name = options.device_name, app_package = options.app_package, app_activity = options.app_activity, remote_flag = options.remote_flag, device_flag = options.device_flag, testrail_flag = options.testrail_flag, test_run_id = options.test_run_id, app_name = options.app_name, ud_id = options.aud_id, org_id = options.org_id, signing_id = options.signing_id, no_reset_flag = options.no_reset_flag) else: print ('ERROR: Received incorrect comand line input arguments') print (options_obj.print_usage()) |
How to setup test with .app
1. Copy the path location of your .app file.
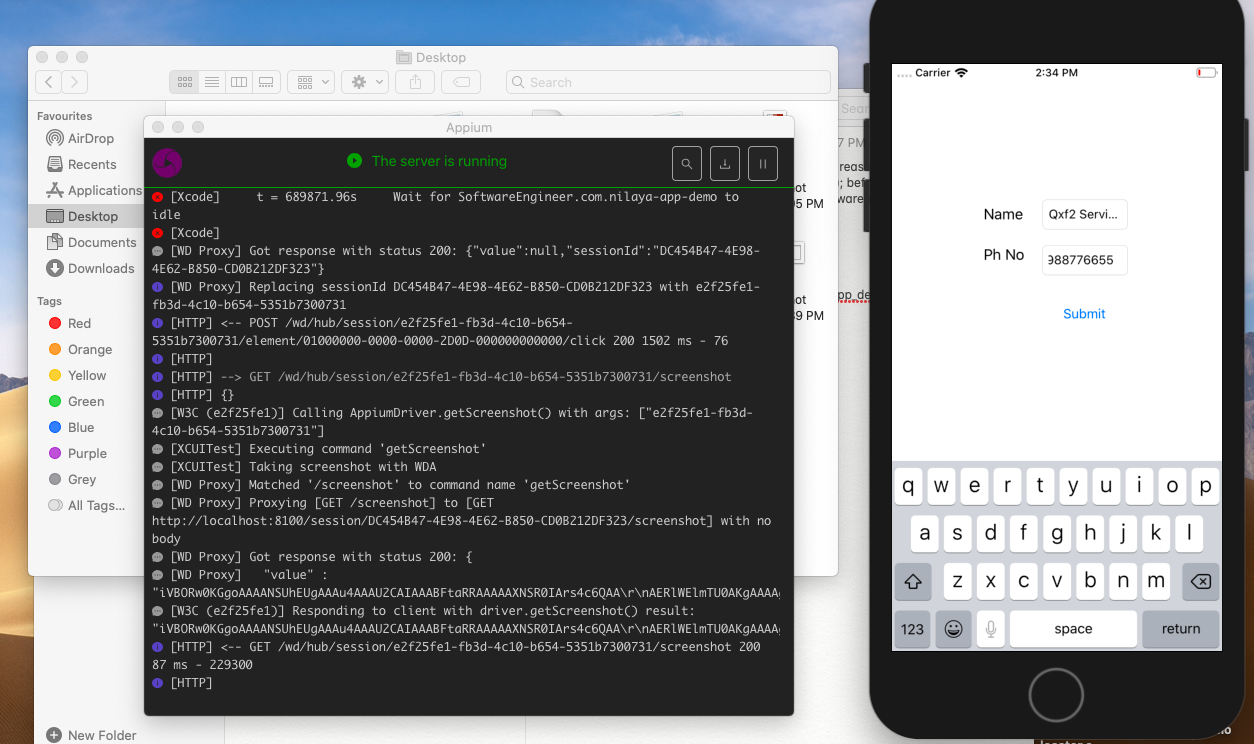
2. Run the appium server.
3. From Xcode Simulator, select the device which is available (in our case it was “iPhone 8”).
4. On the terminal, when we run command “xcrun simctl list”, we get the devices available with their udid.
5. Run the test case as below with capabilities as shown below on Simulator:
a) D: App name b) J: Bundle identifier c) G: Operating System d) H: OS Version e) I: Simulator Device f) ud_id: Unique identifier for Apple Devices g) N: .app location |
6. Qxf2 Framework has some fixtures defined, to take information related to capabilities as below:
@pytest.fixture def ud_id(request): "pytest fixture for iOS udid" return request.config.getoption("--ud_id") @pytest.fixture def org_id(request): "pytest fixture for iOS team id" return request.config.getoption("--org_id") @pytest.fixture def signing_id(request): "pytest fixture for iOS signing id" return request.config.getoption("--signing_id") @pytest.fixture def no_reset_flag(request): "pytest fixture for no_reset_flag" return request.config.getoption("--no_reset_flag") |
Command to run the tests with the required fixtures is shown below:
pytest test_mobile_ios.py -D="nilaya_app_demo.app" -J="SoftwareEngineer.com.nilaya-app-demo" -G="iOS" -H="13.0" -I="iPhone 8" --ud_id="251C968C-BC97-4B18-B967-B22DC7CE759A" -N "/Users/apple/Desktop" -s -v |
Hope you liked this post and is helpful for you to get going on iOS app testing. Happy testing!!!!
I have started my career with Networking Domain.Have 8 years of relevant IT experience in network protocol testing.Experienced in functional testing of various networking protocols and Device-specific features.I was involved mainly in Manual Testing, Writing Test Plans, Updating Release Notes, Documentation for the same.Mainly worked on L4-L7 Load Balancers, Application Accelerators, Application Delivery Controllers.After that, I was looking for Automation Testing and Remote Work Opportunities.I found Qxf2 is the right place.Learning Python,Automation Framework, Exploring New Tools for Automation.My hobbies are listening classical,non-classical music .

