Problem: There is a perception among testers that getting started with mobile automation is hard.
Why this post?
I strongly believe that a tester must have a wide range of skills. You do not need to be an expert in all of them, but it is extremely important to have contemplated a spectrum of concepts and explored a variety of tools. The context under which you test will inform you of the specific choice of testing methodology and test tools to choose. The more options you are aware of, the better your context specific choice is going to be. In this regard, I began noticing that mobile testing has become somewhat of a niche among testers. Testers are reluctant to get started with mobile testing – probably because they think getting started involves a lot of time and effort. At Qxf2 Services, we have decided to tackle the problem head on. This post is the first in a series of quick, easily consumable tutorials geared towards hands-on testers looking to start exploring the mobile testing landscape.
NOTE: In this post we are concentrating only on the “getting started” phase. The tools your test team uses to solve the specific and unique problems can greatly vary. There is no one silver bullet.
Overview
For this post, we will show you how to get started with Selendroid and Python in less than 2 hours. Selendroid is a test automation framework which drives off the UI of Android native and hybrid applications (apps) and the mobile web. Tests are written using the Selenium 2 client API. Selendroid can be used on emulators and real devices. We will show you how to setup an Android emulator, launch a browser, click a link and verify the title of the new page that loads.
1. Download and install Android-Sdk
2. Setup your environment variables
3. Start the emulator
4. Write the Python test
5. Download and start Selendroid
6. Run the test
STEP 1: Download and Install Android-Sdk
From Android web site, download the latest Android-Sdk. This also installs the AVD Manager, a graphical user interface for creating and managing Android Virtual Devices (AVDs).
STEP 2: Setup your environment variables
Make sure you have Java Installed on your machine. Setup the following system environment variables:
ANDROID_HOME= $YOUR_SDK_INSTALL_PATH\sdk JAVA_HOME=$YOUR_JAVA_HOME (e.g.: C:\Program Files\Java\jdk1.8.0_05) |
Add ANDROID_HOME/tools, ANDROID_HOME/platform-tools and ANDROID_HOME/build-tools to your PATH environment variable.
STEP 3: Start the emulator
For this tutorial, we are choosing to use the Android emulator. If you do not have an Android device for testing, you can use an Android virtual device. After installing Android SDK and setting up your system variables, run the below command
android create avd --name Device Name --target android-19 --abi armeabi-v7a |
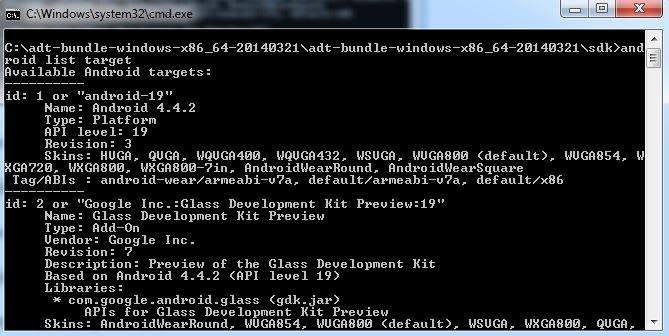
Where “name” Name of the new AVD created, “target” Target ID of the new AVD created and “abi” The CPU/ABI to use for the AVD. You can use the below command to display the list of all available targets. You can then use this details to update the “target” and “abi”:
android list target |
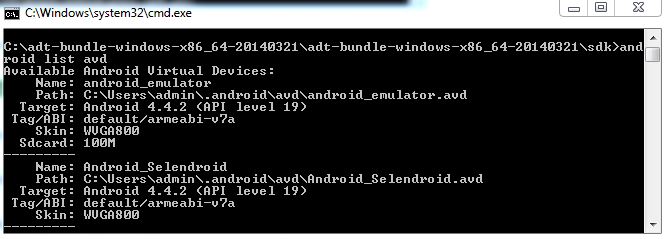
You can run the below command to view the AVD created:
android list avd |
You can run the below command to verify that the AVD is working:
emulator -avd Default |
STEP 4: Write the Python test
We are going to be using a chess website called Chessdom to write our test. We will launch a browser, click on the ‘Chess News’ link and verify the title of the page that loads. The code should look something like the snippet below
""" Qxf2 Services: Sample Python script to get started with Selendroid """ import unittest, time from selenium import webdriver from selenium.webdriver.common.touch_actions import TouchActions class FindElementTest(unittest.TestCase): def setUp(self): "Set up the Android Driver" self.driver = webdriver.Remote(desired_capabilities=webdriver.DesiredCapabilities.ANDROID) self.driver.implicitly_wait(30) def test_Launch_Chessdom(self): "Test the title of the Chess News page on Chessdom.com is correct" # Go to url:http://www.chessdom.com/ self.driver.get('http://www.chessdom.com/') time.sleep(5) #Click on the link "Chess News" ChessNews = self.driver.find_element_by_xpath("//a[@title='View all posts filed under Chess News' and text()='Chess News']") ChessNews.click() time.sleep(5) #Increase sleep time if your emulator has performance issues # Assert that the Page has title "Chess News | Chessdom" self.assertIn("Chess News | Chessdom", self.driver.title) def tearDown(self): "Tear down the test" self.driver.quit() if __name__ == '__main__': unittest.main() |
Why is chess there in this example? Because, I love chess. I named Qxf2 Services after Black’s fantastic 21st move in this masterpiece by Hikaru Nakamura.
STEP 5: Download and start Selendroid
Download Selendroid and cd to the folder where you downloaded the jar. Spin up a new command prompt and run the command below to start Selendroid
java -jar selendroid-standalone-0.10.0-with-dependencies.jar |
Selendroid-standalone will start an http server on port 4444 and will scan all Android virtual devices
STEP 6: Run the test
You can run the test script the normal way you do. We run it via the command prompt.
You can also view the test running in the Android emulator
There you have it! A tutorial to get you started with Selendroid in under two hours.
Note: To save time writing your mobile automation tests, we recommend you start out with our open-sourced test automation framework in Python.

I am a dedicated quality assurance professional with a true passion for ensuring product quality and driving efficient testing processes. Throughout my career, I have gained extensive expertise in various testing domains, showcasing my versatility in testing diverse applications such as CRM, Web, Mobile, Database, and Machine Learning-based applications. What sets me apart is my ability to develop robust test scripts, ensure comprehensive test coverage, and efficiently report defects. With experience in managing teams and leading testing-related activities, I foster collaboration and drive efficiency within projects. Proficient in tools like Selenium, Appium, Mechanize, Requests, Postman, Runscope, Gatling, Locust, Jenkins, CircleCI, Docker, and Grafana, I stay up-to-date with the latest advancements in the field to deliver exceptional software products. Outside of work, I find joy and inspiration in sports, maintaining a balanced lifestyle.


Hi ,
Can Selendroid used to access mobile device database.
We have an application where we used SQLite offline DB in the Mobile Device.
My question is.
Is it possible to access Database through Selendroid?
Is it possible to access Device Logs where the test app is installed?
Thank you
I am new to selendroid , I am starting automation with python for android device. I have a query that how do i start a hybrid application in android device and start testing it with selendroid?
Hi Govinda,
You can refer to link below to see how you can pass the id of the app under test and start testing the app. The id of the app under test must be provided in the format: io.selendroid.testapp:0.17.0
https://github.com/selendroid/demoproject-selendroid/blob/master/src/main/python/FindElementTest.py
https://github.com/selendroid/demoproject-selendroid/blob/master/src/main/python/FindElementTest.py
I am using Linux, Selendroid: 0.17.0 version
I have downloaded stand alone jar files, installed selenium for python
and ran the below command
java -jar selendroid-standalone-0.17.0-with-dependencies_fixed.jar -aut selendroid-test-app-0.17.0.ap
Got this as well……….
INFO: Selendroid standalone server has been started on port: 4444
Also i could not find any other sample test case on google using selendroid with python, plenty are there using java, post few more sample test cases with python……suggest any solution to this problem
This code is not working, showing this error in desired capabilities with below java exceptions
———————————————————————————————-
io.selendroid.standalone.server.handler.CreateSessionHandler handleRequest
SEVERE: Error while creating new session
java.lang.NullPointerException
at io.selendroid.standalone.android.impl.DefaultHardwareDevice.unlockScreen(DefaultHardwareDevice.java:111)
at io.selendroid.standalone.server.model.SelendroidStandaloneDriver.createNewTestSession(SelendroidStandaloneDriver.java:234)
at io.selendroid.standalone.server.model.SelendroidStandaloneDriver.createNewTestSession(SelendroidStandaloneDriver.java:214)
at io.selendroid.standalone.server.handler.CreateSessionHandler.handleRequest(CreateSessionHandler.java:40)
at io.selendroid.standalone.server.BaseSelendroidStandaloneHandler.handle(BaseSelendroidStandaloneHandler.java:45)
at io.selendroid.standalone.server.SelendroidServlet.handleRequest(SelendroidServlet.java:131)
at io.selendroid.server.common.BaseServlet.handleHttpRequest(BaseServlet.java:67)
at io.selendroid.server.common.http.ServerHandler.channelRead(ServerHandler.java:53)
at io.netty.channel.AbstractChannelHandlerContext.invokeChannelRead(AbstractChannelHandlerContext.java:333)
at io.netty.channel.AbstractChannelHandlerContext.fireChannelRead(AbstractChannelHandlerContext.java:319)
at io.netty.handler.traffic.AbstractTrafficShapingHandler.channelRead(AbstractTrafficShapingHandler.java:223)
at io.netty.channel.AbstractChannelHandlerContext.invokeChannelRead(AbstractChannelHandlerContext.java:333)
at io.netty.channel.AbstractChannelHandlerContext.fireChannelRead(AbstractChannelHandlerContext.java:319)
at io.netty.handler.codec.MessageToMessageDecoder.channelRead(MessageToMessageDecoder.java:103)
at io.netty.channel.AbstractChannelHandlerContext.invokeChannelRead(AbstractChannelHandlerContext.java:333)
at io.netty.channel.AbstractChannelHandlerContext.fireChannelRead(AbstractChannelHandlerContext.java:319)
at io.netty.handler.codec.ByteToMessageDecoder.channelRead(ByteToMessageDecoder.java:163)
at io.netty.channel.CombinedChannelDuplexHandler.channelRead(CombinedChannelDuplexHandler.java:148)
at io.netty.channel.AbstractChannelHandlerContext.invokeChannelRead(AbstractChannelHandlerContext.java:333)
at io.netty.channel.AbstractChannelHandlerContext.fireChannelRead(AbstractChannelHandlerContext.java:319)
at io.netty.channel.DefaultChannelPipeline.fireChannelRead(DefaultChannelPipeline.java:787)
at io.netty.channel.nio.AbstractNioByteChannel$NioByteUnsafe.read(AbstractNioByteChannel.java:125)
at io.netty.channel.nio.NioEventLoop.processSelectedKey(NioEventLoop.java:511)
at io.netty.channel.nio.NioEventLoop.processSelectedKeysOptimized(NioEventLoop.java:468)
at io.netty.channel.nio.NioEventLoop.processSelectedKeys(NioEventLoop.java:382)
at io.netty.channel.nio.NioEventLoop.run(NioEventLoop.java:354)
at io.netty.util.concurrent.SingleThreadEventExecutor$2.run(SingleThreadEventExecutor.java:116)
at io.netty.util.concurrent.DefaultThreadFactory$DefaultRunnableDecorator.run(DefaultThreadFactory.java:137)
at java.lang.Thread.run(Thread.java:748)