BrowserStack has a number of useful configuration options. In this post, we will show you how to make your automated test runs to use specific configuration parameters of BrowserStack. We walk you through the steps needed to modify your existing automated test runs to use specific configuration parameters of BrowserStack. We assume you have a BrowserStack account. If not, please sign up for a free trial (no credit card required) over here.
BrowserStack configuration option
In our previous post, we wrote a Selenium test to click on the sign up button on Chess.com. In this example, we will reuse the automated test and run it on a Android device and an iPhone. The automated iPhone test will report to the nightly run while the automated Android test will report to an acceptance run. We also added some useful reporting parameters like project, build and test run name to help testers identify and organize different test runs easily. We are going to show you how to set the following parameters:
1. platform
2. browser Name
3. device
4. project: name of the project under which the test is associated
5. build: version of your application the test was running against
6. name: name your test case
7. browserstack.debug: enables visual logs if it is set to true.
The configuration parameters will be listed in a file and read via the Python module ConfigParser.
OVERVIEW
1. Create a configuration file
2. Accept command line options for configuration file and test run name
3. Use ConfigParser to read the configuration
4. Run the tests
5. Check the result on BrowserStack
STEP 1: Create a configuration file
We can create a configuration file that uses the test run name to identify sections and list the desired configuration under it. For this example we created a file called test_configuration.ini. Add the contents below to your configuration file and tweak the parameter values as you like. In this example we are showing you two test runs (Nightly Run and Acceptance Run) using different configurations.
[Nightly Run] platform = MAC browserName = iPhone device = iPhone 5 project = Chess App Nightly Run build = Build 15.1 name = 10-Oct Nightly Run browserstack.debug = true [Acceptance Run] platform = ANDROID browserName = android device = Samsung Galaxy S3 project = Chess App Acceptance build = Build 15.1 name = 9-Oct Acceptance Run browserstack.debug = false |
STEP 2: Accept command line options for configuration file and test run name
Since we want to show you how to modify an existing test, please use the script (from a preivous blog post) in Step 3 over here. Notice that we are already accepting command line arguments in our test script. In this post we will modify the command line parameters to accept the configuration file and test run name. The code snippet to accept the configuration file and command line is given below.
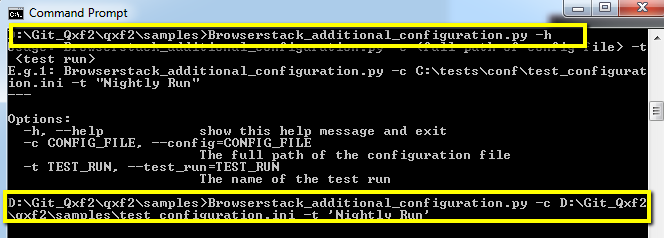
#---START OF SCRIPT if __name__ == '__main__': #Lets accept some command line options from the user #We have chosen to use the Python module optparse usage = "usage: %prog -c -t \nE.g.1: %prog -c C:\\tests\\conf\\test_configuration.ini -t \"Nightly Run\"\n---" parser = OptionParser(usage=usage) parser.add_option("-c","--config",dest="config_file",help="The full path of the configuration file") parser.add_option("-t","--test_run",dest="test_run",help="The name of the test run") (options,args) = parser.parse_args() |
STEP 3: Use ConfigParser to read the configuration
Qxf2 Services loves Python. We have chosen to use the module ConfigParser to read our configuration file. Python newbies can use either this link (pmotw) or this link (Python wiki) to get started with ConfigParser. On our end, we are modifying our SeleniumOnBrowserStack class to look like the snippet below:
class SeleniumOnBrowserStack(unittest.TestCase): "Example class written to run Selenium tests on BrowserStack" def __init__(self,config_file,test_run): "Constructor: Accepts the configuration file and the test run name as parameters" self.config_file = config_file self.test_run = test_run def setUp(self): "Setup for this test involves spinning up the right virtual machine on BrowserStack" parser = SafeConfigParser() parser.read(self.config_file) desired_capabilities = {'platform' : parser.get(self.test_run, 'platform'), 'browserName' : parser.get(self.test_run, 'browserName'), 'device' : parser.get(self.test_run, 'device'), 'project' : parser.get(self.test_run, 'project'), 'name' : parser.get(self.test_run, 'name'), 'build' : parser.get(self.test_run, 'build'), 'browserstack.debug' : parser.get(self.test_run, 'browserstack.debug')} self.driver = webdriver.Remote(command_executor='http://USERNAME:[email protected]:80/wd/hub',desired_capabilities=desired_capabilities) |
STEP 4. Run the tests
Bringing everything together, your script should look something like the code below
import unittest, time, sys, optparse from optparse import OptionParser from selenium import webdriver from ConfigParser import SafeConfigParser from selenium.webdriver.common.desired_capabilities import DesiredCapabilities class SeleniumOnBrowserStack(unittest.TestCase): "Example class written to run Selenium tests on BrowserStack" def __init__(self,config_file,test_run): "Constructor: Accepts the configuration file and the test run name as parameters" self.config_file = config_file self.test_run = test_run def setUp(self): "Setup for this test involves spinning up the right virtual machine on BrowserStack" parser = SafeConfigParser() parser.read(self.config_file) desired_capabilities = {'platform' : parser.get(self.test_run, 'platform'), 'browserName' : parser.get(self.test_run, 'browserName'), 'device' : parser.get(self.test_run, 'device'), 'project' : parser.get(self.test_run, 'project'), 'name' : parser.get(self.test_run, 'name'), 'build' : parser.get(self.test_run, 'build'), 'browserstack.debug' : parser.get(self.test_run, 'browserstack.debug')} self.driver = webdriver.Remote(command_executor='http://USERNAME:[email protected]:80/wd/hub',desired_capabilities=desired_capabilities) def test_chess(self): "An example test: Visit chess.com and click on sign up link" #Go to the URL self.driver.get("http://www.chess.com") # Assert that the Home Page has title "Play Chess Online - Free Chess Games at Chess.com" self.assertIn("Play Chess Online - Free Chess Games at Chess.com", self.driver.title) # Identify the xpath for Sign up button and click on it to print the title of Sign up page elem = self.driver.find_element_by_xpath("//*[@id='signup-button']") elem.click() time.sleep(5) self.driver.save_screenshot('signup.png') print self.driver.title def tearDown(self): self.driver.quit() if __name__ == '__main__': #Lets accept some command line options from the user #We have chosen to use the Python module optparse usage = "usage: %prog -c <full path of config file> -t <test run> \nE.g.1: %prog -c C:\\tests\\conf\\test_configuration.ini -t \"Nightly Run\"\n---" parser = OptionParser(usage=usage) parser.add_option("-c","--config",dest="config_file",help="The full path of the configuration file") parser.add_option("-t","--test_run",dest="test_run",help="The name of the test run") (options,args) = parser.parse_args() #Create a test obj with our parameters test_obj = SeleniumOnBrowserStack(config_file=options.config_file,test_run=options.test_run) #We are explicitly calling setup and tearDown because what we are showing is technically not a unit test test_obj.setUp() #Run the test itself. NOTE: This is NOT a unit test test_obj.test_chess() #We are explicitly calling setup snd tearDown because what we are showing is technically not a unit test test_obj.tearDown() |
You can run the test script the normal way you do. We run it via the command prompt. Here is a screenshot from our machine.
STEP 5: Check the result on BrowserStack
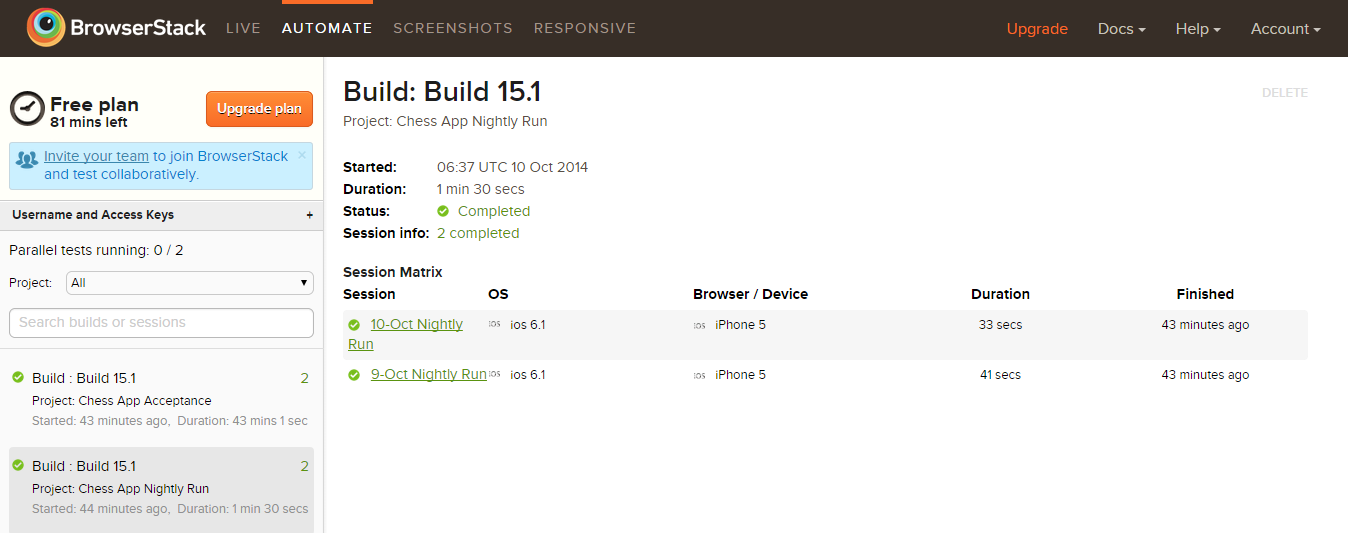
You can see the results on your web account. Login to your BrowserStack account and you should see a result table like the screen shot below.
Woot! You learnt how to use different BrowserStack configurations in under an hour!

I am a dedicated quality assurance professional with a true passion for ensuring product quality and driving efficient testing processes. Throughout my career, I have gained extensive expertise in various testing domains, showcasing my versatility in testing diverse applications such as CRM, Web, Mobile, Database, and Machine Learning-based applications. What sets me apart is my ability to develop robust test scripts, ensure comprehensive test coverage, and efficiently report defects. With experience in managing teams and leading testing-related activities, I foster collaboration and drive efficiency within projects. Proficient in tools like Selenium, Appium, Mechanize, Requests, Postman, Runscope, Gatling, Locust, Jenkins, CircleCI, Docker, and Grafana, I stay up-to-date with the latest advancements in the field to deliver exceptional software products. Outside of work, I find joy and inspiration in sports, maintaining a balanced lifestyle.


One thought on “%1$s”