At Qxf2, our ongoing efforts involve delving into popular Rust crates and crafting tutorials to facilitate seamless adoption and utilization of these crates. As part of this undertaking, we turned our attention to the Clap crate, recognizing its significance as a valuable library for parsing command line arguments in Rust.
This blog post aims to provide you with a comprehensive introduction to Clap, guiding you through the process of integrating it into your project, building your inaugural Clap application, and delving into various additional features it offers.
What is Clap and why it rocks?
Clap is an awesome rust library for parsing command line arguments in console applications. Just tell Clap what’s valid, and it takes care of the rest. No need to sweat the details. Another reason as to why Clap rocks is that it automatically adds version and help switches without you lifting a finger.
Once Clap decodes the user’s input, it provides you with the matches and values. If there’s an issue with the input, Clap has your back – it kindly points out the hiccup and exits gracefully, ensuring a smooth user experience.
Integrating Clap into Your Project
Create a Cargo Project:
1. Open a terminal and navigate to the directory where you want to create your new project. Run the following command to initiate a new Cargo project:
cargo new your_project_name |
Replace your_project_name with the desired name for your project.
2. To include Clap in your project, simply add the following to your project’s Cargo.toml file:
[dependencies] clap = { version = "4.4.6", features = ["derive"] } |
This snippet configures Clap as a dependency, incorporating its derive features into your project.
3. Since our project is going to have multiple binaries we need to create an src/bin directory, where we will place our executables.
4. Within the bin directory, include a new Rust file (e.g., default_clap.rs) that will be utilized for crafting our initial example
Your first Clap program
Now that we’ve set up our project and integrated Clap as a dependency, let’s dive into creating your first Clap program. We will create a simple program that takes a user-inputted number and compute both the square and cube of this number.
1. Open the Rust file you created in the “bin” directory (e.g., `default_clap.rs`) and start by importing the necessary modules:
use clap::{Arg}; |
2. Define a struct called Args representing the command-line arguments.
#[derive(Parser, Debug)] #[command(author, version, about)] struct Args { #[arg(short, long)] number: f64, } |
The #[arg(short, long)] attribute defines a command-line argument named number with short and long options.
3. Next, lets parse the Command Line Arguments
let args = Args::parse(); |
Here, we use the generated parse method from the Parser trait to parse command-line arguments into the Args struct.
4. Now, lets calculate the square and cube of the provided number using simple arithmetic operations.
let square = args.number * args.number; let cube = args.number * args.number * args.number; |
5. Finally, we can print out the results
println!("Number: {}", args.number); println!("Square of number: {}", square); println!("Cube of number: {}", cube); |
6. Putting it all together
use clap::Parser; /// Define a struct to represent command line arguments using Clap's derive attribute /// The struct will have built-in help, version, and author information #[derive(Parser, Debug)] #[command(author, version, about)] struct Args { /// The number for which to calculate square and cube #[arg(short, long)] number: f64, } fn main() { // Parse the command line arguments using the generated Args struct let args = Args::parse(); // Calculate the square and cube of the provided number let square = args.number * args.number; let cube = args.number * args.number * args.number; // Display the results to the user println!("Number: {}", args.number); println!("Square of number: {}", square); println!("Cube of number: {}", cube); } |
Running Your Clap Program
Now that you’ve crafted your first Clap program, it’s time to run a test to see it in action. Follow these steps to execute the program using the Cargo command:
1. Open a terminal window and navigate to your project’s root directory.
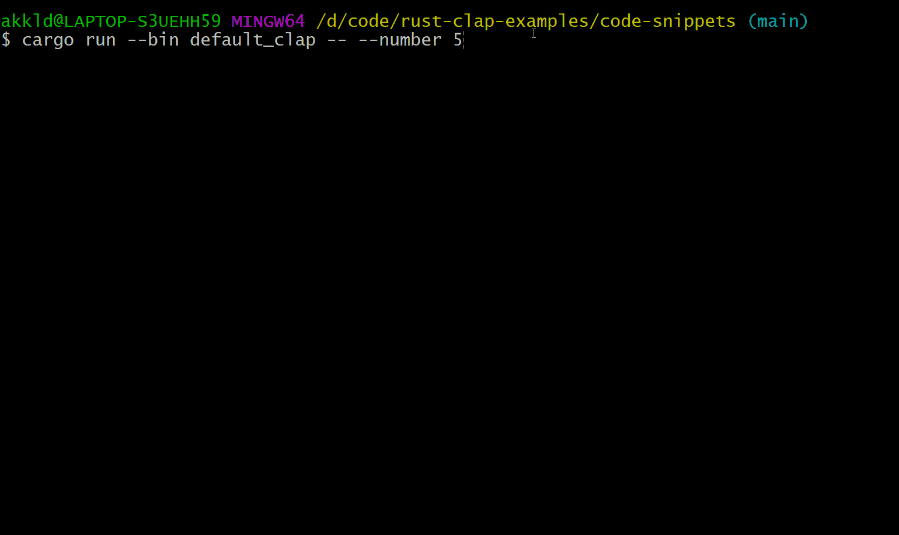
2. Run the following command to build and run your Clap program, providing a sample input (replace `5` with your desired number):
cargo run --bin default_clap -- --number 5 |
3. After executing the command, you should see the output displaying the number, square, and cube of the provided input.
Example Output:
Number: 5 Square of number: 25 Cube of number: 125 |
4. To access help information about your Clap program and its available options, use the following command:
cargo run --bin default_clap -- -h |
This command triggers Clap to display information about the available command-line options, their descriptions, and any other relevant details you’ve configured in your Clap program.
Congratulations! You’ve successfully run your first Clap program!
The builder pattern
We just saw the simplest way to use Clap in the above example, next lets take a look at the Builder Pattern. For those wondering, Builder Pattern is another way to build your command line application using Clap which allows more advanced configuration options. It is useful when you need fine-grained control of your CLI.
1. To get started with builder pattern, we need to import the basics ie: Command and Arg structs from the Clap crate
use clap::{Command, Arg}; |
Command is used for building command-line interfaces (CLIs). It defines the overall configuration and behavior of the CLI application while Args is used for defining individual command-line arguments.
2. Now, let’s look at a sample code snippet that uses the ‘Build Pattern’ approach to create a new CLI application
let app = Command::new("Builder pattern program") .author("Me, [email protected]") .version("1.0") .about("Example to demonstrate builder pattern") .arg( Arg::new("number") ) .get_matches(); |
The above code sets up a CLI application named “Builder pattern program” with author, version, and description information. It also defines a command-line argument named “number”. The get_matches() method is then called to parse and retrieve the matched values from the command line.
Argument Grouping
In more complex command-line applications, you might want to organize related arguments into groups. Clap provides the ArgGroup struct to facilitate this grouping. This feature becomes handy when you want to ensure that certain arguments are used together or mutually exclusive.
1. Begin by importing the necessary module:
use clap::ArgGroup; |
2. Define Argument Groups:
Let’s say you have two optional arguments, --input and --output, and you want to ensure that the user strictly provides only one of those arguments . You can create an argument group for this purpose in the following way.
let app = Command::new("ArgGroup Demo") .arg(Arg::new("input")) .arg(Arg::new("output")) .group( ArgGroup::new("IO") .args(&["Input", "Output"]) .required(true), ); |
In this example, the ArgGroup::new("IO") creates a new group named “IO”. The args(&["input", "output"]) method specifies which arguments belong to this group. Finally, .required(true) indicates that the user must provide either --input or --output but not both.
3. Now, let’s say we have the same optional arguments, --input and --output, but you want to ensure that the user provides both of those arguments. You can create an argument group for this as follows.
let app = Command::new("ArgGroup Demo") .arg(Arg::new("input")) .arg(Arg::new("output")) .group( ArgGroup::new("IO") .args(&["Input", "Output"]) .requires_all(true), ); |
Here, same as in the previous snippet, ArgGroup::new("IO") creates a new group named “IO.” The args(&["input", "output"]) method specifies which arguments belong to this group. But, we use .requires_all(true) in this case to indicate that the user must provide both --input and --output arguments.
Similarly, ArgGroup can be implemented for various other scenarios as well, for further details click here
A complete example using Builder pattern
Now, let’s explore a complete example that demonstrates the builder pattern that also includes the grouping of command-line arguments.
1. In this example, we will use the builder pattern in Clap to create a CLI application that calculates the square or cube of a number based on the chosen operation. We will also be using argument grouping to ensure that the user provides either “square” or “cube” but not both.
2. Let’s start off by importing the dependencies
// Import necessary modules from the Clap crate use clap::{Command, Arg, ArgGroup}; |
Here, we import the Command, Arg, and ArgGroup structs from the Clap crate. These will be used for building our command-line interface.
3. Next, let’s build our CLI Configuration using Builder Pattern
// Build the CLI by defining the configuration using the builder pattern let cmd = Command::new("NumberCalculator") .version("1.0") .about("Calculates square or cube of a number based on choice of operation") .arg( Arg::new("number") .short('n') .long("number") .num_args(1) .value_parser(clap::value_parser!(i32)) .required(true) ) .arg( Arg::new("square") .short('s') .long("square") .num_args(0) ) .arg( Arg::new("cube") .short('c') .long("cube") .num_args(0) ) .group( ArgGroup::new("operation") .args(["square", "cube"]) .required(true) ); |
Here, we use the Command::new method to initiate the CLI configuration. Then, we chain various methods like version, about, arg, and group to define the application’s behavior. We specify the number argument as required and the square and cube arguments as optional. The ArgGroup::new method is used to group the square and cube arguments, ensuring that only one of them can be provided.
4. Now let us define the code to parse the runtime arguments.
// Runtime argument parsing let matches = cmd.get_matches(); let number_passed = matches.get_one("number"); let number = match number_passed { Some(number_passed) => number_passed, None => &0, }; |
During runtime, we use cmd.get_matches() to parse the command-line arguments. We then retrieve the provided number using matches.get_one("number");. The obtained value is then used in the subsequent code. If no value is provided for “number” ,it defaults to 0.
5. Finally, we can perform the necessary calculations on the number based on the input provided.
if let Some(true) = matches.get_one("cube") { println!("Cube of {} is: {}", number, number * number * number); } else if let Some(true) = matches.get_one("square") { println!("Square of {} is: {}", number, number * number); } |
Here, if let Some(true) = matches.get_one("cube") checks if the “cube” argument was present in the command line. If true, it calculates and prints the cube of the provided number.
Similarly, if let Some(true) = matches.get_one("square") checks if the “square” argument was present, and if true, it calculates and prints the square of the provided number.
6. Putting it All Together
/* A CLI application showing - grouping of command-line arguments */ use clap::{Command, Arg, ArgGroup}; fn main() { // Build the CLI by defining the configuration using builder pattern let cmd = Command::new("NumberCalculator") .version("1.0") .about("Calculates square or cube of a number based on choice of operation") .arg( Arg::new("number") .short('n') .long("number") .num_args(1) .value_parser(clap::value_parser!(i32)) .required(true) ) .arg( Arg::new("square") .short('s') .long("square") .num_args(0) ) .arg( Arg::new("cube") .short('c') .long("cube") .num_args(0) ) .group( ArgGroup::new("operation") .args(["square", "cube"]) .required(true) ); // Runtime argument parsing let matches = cmd.get_matches(); let number_passed = matches.get_one("number"); let number = match number_passed { Some(number_passed) => number_passed, None => &0, }; if let Some(true) = matches.get_one("cube") { println!("Cube of {} is: {}", number, number * number * number); } else if let Some(true) = matches.get_one("square") { println!("Square of {} is: {}", number, number * number); } } |
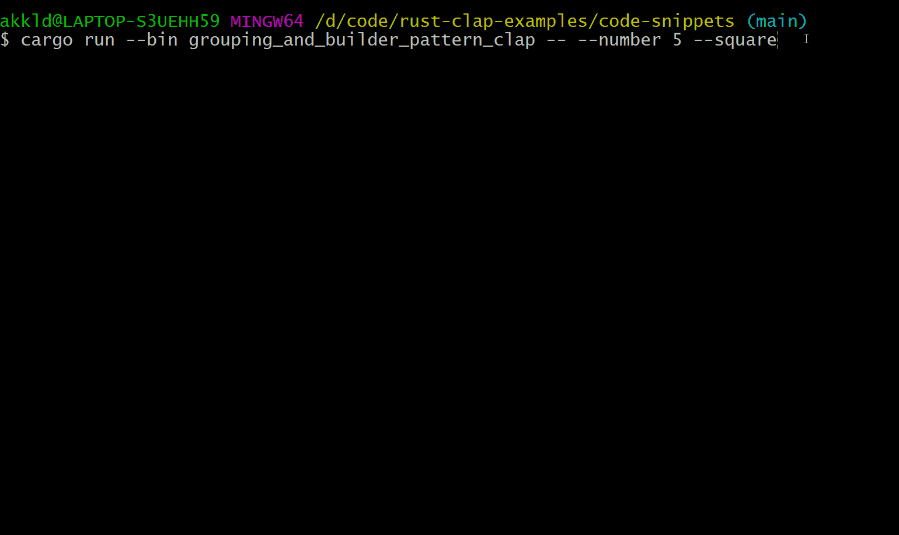
Example Output:
Number: 5 Operation: Square Square of number: 25 |
Number: 5 Operation: Cube Cube of number: 125 |
Final thoughts
In conclusion, Clap proves to be a powerful and user-friendly tool for handling command line arguments. In this post, we covered integration of Clap into your project, building basic programs with both derive and the builder patterns, and explored features like argument grouping. Stay tuned for upcoming blog where we’ll dive deeper into Clap, exploring more of its feature like optional arguments, Boolean options, subcommands, and many more. Happy Coding!
Hire technical testers from Qxf2
Testers from Qxf2 continually learn and evolve. We have excellent testing fundamentals and constantly update our technical toolbelt. Engineering teams love working with us because we understand the problems they face and are in a position to compliment their technical abilities. If you are having a hard time hiring technical testers, get in touch with Qxf2.

I am a QA Engineer. I completed my engineering in computer science and joined Qxf2 as an intern QA. During my internship, I got a thorough insight into software testing methodologies and practices. I later joined Qxf2 as a full-time employee after my internship period. I love automation testing and seek to learn more with new experiences and challenges. My hobbies are reading books, listening to music, playing chess and soccer.

