Visual testing has been around for quite some time, yet most development teams tend to focus on unit and integration tests alone. These tests mainly look at the application’s logic, overlooking any potential visual issues at the UI level. By bringing in visual testing, we can catch these visual problems early on and fix them before the product goes live. At Qxf2, we recently came across an interesting visual testing tool offered by BrowserStack called “Percy” and decided to give it a shot. Since the official documentation of Percy is pretty straightforward and takes you through the entire process of integrating Percy into your tests, in this post, we thought of covering just some of the grey areas that might cause a bit of a hiccup for folks new to the tool.
Key Takeaways from Percy
Before diving into Percy, it’s important to evaluate whether it aligns with your specific needs and concerns. Here are some key takeaways to consider:
1. Static webpages Percy is particularly effective when you need to test static webpages that rarely change.
2. Pixel perfect UI: Percy proves valuable when you need to ensure visual consistency across various browsers, resolutions and devices. This is especially useful when you need “pixel perfect” UI implementations.
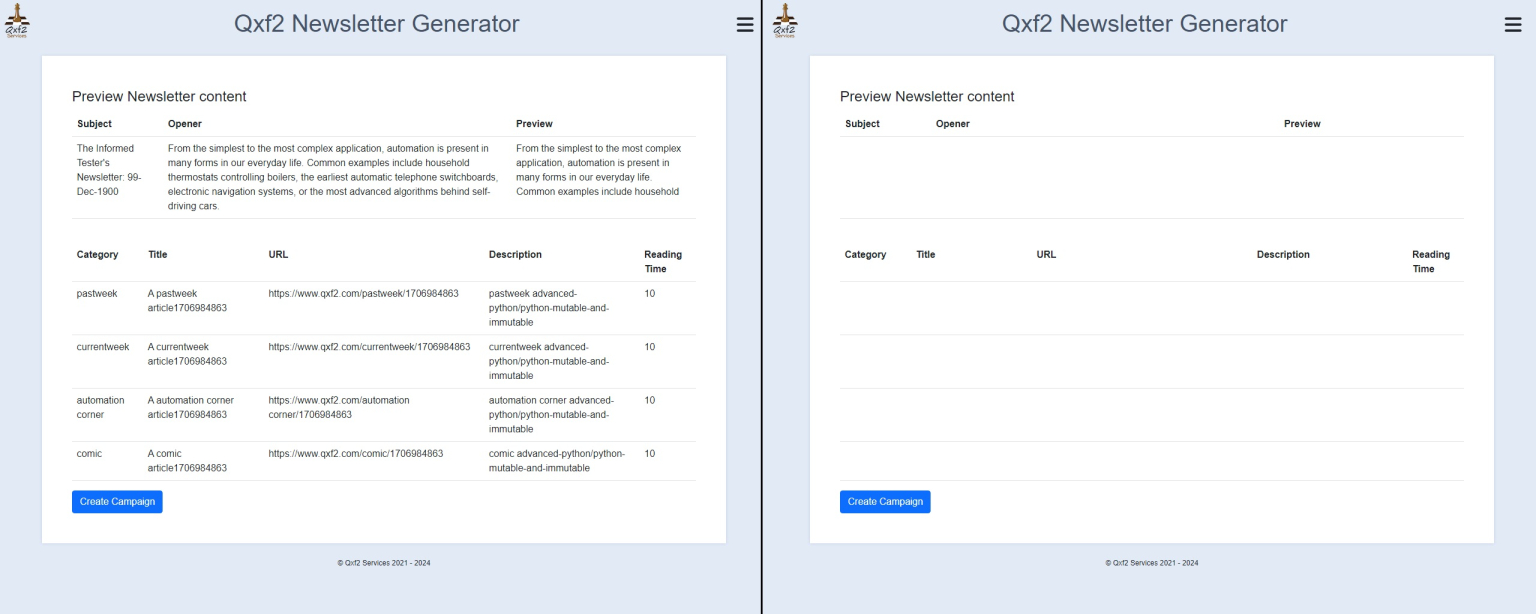
3. Limitations with Dynamic content: Percy works well with static data. For dynamic data, workarounds like mocking the data or hiding it are possible. However, hiding dynamic data elements may not always be foolproof and can result in false visual differences. For example, suppose we have a table in our webpage that is populated by data that change dynamically. Even if we employ methods to hide the data within the table the the size table borders would still differ causing visual differences. Percy may not be apt in such cases
4. Introduction of an external service: Utilizing Percy introduces a dependency on an external service. As Percy is a cloud-based service, there is a reliance on an external provider for visual testing. So if you are concerned about data privacy and security, this may not be the tool for you.
Before incorporating Percy into your testing strategy, carefully assess these factors to determine if it’s the right fit for your specific use case.
How Percy works
Let’s see how Percy works behind the scenes.
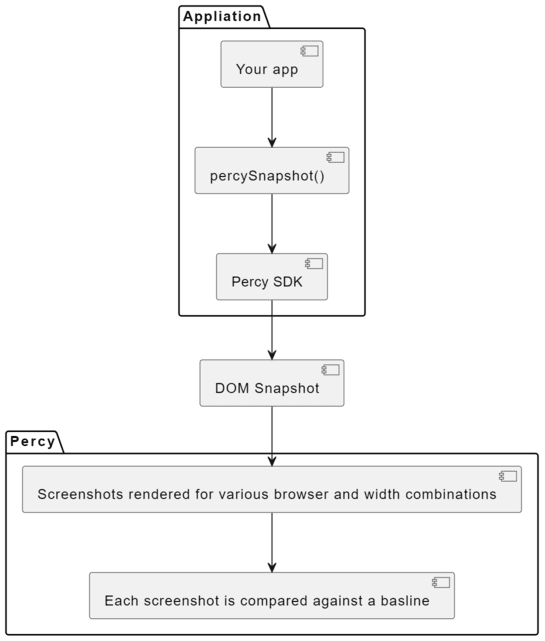
Percy works by capturing the DOM snapshot everywhere the percySnapshot() command is called. This snapshot method can be exposed by integrating your project with a Percy SDK. Percy offers a number of SDKs that allow you to use an existing framework to generate Percy snapshots. For example, if you’re using Selenium, you can use the percy/percy-selenium-python SDK to leverage your existing suite for visual testing. The Percy SDK sends the captured DOM snapshots to the Percy server. On the server, the DOM is used to recreate the page or component, and the screenshots are taken at various browser plus width combinations. These screenshots are then compared against baseline snapshots to determine the visual differences.
Hiding elements from Snapshots
In some cases, you may need to exclude certain elements from your visual snapshots to reduce noise. Percy provides mechanisms for hiding elements, allowing you to focus on the areas of the page that matter most. It is also helpful to hide sensitive information’s from your snapshots.
This can be accomplished through the use of “Percy-specific CSS”. This feature proves beneficial for disregarding certain regions, hiding sections that generate inaccurate visual differences, or when you desire precise control over the appearance of UI elements such as visualizations and animations.
You can include the Percy-CSS in your snapshots while using Percy-selenium, using the percy_css argument.
For example:
percy_snapshot(driver=get_current_driver(),name="Sample Snapshot", percy_css='tbody td {visibility:hidden; }') |
Capturing a Single Element
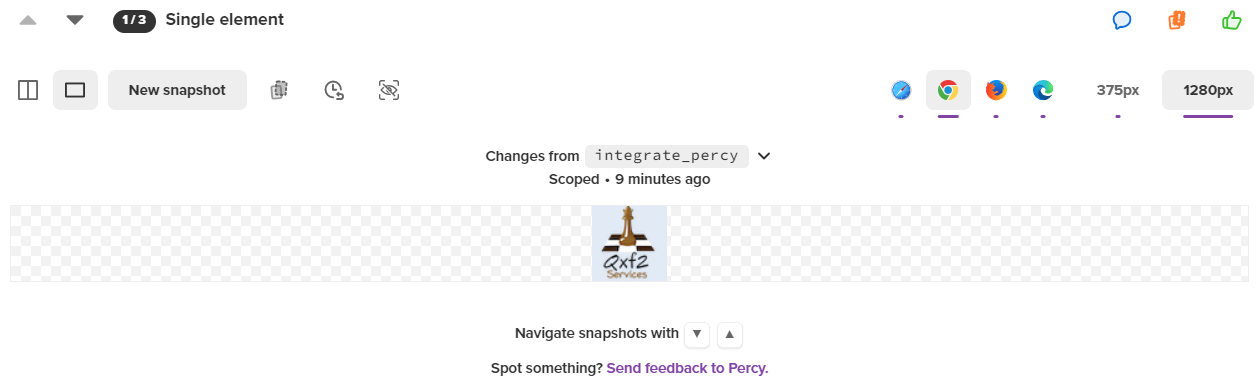
Percy allows you to capture snapshots of individual elements on a page. This can be particularly useful when you want to focus on specific components or sections of your web application. Achieving this is made possible through the use of the scope selector.
Scope is a string containing a selector to narrow down the screenshot to the specific element. The scope argument accepts any valid selector.
Screenshot a single element using a selector:
percy_snapshot(driver=get_current_driver(), name="Sample Image", scope=".selector") |
Screenshot a single element using xpath:
percy_snapshot(driver=get_current_driver(), name="Sample Image", scope="//form[@method='POST']") |
Ignoring custom regions of a page
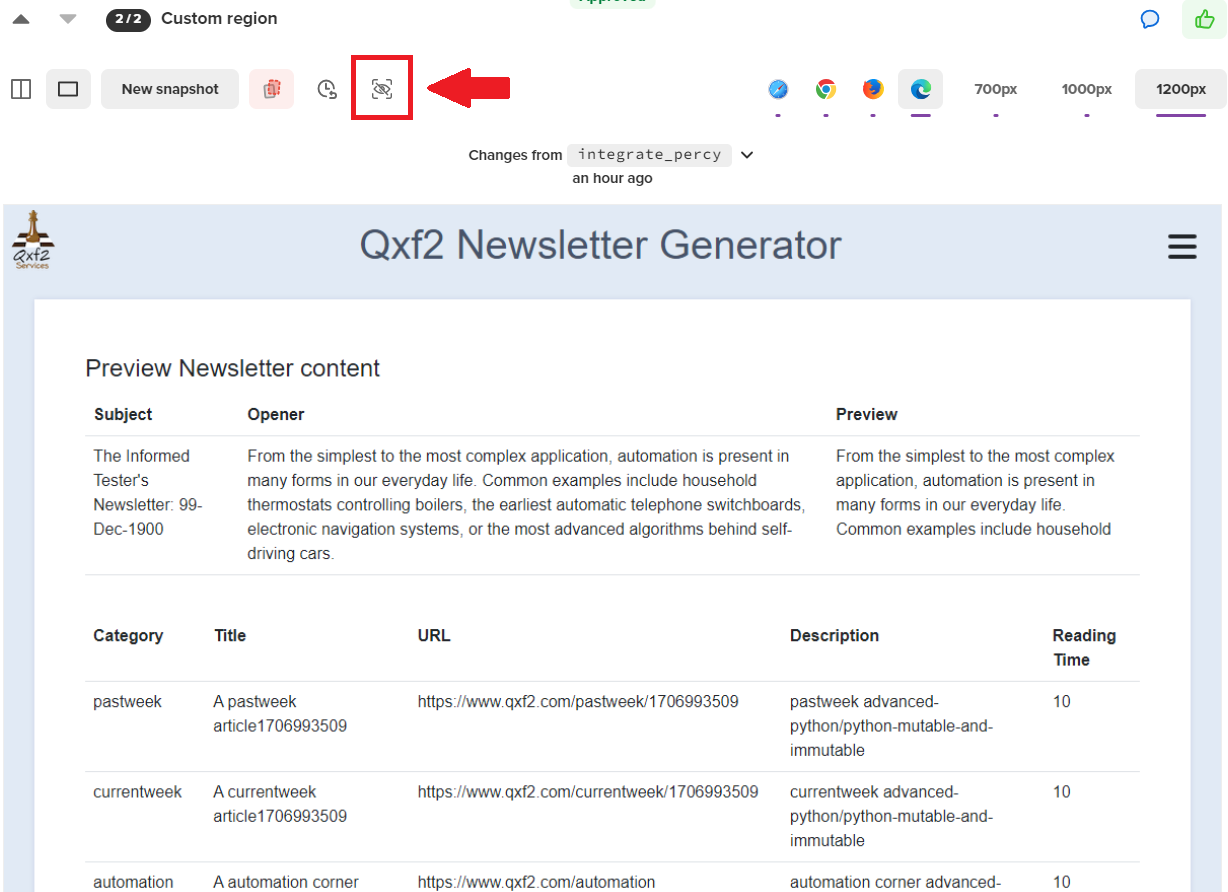
For more granular control, Percy enables you to ignore comparison of visual differences for selected regions of a page. This feature is beneficial when you want to ignore specific areas, such as tables, date-time elements etc. This can be done by setting the region to ignore on a baseline image in your Percy server.
1. On your Percy server, select the baseline image on which you wish to add a region to ignore
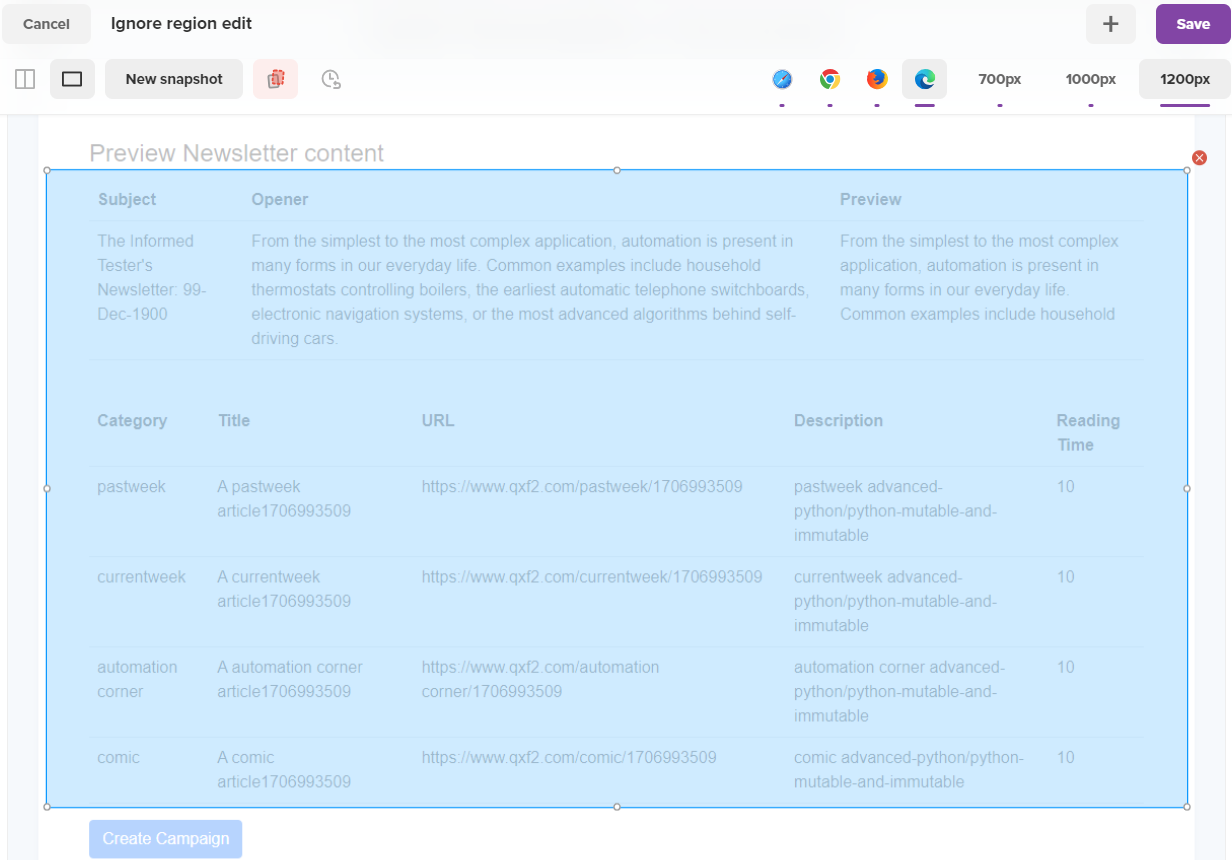
2. After selecting the image, click on the ‘Edit ignored region’ option.
3. This will give you an overlay, featuring an adjustable box. Move and resize the box to surround the region that you would like to ignore. You can also add new regions by clicking the ‘+’ button at the top right of the screen(Next to Save).
4. The selected regions are marked with a yellow “yield” icon, indicating that they have not been applied yet but will be implemented in subsequent builds. The implementation will occur either on the current branch or all branches, depending on the branch strategy you selected while saving the ignored regions.
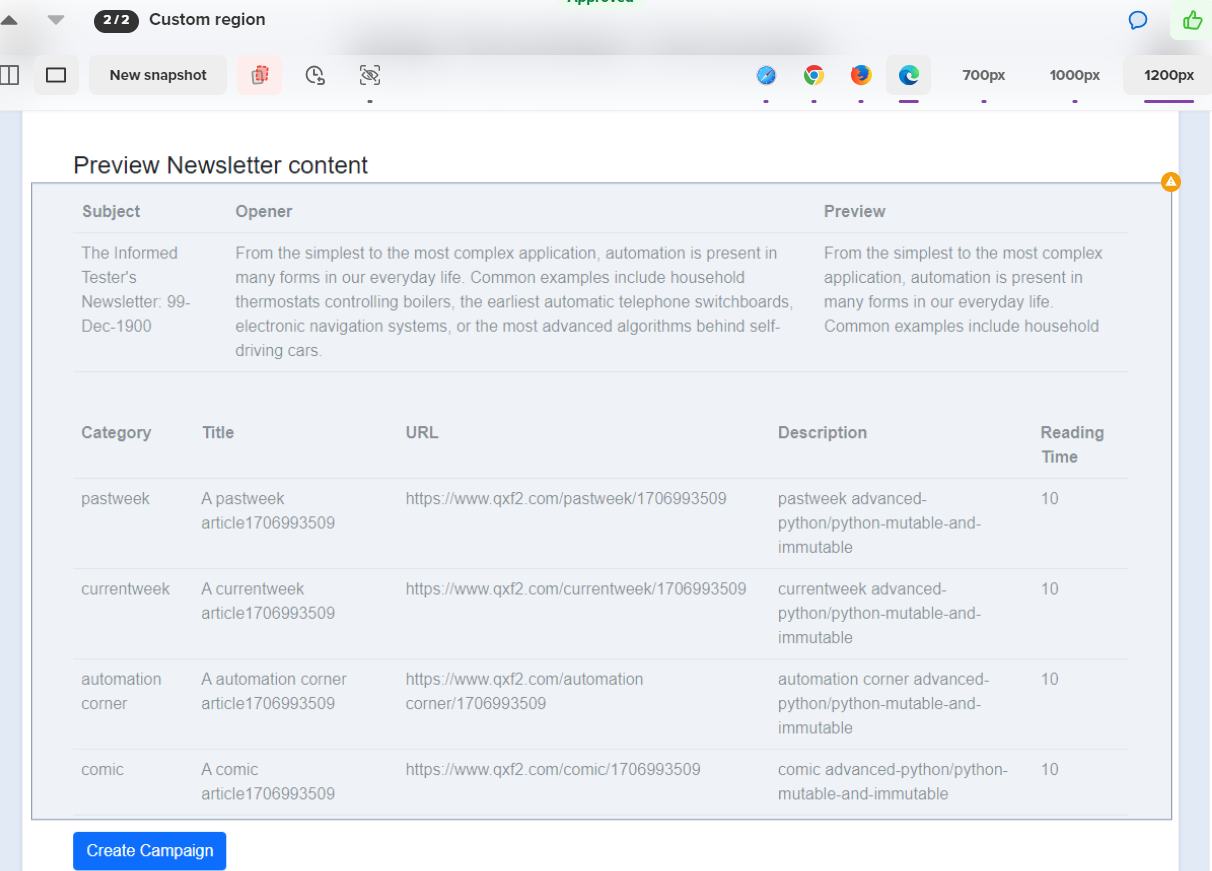
5. In subsequent builds, any differences that falls within the ignored regions will not be considered.
Percy in CI/CD Pipeline
Percy works great when it’s part of your CI process, running alongside your test suite. It is designed to easily integrate with popular CI tools and can be set up for different environments. Once you include Percy in your tests and CI, it starts rendering screenshots every time your CI build runs.
1. To activate Percy, set up the environment variable ‘PERCY_TOKEN‘ in your CI service. This token is unique to each Percy project, and must be kept confidential. You can find the PERCY_TOKEN in your project settings.
2. For instance, if you are using GitHub Actions as your CI service, add the PERCY_TOKEN to your repository secrets.
3. In your GitHub project’s settings, go to Settings > Secrets and variables > Actions > New repository secret.
4. Here set the variable name as ‘PERCY_TOKEN‘ and the value to the token from your Percy project.
5. Next in your pipeline script install Percy CLI NPM package.
npm install -g --save-dev @percy/cli |
6. Now you would be able to run snapshots tests with Percy using percy exec command.
percy exec -- python -m pytest tests/ui_tests/test_snapshots.py --browser headless-chrome --api_url http://localhost:5000 |
Best Practices
Finally, Let’s take a look at some of the best practices to use Percy
1. Ensure Full Page Verification: For comprehensive visual testing of your application with Percy, it’s advisable to verify the entire page. This ensures maximum coverage for your website or mobile applications.
2. Wrap it up: Make a wrapper class to bundle up the Percy Screenshot calls. This keeps things organized, making it easier to handle.
3. Team Up on the Percy Dashboard: Use the Percy dashboard to point out failures to developers or QA teams. It’s a helpful place to note any concerns or changes that need a second look.
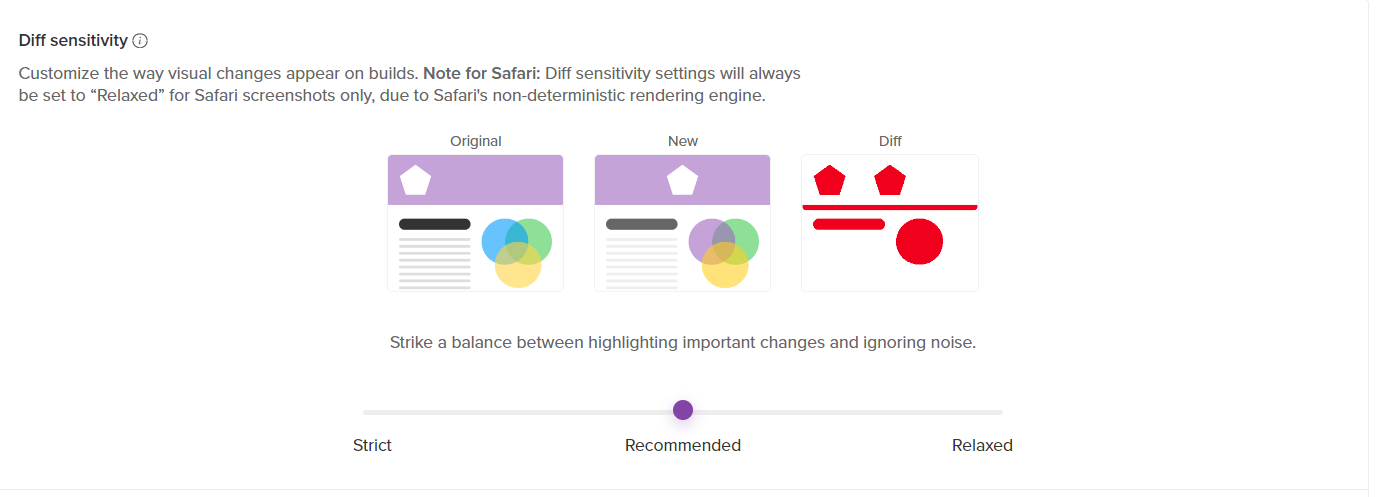
4. Opt for the Recommended Match Level setting: Percy has a setting where you can control the sensitivity employed by Percy to spot the visual differences. It is advised to keep this setting to ‘Recommended’ level. The recommended comparison method ensures accurate and reliable results. Try not to play around with this setting as much as possible.
5. Connect Percy with Slack or MS Teams for Faster Fixes: Connect Percy to your Slack or MS Teams if your team utilizes these platforms. Percy offers a seamless integration with these platforms. This would make the process of sharing and resolving visual bugs faster and much more smoother.
Hire testers from Qxf2
Qxf2 is the home for technical testers. Our testers can help you implement a testing stack that suits your team. Not only do we stay abreast with the latest tools and testing techniques, our deep testing background allows us to understand the trade-offs of using certain tooling. Our open sourced test automation framework is used by over a hundred companies. And in spite of being able to write good code, as you can see from this post, we do entertain using visual testing techniques in some specific contexts. This wide range of capabilities is one of the main reasons our clients love working with us. If you are looking for smart, proactive testers to guide your testing efforts, get in touch with Qxf2.

I am a QA Engineer. I completed my engineering in computer science and joined Qxf2 as an intern QA. During my internship, I got a thorough insight into software testing methodologies and practices. I later joined Qxf2 as a full-time employee after my internship period. I love automation testing and seek to learn more with new experiences and challenges. My hobbies are reading books, listening to music, playing chess and soccer.

