Windows desktop automation has become much easier with Appium and WinAppDriver. If you have worked with mobile automation before, the workflow will feel familiar. You start a server, define capabilities, locate elements, and interact with the application. The same concepts now apply to Windows desktop apps.
In this post, we will walk you through a minimal and practical example of desktop automation using Python, Appium, and WinAppDriver. To keep things simple, we will automate the Notepad application and show how to launch the app, clear existing text, type new content, verify it, and close the application.
We use Appium with WinAppDriver because this is the approach Microsoft now recommends for Windows desktop automation after deprecating CodedUI. At Qxf2, we prefer tools that are well-supported and future-friendly, so adopting Microsoft’s recommended stack was the natural choice.
The goal of this guide is to give you a clean, functional setup that you can reuse when automating more complex Windows applications. This tutorial is beginner-friendly and does not require any prior experience with desktop automation.
1. Prerequisites and Setup:
Before we start writing automation for a Windows desktop app, we need to install and configure a few tools. Follow the steps below to prepare your environment.
1.1 Python Installation and Environment Setup
a. Install Python:
- Download Python from the official website.
- During installation, check the box Add Python to PATH.
- Verify installation with:
python --version
pip --version
b. Create and Activate a Virtual Environment:
Creating a virtual environment keeps your dependencies clean and isolated.
- Create a new environment:
python -m venv venv-notepad-automated-test - Activate it:
venv\Scripts\activate
You should now see (venv-notepad-automated-test) in your terminal prompt.
c. Install Appium Python Client
Inside the activated virtual environment, install the Appium Python client:
pip install Appium-Python-Client |
This library allows your Python scripts to communicate with the Appium server.
1.2 Install Windows App Driver (WinAppDriver):
Head over to the WinAppDriver Releases page and download the latest stable build. Install it just like any other Windows application.
WinAppDriver provides the communication bridge that Appium uses to control Windows desktop applications.
1.3 Install Node.js and npm:
Download the Windows installer from the official Node.js website.
The installer automatically includes npm, and you’ll need npm to install and run Appium.
1.4 Install Appium Server:
Once Node.js is ready, install Appium globally using npm:
npm install -g appium |
This sets up the Appium command-line server that powers your automation.
For more details, refer Appium Quickstart Guide.
1.5 Install the Appium Windows Driver:
Install Appium windows driver to add support for Windows desktop automation by running:
appium driver install windows |
Verify the Windows driver installation by running following command:
appium driver list |
The output should confirm that the Windows driver is installed.
1.6 Start the Appium server:
Run following command on terminal to start the Appium Server:
appium |
Keep this terminal window running during your tests.
1.7 Install Locator Tools:
You will need locator tools to inspect UI elements and identify attributes such as AutomationId, Name, ClassName, and NativeWindowHandle. These tools are required for writing reliable selectors for desktop automation.
Windows Inspector (Inspect.exe)
This tool is required. It is the primary utility for inspecting Windows UI Automation elements. You will use it to read attributes, verify tree hierarchy, and extract the NativeWindowHandle when attaching to a running app.
Appium Inspector
This tool is highly recommended. It helps you preview elements through an Appium session, validate XPath expressions, and explore the UI structure more easily. Appium Inspector is especially useful when working with legacy apps where attributes are not unique.
If you are new to these tools, refer to the earlier posts for detailed guidance:
How to use Windows Inspector to write selectors for Windows UI or Desktop App
How to use Appium Inspector along with Windows Inspector
These tools together will help you build stable and accurate locators before writing automation scripts.
2. Understanding Desired Capabilities for Windows Desktop Apps
Before writing our automation script, we need to tell Appium which Windows application we want to launch and how to interact with it. This configuration is done using desired capabilities.
Desired capabilities are sent to the Appium server when a new session is created. They describe the target platform, the application to launch, and the device we are testing on. For Windows desktop automation, the set of capabilities is small and easy to understand.
Below are the capabilities used in our Notepad example.
“app” Capability:
This tells Appium which Windows application to launch.
options.set_capability("app", "notepad.exe") |
You can provide:
- the executable name (for apps like Notepad), or
- the full path to an EXE, or
- an App User Model ID for packaged applications.
In our example, “notepad.exe” is enough.
“platformName” Capability:
This is always “Windows” for desktop automation.
options.set_capability("platformName", "Windows") |
“deviceName” Capability:
This value is required but not validated. You can put any string here.
options.set_capability("deviceName", "WindowsPC") |
Putting it all together.
Here is the exact configuration from your working script:
options = WindowsOptions() options.set_capability("app", "notepad.exe") options.set_capability("platformName", "Windows") options.set_capability("deviceName", "WindowsPC") |
These three capabilities are enough to launch Notepad through Appium and WinAppDriver.
In the next section, we will look at how to use these capabilities inside a simple Python script to automate a Windows desktop application.
3. Writing Your First Desktop Automation Script (Python):
Now that you understand the setup and desired capabilities, let’s walk through creating your first python Windows desktop automation script using Appium and WinAppDriver. We will automate a simple workflow in Notepad. First, we will build the script step by step, and then you will see the complete working example. The goal is to understand how each part of the script works before running the final example.
We will follow a simple test flow:
- Launch Notepad
- Locate the text editor area
- Clear any existing content
- Verify the content is cleared
- Add new text
- Verify the text is added successfully
- Close the application
Let us walk through the script step by step.
Step 1: Create Windows options and set capabilities
We begin by defining the capabilities required for Appium to launch the Notepad application. These capabilities tell Appium which app to start and on which device.
options = WindowsOptions() options.set_capability("app", "notepad.exe") options.set_capability("platformName", "Windows") options.set_capability("deviceName", "WindowsPC") |
Step 2: Start the automation session
To interact with the application, we open a session using Appium that connects to the WinAppDriver server.
driver = webdriver.Remote( command_executor="http://127.0.0.1:4723", options=options ) |
Step 3: Locate the Notepad text input area
Using the name attribute of Notepad’s editable area, we fetch the main text control where input operations will be performed.
text_area = driver.find_element("name", "Text editor") |
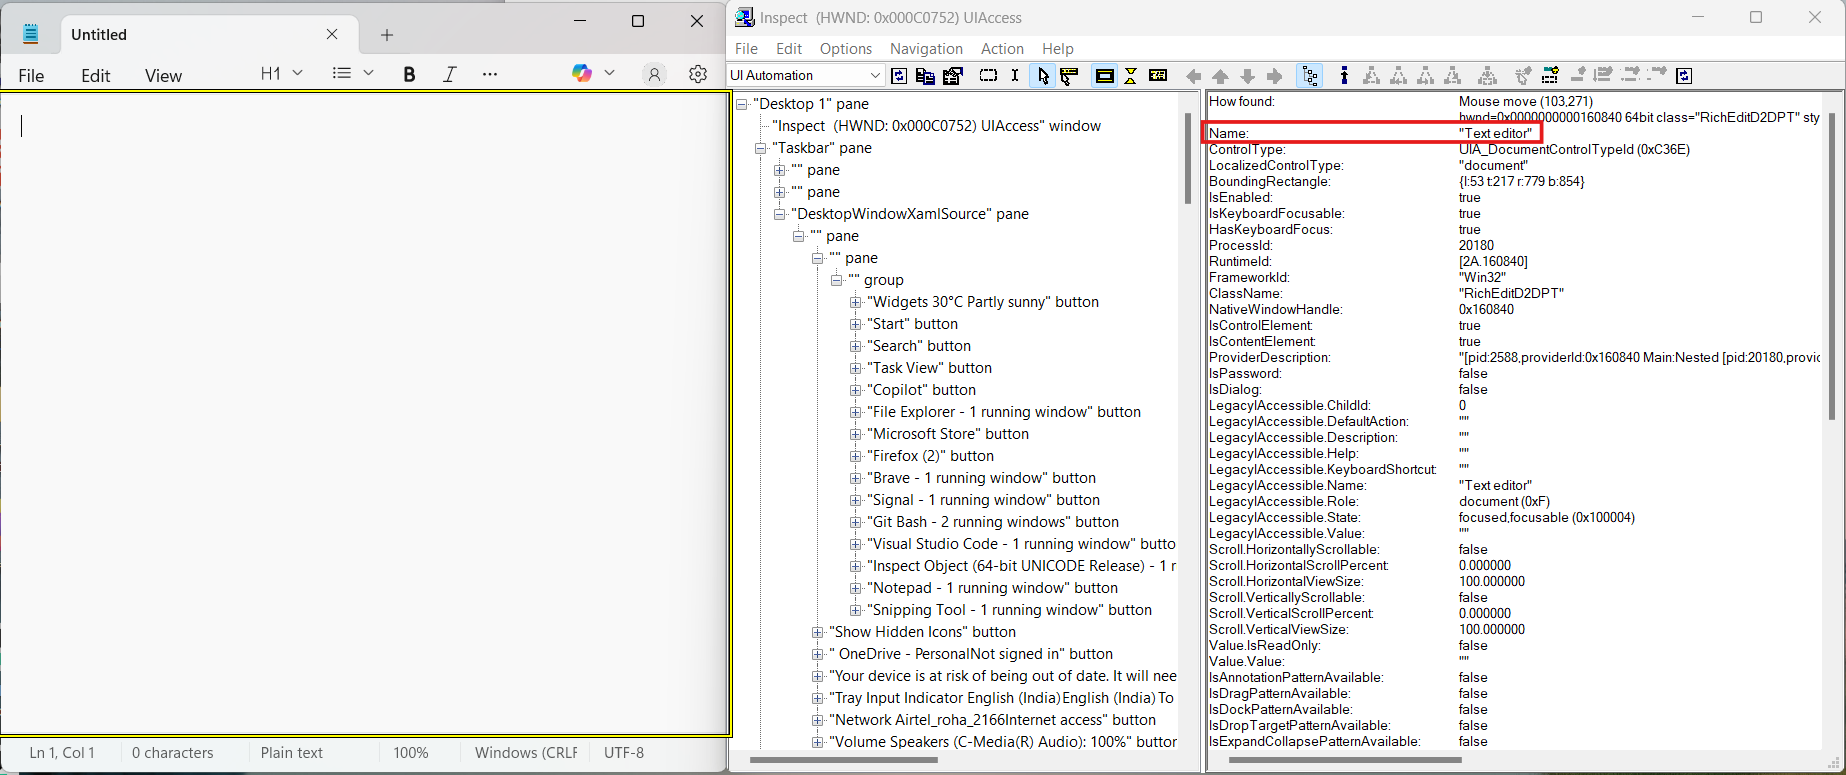
Refer to the screenshot below to see how we obtained the locator values for the text area. We used Windows Inspector to inspect the element.
Step 4: Clear existing content
Before adding new content, the script selects all existing text and deletes it.
text_area.send_keys(Keys.CONTROL, 'a') text_area.send_keys(Keys.DELETE) |
Step 5: Verify the text cleared successfully
To ensure the clear operation worked, the script checks the value of the text field. A cleared text area reports a None value.
cleared_value = text_area.get_attribute("Value.Value") assert cleared_value == None, "Text area not cleared properly!" |
Step 6: Add new text
Now we type the new text into Notepad. This confirms that Appium can send keystrokes to a Windows application.
new_text = "Writing text using Appium with WinAppDriver" text_area.send_keys(new_text) |
Step 7: Verify the new text
To validate correctness, the script reads back the text and checks whether it matches what was typed.
added_value = text_area.get_attribute("Value.Value") assert added_value == new_text, "Text not added correctly!" |
Step 8: Close the application
Once all validations are complete, the script ends the session by closing Notepad.
driver.quit() |
Full Working Example
Below is the complete test script. You can save this file as test_notepad.py and run it directly.
Note: This is highly simplified code to make this post illustrative. We do not use this quality of the code at clients.
#test_notepad.py from appium import webdriver from appium.options.windows import WindowsOptions from selenium.webdriver.common.keys import Keys import time def test_notepad_app(): # --- Appium Windows Options --- options = WindowsOptions() options.set_capability("app", "notepad.exe") options.set_capability("platformName", "Windows") options.set_capability("deviceName", "WindowsPC") # --- Start session (Appium must be running) --- driver = webdriver.Remote( command_executor="http://127.0.0.1:4723", options=options ) time.sleep(1) # --- Locate the Notepad text area --- text_area = driver.find_element("name", "Text editor") # --- Step 1: Clear existing content --- text_area.send_keys(Keys.CONTROL, 'a') text_area.send_keys(Keys.DELETE) # --- Step 2: Verify content is cleared --- cleared_value = text_area.get_attribute("Value.Value") assert cleared_value == None, "Text area not cleared properly!" print("✓ Cleared existing text if any and verified it") # --- Step 3: Add new text --- new_text = "Writing text using Appium with WinAppDriver" text_area.send_keys(new_text) # --- Step 4: Verify text added --- added_value = text_area.get_attribute("Value.Value") assert added_value == new_text, "Text not added correctly!" print("✓ Added text and verified it") # --- Step 5: Close Notepad --- driver.quit() print("✓ Test completed successfully") if __name__ == "__main__": test_notepad_app() |
4. Running Your Test
Once your script is ready, running the test is straightforward. Before executing the test, make sure the following components are running correctly.
Step 1: Start the Appium server
Appium must be started manually and running in the background. Open a new command prompt and run:
appium |
You should see a message saying the server is listening on port 4723. Look at the screenshot below.
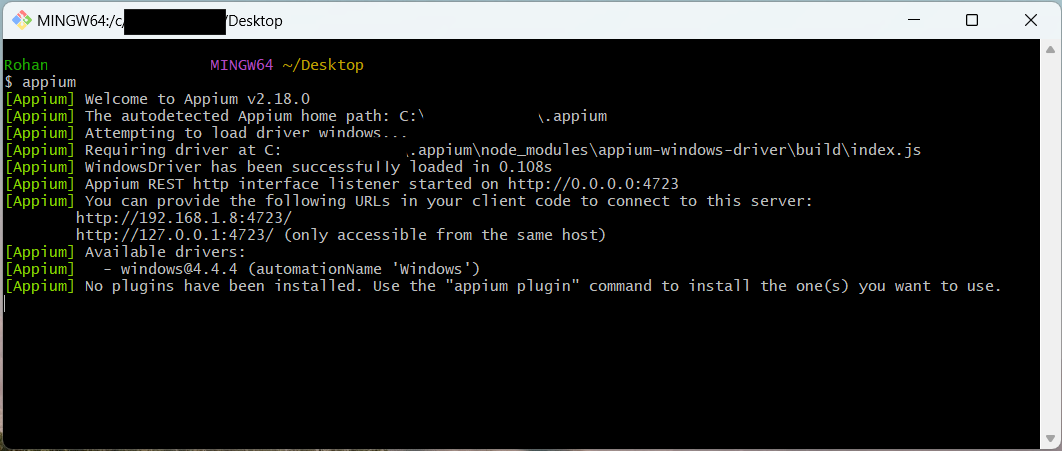
In background, it starts WinAppDriver.
Step 2: Run the Python test
Navigate to the folder containing your test script and execute:
python test_notepad_app.py |
Expected outcome:
If everything is configured correctly, you will see Notepad open, clear any existing text, type new content, verify it, and close automatically.
The console will display success messages such as:
✓ Cleared existing text if any and verified it
✓ Added text and verified it
✓ Test completed successfully
Look at the below screenshot.
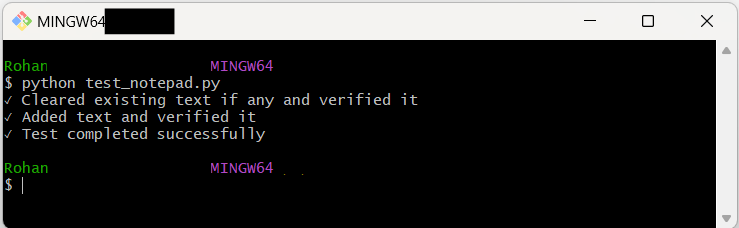
If you see these messages, your Windows desktop automation setup is working.
Hope you found this walkthrough helpful and were able to get your first Windows desktop app test running. Once you see a simple script execute end-to-end, the rest of the automation journey becomes much easier. You now know how to launch a Windows app, locate elements, interact with controls, validate results, and close the application cleanly. These are the core building blocks for any desktop automation project.
Automating Windows applications with Appium and WinAppDriver is a practical way to test legacy systems, internal tools, and native Windows programs. In this blog, you set up the required tools, understood the key capabilities, and wrote a complete Python script for Notepad.
With this foundation in place, you can start exploring more complex applications and workflows. The same approach works for calculators, file explorers, ERP systems, and most Windows apps that expose UI Automation properties. This is a solid base to build reliable and maintainable desktop automation across your projects.
Need Desktop Automation Experts?
Desktop automation is a niche skill that is both hard to hire for and difficult to maintain. At Qxf2, we have engineers who truly enjoy this type of deep technical testing. Our open-source framework already supports Windows desktop applications, making it easier for us to deliver results quickly and reliably. If you need dependable, high-quality desktop automation, we have the expertise to help.

I love technology and learning new things. I explore both hardware and software. I am passionate about robotics and embedded systems which motivate me to develop my software and hardware skills. I have good knowledge of Python, Selenium, Arduino, C and hardware design. I have developed several robots and participated in robotics competitions. I am constantly exploring new test ideas and test tools for software and hardware. At Qxf2, I am working on developing hardware tools for automated tests ala Tapster. Incidentally, I created Qxf2’s first robot. Besides testing, I like playing cricket, badminton and developing embedded gadget for fun.

