Machines struggle with verifying things that humans find easy to check. Images, like charts, graphs, diagrams, and maps, are especially challenging for machines to evaluate. In this post, we introduce a method to automatically check important parts of generated images using Pix2Struct, an advanced model from the Transformers library. We were amazed by the model’s effectiveness in our testing of images.
Context
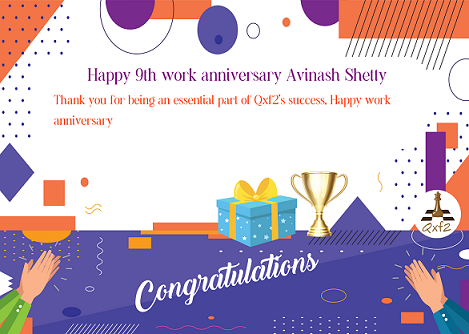
At Qxf2, we have implemented a lambda function that posts congratulatory images to employees on their work anniversaries. You can find a detailed explanation of this process in our this post. Testing other functions of the lambda was a straightforward task. However, I was particularly intrigued by the challenge of testing the functionality of the method responsible for image generation. I have been tinkering with AI/ML over the last several months. I felt like I could use a pre-trained model from the HuggingFace library. Specifically, I wanted the model to test one specific scenario – does the image show the right number of years the employee had worked with Qxf2? In the upcoming sections of this blog, I will elaborate on the implementation details of this testing approach.
Overview
I utilized Google’s Pix2Struct, an encoder-decoder transformer pre-trained in an image-to-text setting, to extract text from the image. My particular focus was on the Visual Question Answering (VQA) feature of Pix2Struct. It enables the model to answer questions based on an image or document. After experimenting with multiple models, I found satisfactory results with the pix2struct-docvqa-large model. By applying this model, I successfully extracted the displayed year from the image. Then, I performed an assertion to compare it against the mock data I had set up. This approach ensured that my tests were not dependent on any specific template or superficial changes that could occur in the image.
In this blog, I provide a detailed explanation of how I implemented this testing approach. I have provided steps on how to use this model. However, the point I want to emphasize is how testers can use such technology for testing challenging scenarios.
Implementation Approach: Extracting the anniversary year from the Image
In this section, I will provide a comprehensive overview of my test implementation. Firstly, I will explain the process of utilizing the Transformer model. And then demonstrate the test I developed.
Performing Visual Question Answering on Image:
-
1. Setup
2. Import necessary classes
3. Instantiate model and processor
4. Perform Visual Question Answering
Scripting the test:
-
1. Setup
2. Executing the Test: Verifying Anniversary Year Extraction
3. Cleanup
Before delving into the specifics, let me provide a concise yet informative overview of Pix2Struct.
Background on Pix2Struct: A Brief Overview
The Pix2Struct model along with other pre-trained models is part of the Hugging Face Transformers library. This library is widely known and used for natural language processing (NLP) and deep learning tasks. Pix2Struct, developed by Google, is an advanced model that seamlessly integrates computer vision and natural language understanding to generate structured outputs from both image and text inputs. It leverages the power of pre-training on extensive data corpora, enabling zero-shot learning. Hence, it can make predictions on previously unseen combinations of images and questions.
As my specific objective involved extracting text from an image using VQA, I selected the sub-model, pix2struct-docvqa-large. This is fine-tuned on Doc-VQA (Document Visual Question Answering). I chose this since my image has some text on it which I want to extract using VQA. Out of the available sub-models, I found that using this model yielded better results for my particular use case. The model is heavy though ~ 5GB. It is important to note that zero-shot learning sufficed for my needs. However, more comprehensive checks may require training the model on specific data.
Performing Visual Question Answering on Images
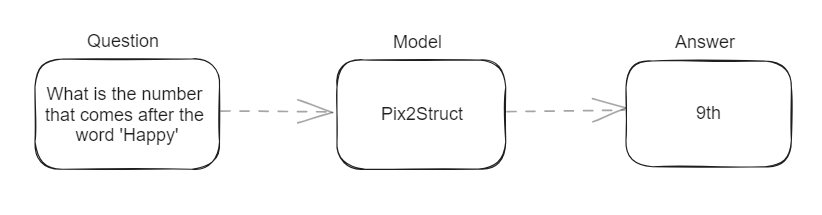
The work anniversary image consisted of a standard message that remained consistent for all employees, along with a varying congratulatory quote. The message section followed a format of “Happy {work_anniversary_year} work anniversary {emp_name}.” My primary objective was to extract the “work_anniversary_year” from this message. To achieve this, I formulated my question as follows: “What is the number or numeric value that appears immediately after the word ‘Happy’?” This approach proved successful for the majority of the images I worked with, although it required a few attempts with alternative questions before achieving optimal results.
1. Setup
In order to utilize the Transformers library and the ML framework for my task, I used PyTorch. It is an open-source deep learning framework widely used for model development and training. To install the necessary dependencies, including the Transformers library, you can use the following commands:
pip install transformers pip install torch |
Note: To select your preferences and install PyTorch, you can refer to this installation guide.
2. Import necessary classes
To begin, we need to instantiate a model and its corresponding processor. This can be achieved using the `from_pretrained()` class provided by the Transformers library. Let’s import the necessary classes:
from transformers import Pix2StructForConditionalGeneration as psg from transformers import Pix2StructProcessor as psp |
The `Pix2StructForConditionalGeneration` class is designed specifically for generating structured outputs from images and questions. On the other hand, the `Pix2StructProcessor` class is responsible for processing the inputs and outputs of the Pix2Struct model, ensuring seamless integration with our testing workflow.
3. Instantiate the model and processor
Subsequently, we can utilize the previously imported classes to load the desired model:
model = psg.from_pretrained("google/pix2struct-docvqa-large") |
An instance of the Pix2StructForConditionalGeneration model will be initialized, and the pre-trained weights specified by the “google/pix2struct-docvqa-large” identifier will be loaded.
We also need to instantiate the processor to handle the input data and ensure it is properly prepared for the model:
processor = psp.from_pretrained("google/pix2struct-docvqa-large") |
The `processor` object, created using the `Pix2StructProcessor` class, will handle the necessary data processing tasks, ensuring that the input is properly formatted and suitable for the model’s requirements.
4. Perform Visual Question Answering
First, we open the image using the `Image` function from the PIL library and define our question. These inputs are then provided to the processor.
image = Image.open(image_path) question = "What is the number or numeric value that comes after the word Happy?" inputs = processor(images=[image], text=[question], return_tensors="pt").to(DEVICE) |
This step encodes the image and question inputs into a suitable format for the model. Additionally, it specifies that the processed inputs should be returned as PyTorch tensors. These are multi-dimensional arrays, serving as the fundamental data structure in PyTorch.
To set up the device, we assign the value of “cuda” to `DEVICE` if it is available; otherwise, we assign it the value of “cpu”.
DEVICE = "cuda" if torch.cuda.is_available() else "cpu" |
Next, we utilize the loaded model to generate predictions by passing the processed inputs:
predictions = model.generate(**inputs) |
Finally, we decode the generated predictions using the processor and extract the first generated output. This corresponds to the top-ranked prediction among the list of generated outputs. To ensure the final decoded output excludes any special tokens used by the model, we set `skip_special_tokens` to True.
answer = processor.decode(predictions[0], skip_special_tokens=True) |
After implementing this process on the work anniversary image, observed successful extraction of the anniversary year.

Here is the complete code snippet.
Creating the Test Script: Validating Anniversary Year Extraction
To write the test, I utilized the unittest framework. The test consists of three main steps: setup, performing the test, and cleanup.
1. Setup
In the setup phase, we initialize any necessary resources or configurations required for the test. In this case, create test images and instantiate model and processor.
Generate test images:
In this step, I created mock data (such as `emp_name`, `joined_date`, and `current_date`) for few employees. This data is then passed to the `calculate_work_anniversary` function of the work anniversary lambda. The function returns a message and `quote_string`. My focus was on the message, which follows the format: “Happy {work_anniversary_year} work anniversary {emp_name}”.
The code snippet can be found here.
Instantiation of model and processor:
To optimize the testing process and reduce redundancy, the instantiation of the model and processor is performed only once for all the tests. This operation can be time-consuming, and therefore, it is more efficient to execute it once and share the instantiated objects among the tests.
To achieve the above two, I utilized the setUpClass method, which is a class method provided by the unittest framework.
class TestWorkAnniversaryYear(unittest.TestCase): @classmethod def setUpClass(cls) -> None: cls.model, cls.processor = instantiate_model_and_processor() cls.image_paths = cls.generate_test_images() |
2. Executing the Test: Verifying Anniversary Year Extraction
Next, I proceeded to write the test that validates the extraction of the anniversary year from various images and compares it against the expected anniversary numbers. To achieve this, I employed the parameterized decorator, allowing multiple tests to be executed within a single test method. Each test case can be effectively handled by providing a list of test inputs. In this case, they are the anniversary year and the corresponding image.
After retrieving the extracted anniversary number from the image using VQA, I utilized pattern matching to isolate the digit from the word. For example, extracting the digit 9 from the word “9th”.
@parameterized.expand([ (4, "Drishya TM_greeting_card.png"), (3, "Preedhi Vivek_greeting_card.png"), ]) def test_anniversary_year(self, anniversary_number, image_path): "Test the anniversary year extraction for different anniversary numbers" img_anniv_year = extract_anniv_year(image_path) self.assertEqual( img_anniv_year, anniversary_number, f"Expected {anniversary_number}, but got {img_anniv_year}", ) |
3. Cleanup
Finally, remove the generated test images as part of the cleanup process.
@classmethod def tearDownClass(cls) -> None: "Remove existing images from test runs" for image_path in cls.image_paths: if os.path.exists(image_path): os.remove(image_path) |
The complete code snippet is here.
The test took around 5 mins to run on my local machine for two images.
Conclusion
In conclusion, my exploration of Pix2Struct and its application in testing images has yielded promising results. The zero-shot approach using the pre-trained model proved effective in extracting the anniversary year from the work anniversary images. However, it’s important to note that for more complex tasks, like testing the accuracy of the congratulatory quotes, fine-tuning the model with specific dataset may be necessary. Nonetheless, this experience highlights the potential of leveraging Transformers technology for testers, offering a valuable tool for tackling challenging tasks such as testing of images. By embracing AI-powered solutions, testers can expand their testing capabilities and uncover new avenues for enhancing software quality.
Hire Qxf2
Do you find your testers often skipping testing critical features because they are too hard to test? Is your testing team lacking the necessary technical leadership? Hire QA engineers from Qxf2. Our experienced testers go beyond test automation, delving into areas like microservices, data pipelines, and AI/ML-based apps. With our strong technical skills and deep understanding of complex systems, we are ideal partners to your engineering teams. Contact us.
I have been in the IT industry from 9 years. I worked as a curriculum validation engineer at Oracle for the past 5 years validating various courses on products developed by them. Before Oracle, I worked at TCS as a Manual tester. I like testing – its diverse, challenging, and satisfying in the sense that we can help improve the quality of software and provide better user experience. I also wanted to try my hand at writing and got an opportunity at Qxf2 as a Content Writer before transitioning to a full time QA Engineer role. I love doing DIY crafts, reading books and spending time with my daughter.


[[..Pingback..]]
This article was curated as a part of #92nd Issue of Software Testing Notes Newsletter.
https://softwaretestingnotes.substack.com/p/issue-92-software-testing-notes
Web: https://softwaretestingnotes.com