Problem: JUnit tutorials are often written by testers with a reasonable amount of unit checking expertise
Why this post?
There are plenty of JUnit tutorials available online. They are often written by testers with a reasonable amount of unit checking experience. The problem is that experts and beginners see things differently. I began noticing that beginners often read these JUnit tutorials written by experts and come away feeling like there is a unsurmountable mountain of knowledge they need to learn before applying the concepts. So we decided to try something different – writing tutorials for beginners by beginners. Rupesh Mishra, a Qxf2 Services employee, volunteered to write this post. The rest of the post is written by Rupesh.
Getting started with JUnit
Using JUnit you can write unit test cases for Java programs, run the test cases and assert the test output with expected result. JUnit makes it easy and fast for me to write unit tests. This post will explain how to create and execute JUnit test cases in Eclipse. At a high level, these are the steps we cover:
1. Create a project in Eclipse
2. Write a Java program to use as the program under test
3. Create test file
4. Write the JUnit test
5. Execute the test and view results
1. Create a project in Eclipse
To write your first Java program using Eclipse your system should have an updated version of Eclipse. You can download and install Eclipse from here.
Now in Eclipse IDE, to create your first Java project click on File -> New -> Java Project.
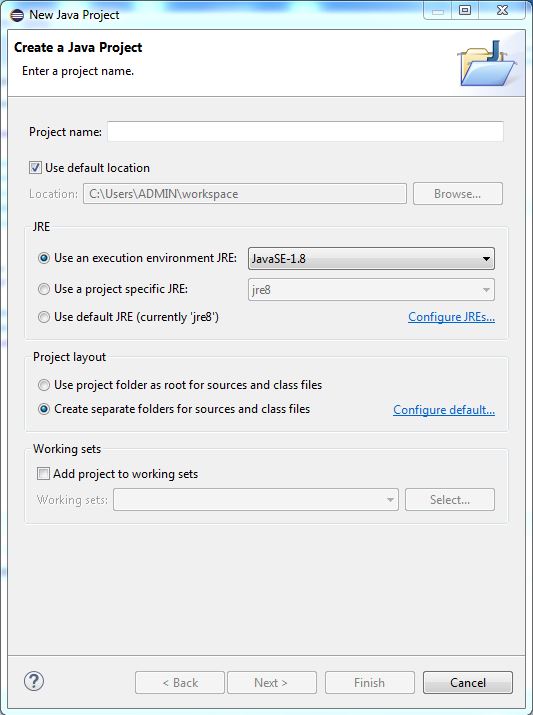
Now I got New Java Project window to create a project.
- Give a name of your project. Here I am giving javatesting
- Tick mark the check-box for “Use default location”.
- Under JRE section select radio button for “Use an execution environment JRE”.
- Under Project layout section select radio button for “Create separate folders for sources and class files”.
- Keep remaining as it is. Click Finish.
To create a new Class right click the Project. For me project name is javatesting.
Choose New -> Class,
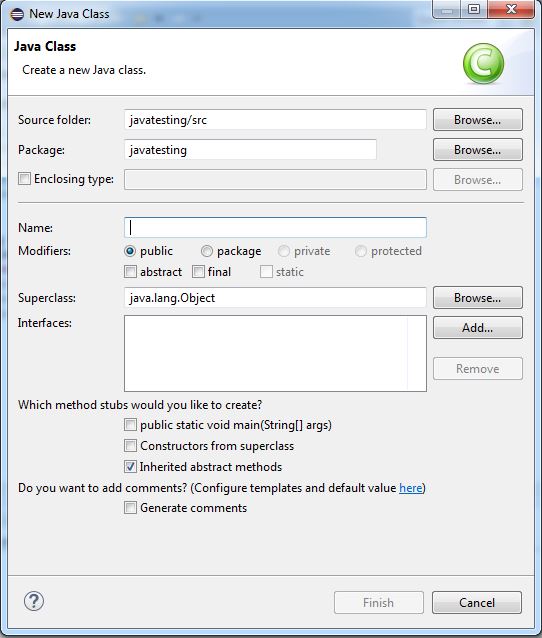
In the New Java Class window
- Source folder should be “Project name / src” like-javatesting/src.
- Normally package name will be same as project name.
- Put the name of class,I put practice_code.java
- Keep remaining as it is. Click Finish.
2. Write a Java program to use as the program under test
Here I created a very simple Java program in practice_code.java under project name javatesting to test with JUnit.
package javatesting; public class Practice_code { /* * Remove character 'A' if it comes in the first two places of the string * Examples: * "ABCD"=>"BCD" * "AACD"=>"CD" * "BACD"=>"BCD" * "AAAA"=>"AA" */ public String truncateAinFirst2pos(String str){ if (str.length()<=2) return str.replace("A", ""); String first2Chars = str.substring(0,2); String stringMinusFirst2Chars = str.substring(2); return first2Chars.replaceAll("A", "") + stringMinusFirst2Chars; } } |
In this program I am truncating character ‘A’ if it comes to the first two places of the string.
3. Create test file
In order to test this method using JUnit, I must add JUnit to the path, create a test class and implement a test. Eclipse has JUnit support and we can use it. But before creating a test class its good practice to create a new source folder dedicated just to test. Right click to project name javatesting, choose New->source folder, name it test and click to finish.
To create test class right click to practice_code.java,choose New-> JUnit Test Case. In the New JUnit Test Case window
- Select radio button for ‘New JUnit 4 test’
- Change the Source folder location from javatesting/src to javatesting/test
- Name of the this test class will automatically be your Java class name + Test. You can change it if you have to create multiple test classes for the same Java class.

Keep remaining options as it is and click Next.
Now you can select methods for which you want to create your tests. I am selecting my only method “truncateAinFirst2pos(String )” under class Practice_code. Click to finish.
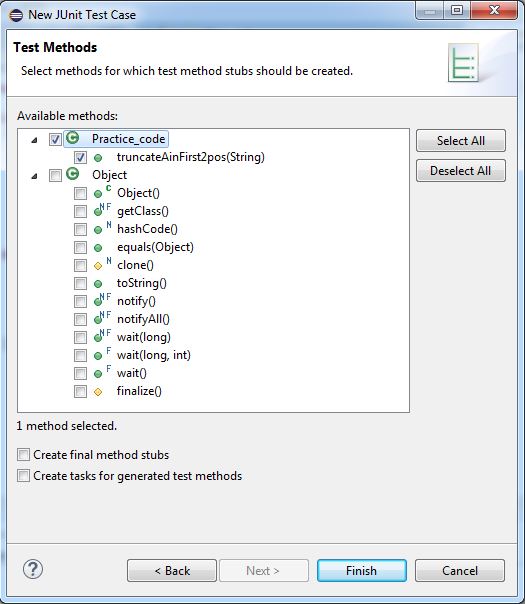
If this is the first time you are doing this operation, Eclipse will ask you to add JUnit library to your class path. Click OK.

Now I got my test class file Practice_codeTest.java into the test folder.
4. Write the JUnit test
Eclipse already created a class named Practice_codeTest with method testTruncateAinFirst2pos() in our test file Practice_codeTest.java.
package javatesting; import static org.junit.Assert.*; import org.junit.Test; public class Practice_codeTest { @Test public final void testTruncateAinFirst2pos() { fail("Not yet implemented"); // TODO } } |
Here Eclipse has already imported ‘junit.Test’ to test the method and ‘junit.Assert’ to compare the test output with expected result.
Lets put some condition in our method to test our class. Create a instance ‘InputString’ for the class Practice_code.
Practice_code InputString = new Practice_code(); |
Now I am going to use one of the JUnit methods named assertEquals which allows me to compare expected output with actual output.
//assertEquals("expected output","actual output" ); assertEquals("BCD", InputString.truncateAinFirst2pos("ABCD")); |
Here is my complete Practice_codeTest.java file to test the method truncateAinFirst2pos() in Practice_code.java file.
package javatesting; import static org.junit.Assert.*; import org.junit.Test; public class Practice_codeTest { @Test public final void testTruncateAinFirst2pos() { Practice_code InputString = new Practice_code(); assertEquals("BCD", InputString.truncateAinFirst2pos("ABCD")); } } |
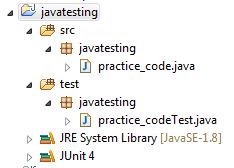
My project files structure is looking like this.
5. Execute the test and view results
For execution right click on your JUnit class file, in my case Practice_codeTest.java and choose Run As->JUnit Test.
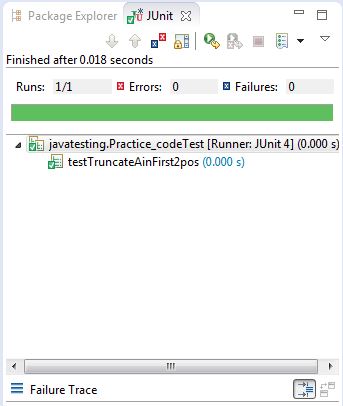
Here is Junit runner window, which shows Errors 0 and Failures 0 that means all pass.
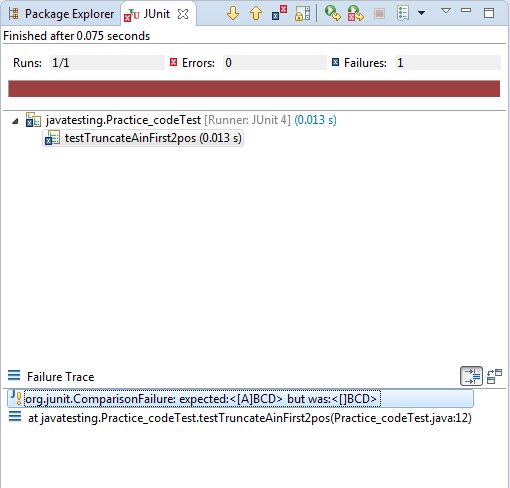
To show failure condition I am making some changes in my expected output.
//assertEquals("expected output","actual output" ); assertEquals("ABCD", InputString.truncateAinFirst2pos("ABCD")); |
Now, as expected, in JUnit runner window I got Failures 1.JUnit clearly points out whats wrong in your code under Failure Trace as its showing here “expected:<[A]BCD> but was:<[]BCD>”.
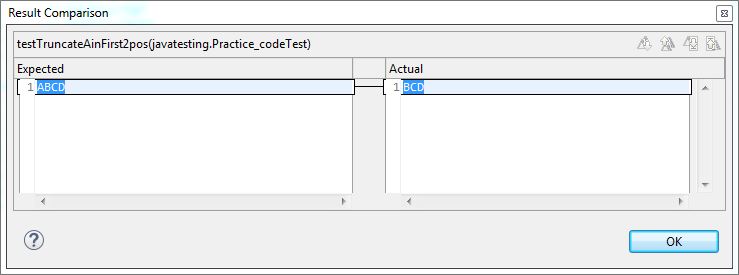
If I double click the Failure Trace line it will show the Result Comparison window.
And that brings us to the end of the tutorial. Let us know if it helped having a beginner write for beginners. Stay tuned for an upcoming post on Junit asserts and matchers.
I tinker with technology. My work has helped me gain good exposure to different areas of testing like Test planning and execution, filing bug reports, preparing test reports, Writing Automation script using python and Selenium webdriver. I am also aware of Unit testing using Junit, Jasmine and Python. I also have good knowledge of HTML, JavaScript, CSS, SQL, Django and Unix.Beside testing I like playing cricket, football, squash and listening to music.


Did u assume that the user has coding language experience ??
Can u re-write the same for the people who do not have coding experience
Sai, the post assumes that you already have some coding knowledge.