Assuming you already know what you want to automate and that you have a good reason to automate it, then GUI automation is largely about:
a) identifying a web element you want to interact with
b) performing an action on the identified element
c) repeat steps a),b) until you have automated the workflow that you identified.
To perform step a), all GUI automation tools use locators. A locator effectively tells your automation to look for “a big blue button with the label Confirm on it” or “a table cell with the word Qxf2 in it”. For web applications, XPaths and CSS selectors are used to locate web elements. This post helps you get started with writing good XPaths.
XPath is used to locate a web element based on its XML(Extensible Markup Language) path. XPaths can be created in two ways: Absolute XPath and Relative XPath. Absolute XPaths are very susceptible to changes in the web page whereas Relative XPaths can be made more robust.This post focuses on Relative Path, henceforth every instance of XPath here would mean only Relative paths.
Why this post?
The foundation to robust GUI automated checks is writing good element locators. While talking to testers, we noticed that their habits around writing element locators have not evolved since they first learnt how to write them. Most testers just learn to write locators one way when they start learning GUI automation and then stick to it. Many bad habits that may be ok when getting started, persist through the tester’s career. So we thought we would write a series of posts to help you build good fundamentals for identifying elements for your GUI automation.
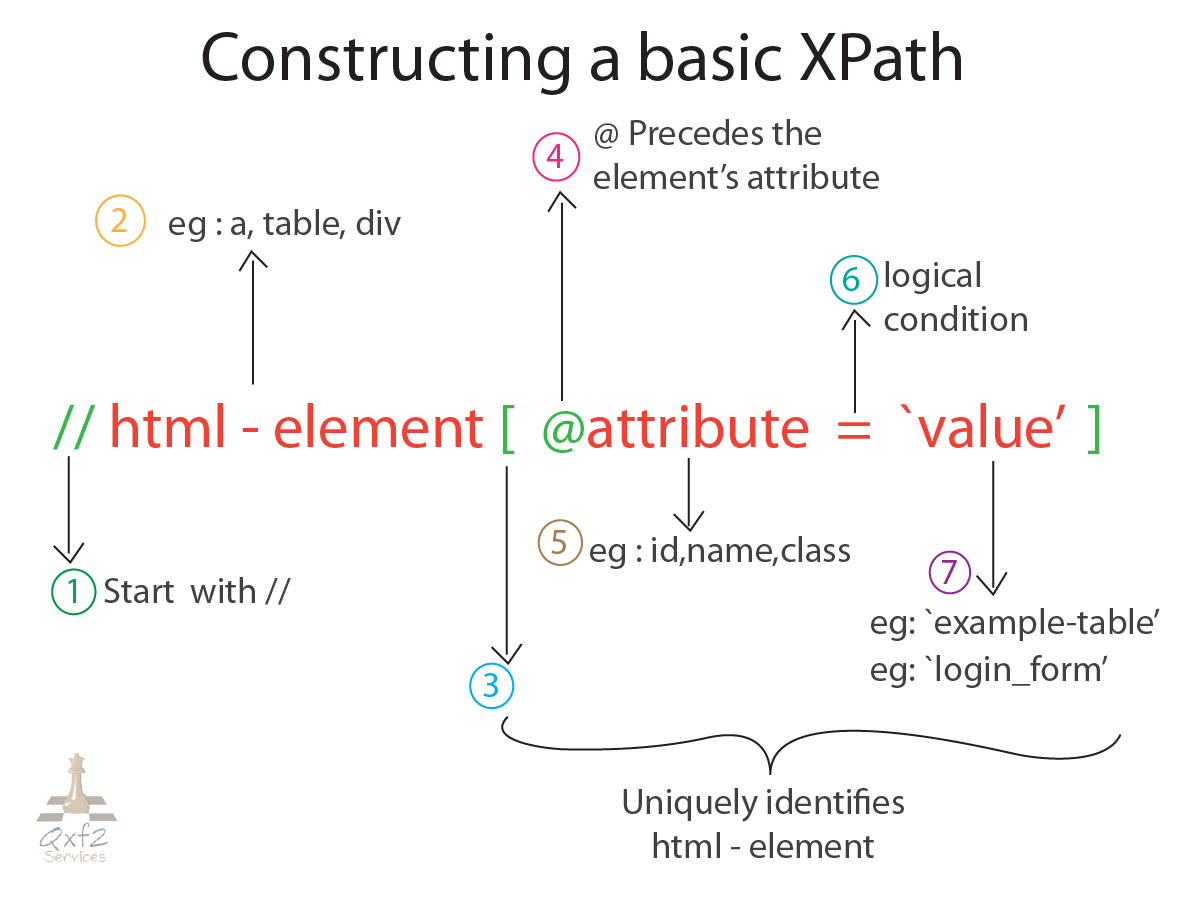
XPath structure
An XPath:
a) starts with a //
b) is followed by a HTML element
c) the HTML element is identified by a condition within square brackets
c1) the condition involves the attribute(s) of the HTML element
c2) the attribute is referenced by the @ symbol
c3) the condition can have logical operators like NOT, AND, OR, contains, =, etc.
Constructing a good XPath involves finding a html-element, locating it uniquely based on its attributes and then if needed, deriving a path referencing it to another element which is less likely to change in a web page. We have tackled this more advanced version in this post.
Examples
We are going to use the elements in the page http://qxf2.com/selenium-tutorial-main to clearly explain arriving at good XPaths. Let us try and create Xpaths for:
Example 1. the name field in the form
Example 2. the submit button in the form with text Click me!
Example 3. the cell with text [email protected] in the Example Table.
Example 1.
Open the page with firefox or chrome, right click on the name field in the form and select Inspect Element

Note: We have tried arriving on an XPath from the basic syntax //html element[@attribute = ‘value’] adding element,attribute and value with each step
the first step in writing an XPath is identifying the html element ,input with unique attributes represent the element in the web page,
//input[@attribute = 'value'] |
in the next step an attribute is chosen for the html element,the id attribute is chosen for this example as it is unique
//input[@id = 'value'] |
in the final step we add the value ‘name’ to its attribute(id)
//input[@id = ‘name’] |
thus writing an XPath for the name field in this page is straightforward as it is represented by a html element with unique attributes.
Excample 2.
To inspect click me! right click on it and select Inspect Element
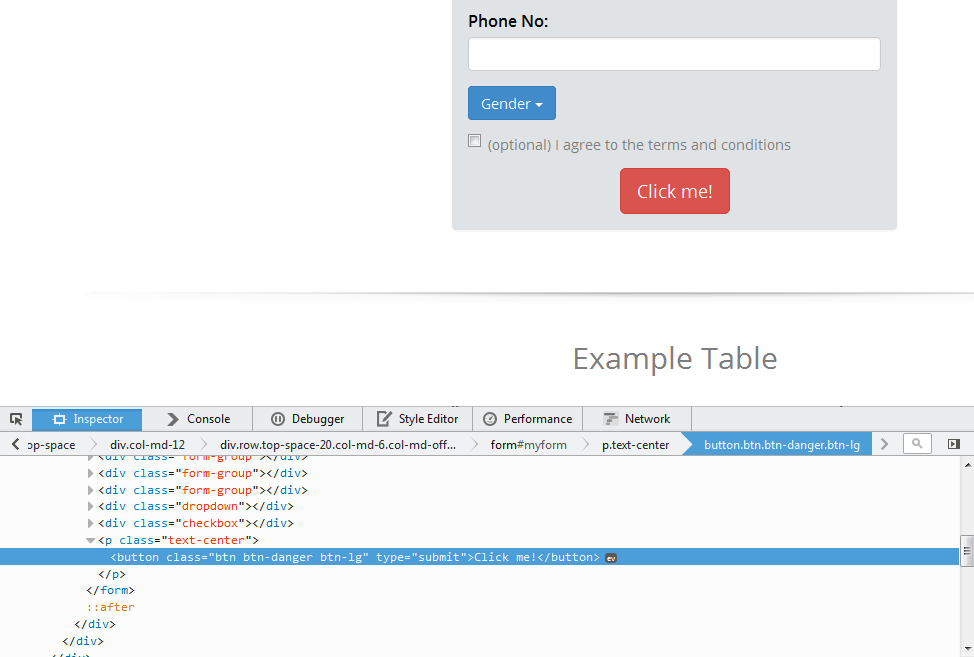
The html element for this example is button
//button[@attribute = 'value'] |
the attributes for the button element are class and type, we will use a different attribute for this example as we assume the values of class and type may change
//button[contains(text(),'value')] |
The value for the attribute text() can be a phrase that is used to represent the element
//button[contains(text(),'Click me!')] |
Contains() operator can be used if a particular text is unlikely to be changed,the name of the button is going to remain ‘Click me!’
Example 3.
To inspect [email protected] right click on it and select Inspect Element
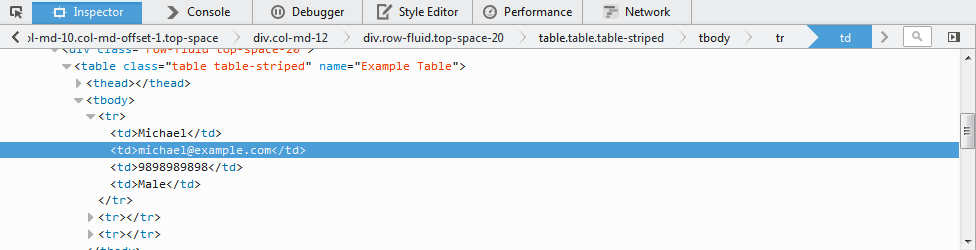
The html-element for this example can be the table as its name attribute seems fixed.
unlike the other two examples the XPath for this element has to be derived from a html element above it as the element that holds [email protected] has no unique attributes.
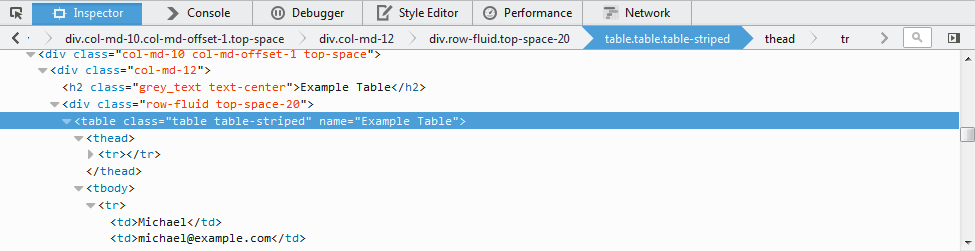
the closest html element is table
//table[@attribute = 'value'] |
the attributes of the html element are class and name, like the previous examples we have chosen an attribute that is unlikely to change
//table[@name = 'value'] |
the value of the name attribute is ‘Example Table’
//table[@name = ‘Example Table’] |
with the html-element set and defined, the element can be arrived at in two different ways
(a) //table[@name = 'Example Table']/tbody/tr[1]/td[2] |
(b) //table[@name = 'Example Table']/descendant::td[contains(text(),'[email protected]')] |
the XPath in example (a) is derived from the table html element to the corresponding element using indices whereas the XPath in example (b) we use the descendant (XPath axis)to navigate to the element.
though the examples a and b would find the intended elements, the example (a) is usually not preferred since the chances of re-ordering the data in the table are high ,i.e any other element could take the place of [email protected] and it could be pushed to a newer location . The descendant is used to make our locator robust to any changes that can be made to data in the rows of the table.
Tools:
You can check if the XPath you constructed identifies the element you want or not by using a couple of useful tools.
1. Firebug– Firebug is a Firefox plugin. Firebug provides access to a plethora of developer tools that supports editing, debugging and monitoring CSS, HTML and JavaScript live on any webpage. It assists in writing XPaths as it supports inspecting and editing HTML attributes and their values. For additional information on Firebug please refer Using Firebug 2.0 to craft XPaths
2. CSS and XPath checker– CSS and XPath checker is add-on for Chrome to help you verify your XPaths.

Hope this helps get you started with XPaths.
My expertise lies in engineering high-quality software. I began my career as a manual tester at Cognizant Technology Solutions, where I worked on a healthcare project. However, due to personal reasons, I eventually left CTS and tried my hand at freelancing as a trainer. During this time, I mentored aspiring engineers on employability skills. As a hobby, I enjoyed exploring various applications and always sought out testing jobs that offered a good balance of exploratory, scripted, and automated testing.
In 2015, I joined Qxf2 and was introduced to Python, my first programming language. Over the years, I have also had the opportunity to learn other languages like JavaScript, Shell scripting (if it can be called a language at all), and more recently, Rust. Despite this exposure, Python remains my favorite language due to its simplicity and the extensive support it offers for libraries.
In my free time, I like to watch football (I support Arsenal Football Club), play football myself, and read books.


One thought on “%1$s”