Problem: There are not many good tutorials on Android unit testing
Android applications are written in Java. So you probably think if you know JUnit, you can unit test Android applications. Surprise! JUnit is not sufficient for unit testing Android applications. Junit works when the code runs within a JVM. Android applications interact with the Android OS. So you need to learn and use a different testing framework.
Why this post?
Qxf2 likes unit testing. Unit testing is one component of an effective testing strategy. Good unit testing rocks. Android unit testing is still in its early days. There are not too many good tutorials that help testers get started with Android unit testing. This post is aimed at helping hands on testers get started with Android unit testing.
NOTE: You can read our other posts on mobile app testing here.
Overview
In this post we will show you two ways of writing and executing unit tests for Android applications:
1) Android testing framework: Android provides a testing framework to run unit tests on both emulators and physical devices.
2) Robolectric: Robolectric provides a unit test framework that allows you to run tests inside the JVM on your computer.
We will use Mileage Tracker app as our the application under test. We chose it because it was open source, the code base was relatively small and came with some unit tests. We will write a simple unit test and run it using both Android test framework and Robolectric.
Part I: Android testing framework
The Android framework provides a testing framework to test your application. Android test suites are based on JUnit 3. We can use JUnit to test a class that doesn’t call the Android API. We should use Android’s JUnit extensions to test Android components. At a high level our steps are:
1. Set up Eclipse ADT
2. Import the test app to eclipse
3. Select a test and check the method
4. Run the test
1. Set up Eclipse ADT
Download the Eclipse ADT and follow the instructions mentioned here
2. Import the test app to eclipse
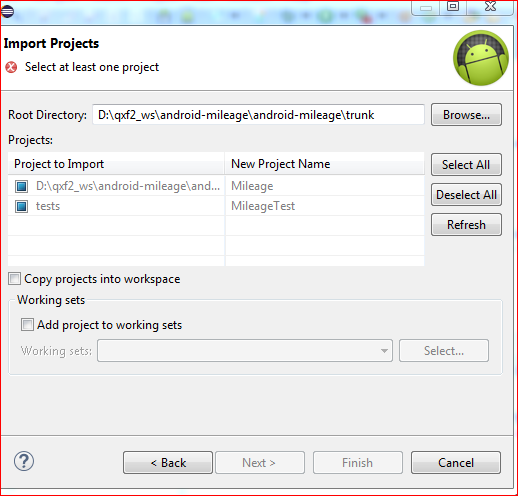
Create a new “Android Project from Existing Code” and import the downloaded Mileage Tracker app to your eclipse. The Mileage Tracker app also has some sample tests which are already written. Set your root directory and check the projects to import as shown below.
3. Select a test and check the method
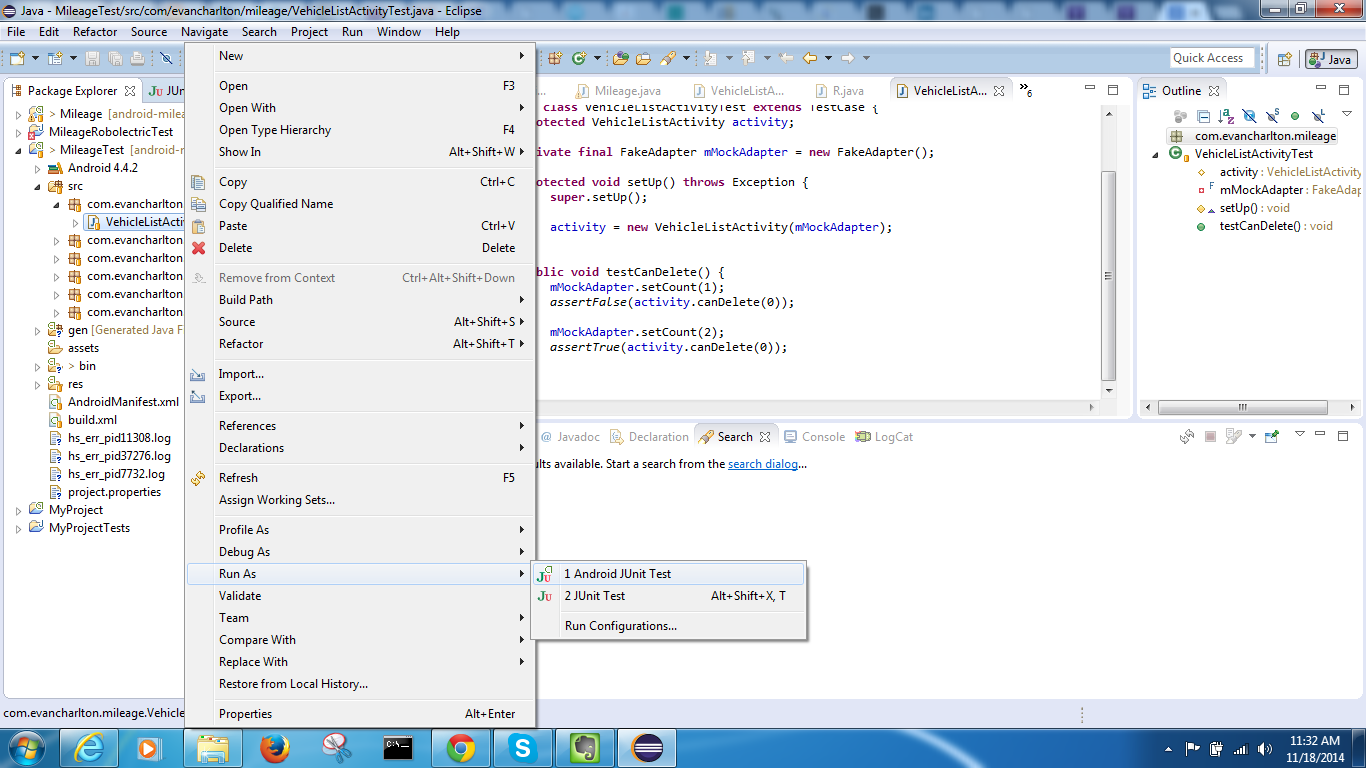
The test project already has some tests written to check some of the apps functionality. We will focus on the test VehicleListActivityTest.java which checks the canDelete() method in VehicleListActivity.java in the package com.evancharlton.mileage.
This method returns true if the getAdapter().getCount() is more than 1, else it returns false. This means that in the Vehicle tab you can delete any vehicle information only if there are more than one vehicle information present, else the delete option is not available.
@Override public boolean canDelete(int position) { return getAdapter().getCount() > 1; } |

VehicleListActivityTest.java:
package com.evancharlton.mileage; /** * Test to check that canDelete() in VehicleListActivity.java in the package com.evancharlton.mileage returns true if the getAdapter().getCount() is more than 1, else returns false. *A FakeAdapter class is created which extends BaseAdapter class so that we can set the count using setCount() function */ import com.evancharlton.mileage.adapters.FakeAdapter; import com.evancharlton.mileage.tests.TestCase; public class VehicleListActivityTest extends TestCase { protected VehicleListActivity activity; // Creating an object of FakeAdaptor class private final FakeAdapter mMockAdapter = new FakeAdapter(); protected void setUp() throws Exception { super.setUp(); activity = new VehicleListActivity(mMockAdapter); } public void testCanDelete() { mMockAdapter.setCount(1); //Since the vehicle count is set to 1 this will return false assertFalse(activity.canDelete(0)); mMockAdapter.setCount(2); //Since the vehicle count is set to 2 this will return true assertTrue(activity.canDelete(0)); } } |
4. Run the test
Running the test as Android JUnit involves building, deploying, and launching the app in an Android emulator or a physical device, hence the directory structure of MileageTest project is similar to that of Mileage Project. Please refer to this link to set up the run configuration to run your tests either in device or an emulator. If you are running your test using emulator, follow this link for the process on how to create an emulator.
Here is the snapshot of the test run as Android JUnit Test.
– VehicleListActivityTest for the mileage app.
-Result of the test (using an emulator)
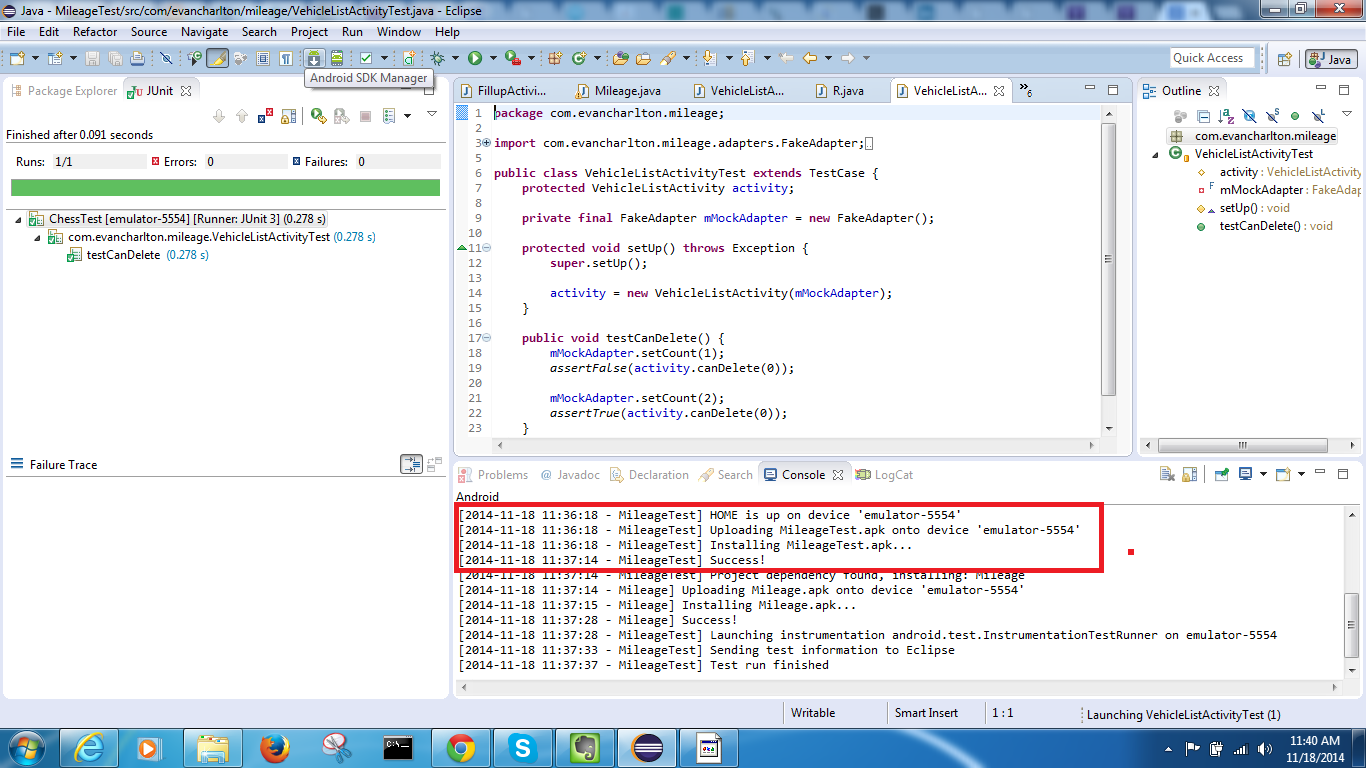
The console output as shown in the above screenshot shows that the MileageTest.apk is installed on the emulator for the test to be executed.
Part II: Android unit testing using Robolectric
Robolectric is a unit testing framework that allows you to write and run tests inside the JVM on your workstation. Robolectric makes this possible by rewriting Android SDK classes as they are being loaded and making it possible for them to run on a regular JVM. Running tests using the Android testing framework involves building, deploying and launching the app in an Android emulator or a physical device. The process is a bit slow. Robolectric addresses some of these concerns. At a high level our steps are:
1. Download Robolectric jar and set up the test app in eclipse
2. Select a method to test
3. Write the test
4. Setting up the Run configuration
5. Running the test
1. Download Robolectric jar and set up the test app in eclipse
Follow the detailed steps given here to download the required jar and set up the Mileage Tracker app. In some cases you may require fest.jar and maps.jar files, you can refer to link to set up Robolectric with these jars.
2. Select a method to test
We will test the same canDelete() method as mentioned above for Android unit test.
3. Write the test
To run our test using Robolectric, we will annotate the test using the @RunWith annotation.
package com.evancharlton.mileage; * Test to check that CanDelete() in VehicleListActivity.java in the package com.evancharlton.mileage returns true if the getAdapter().getCount() is more than 1, * else it returns false. A FakeAdapter class is created which extends BaseAdapter class so that we can set the count using setCount() function */ import static org.junit.Assert.*; import org.junit.Before; import org.junit.Test; import org.junit.runner.RunWith; import org.robolectric.Robolectric; import org.robolectric.RobolectricTestRunner; import org.robolectric.annotation.Config; import com.evancharlton.mileage.VehicleListActivity; //@Config annotation so that Robolectric emulate an SDK version, since Robolectric doesn't support API level 19 and above @Config(emulateSdk = 18) //To run your test with Robolectric, you need to tell JUnit use the @RunWith annotation @RunWith(RobolectricTestRunner.class) public class VehicleListActivityTest { protected VehicleListActivity activity; private final MyAdapter testAdapter = new MyAdapter(); @Before public void setup() throws Exception { activity = new VehicleListActivity(testAdapter); } @Test public void testCanDelete() throws Exception { testAdapter.setCount(1); //Since the vehicle count is set to 1 this will return false assertFalse(activity.canDelete(0)); testAdapter.setCount(2); //Since the vehicle count is set to 2 this will return true assertTrue(activity.canDelete(0)); } } |
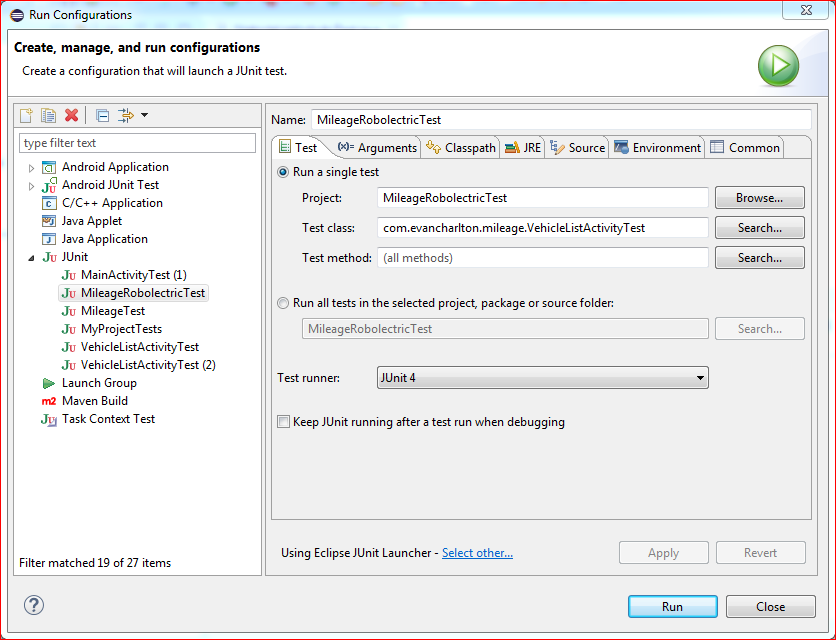
4. Setting up the Run configuration
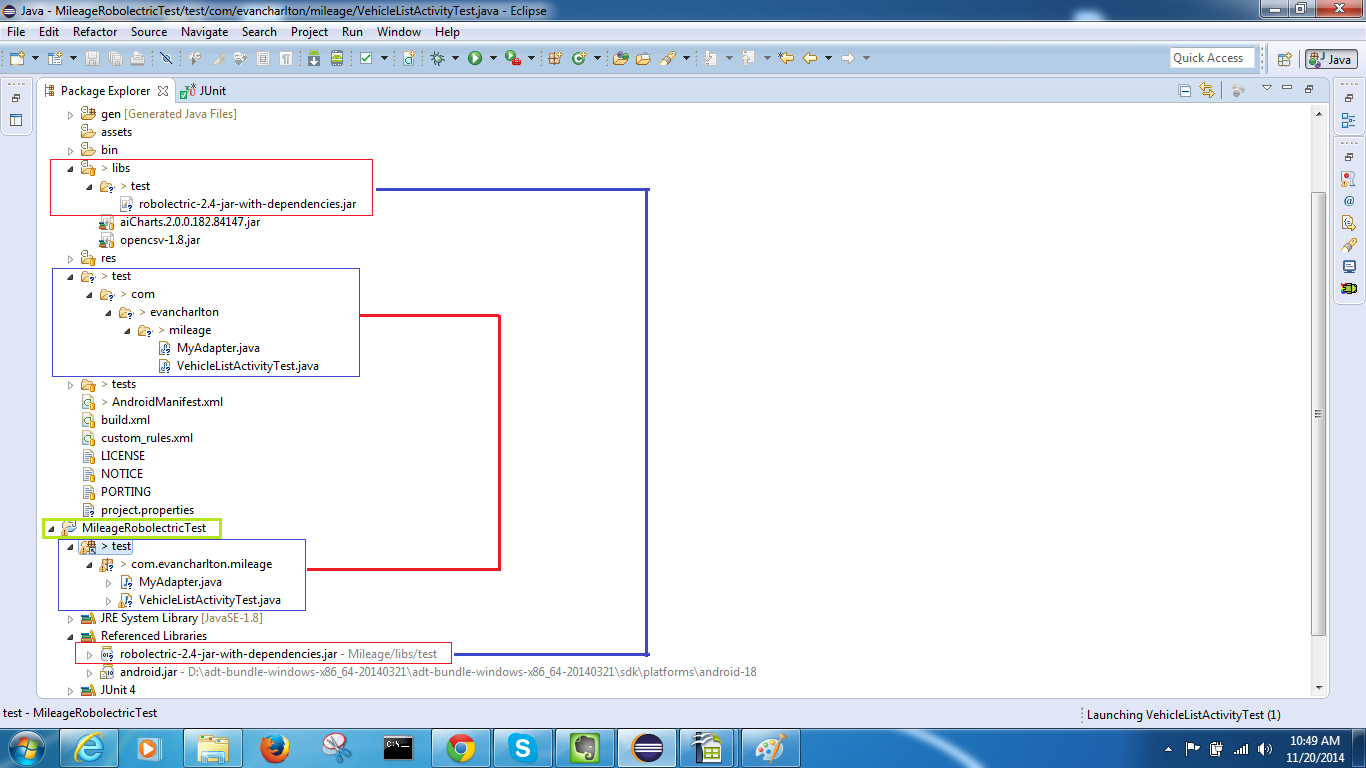
You can refer to the Setup Run Configuration section in this link to configure it properly. Here is snapshot of the test run configuration for our test project.
5. Running the test
Select the Run configuration which you created, run the test and verify the JUnit test result.
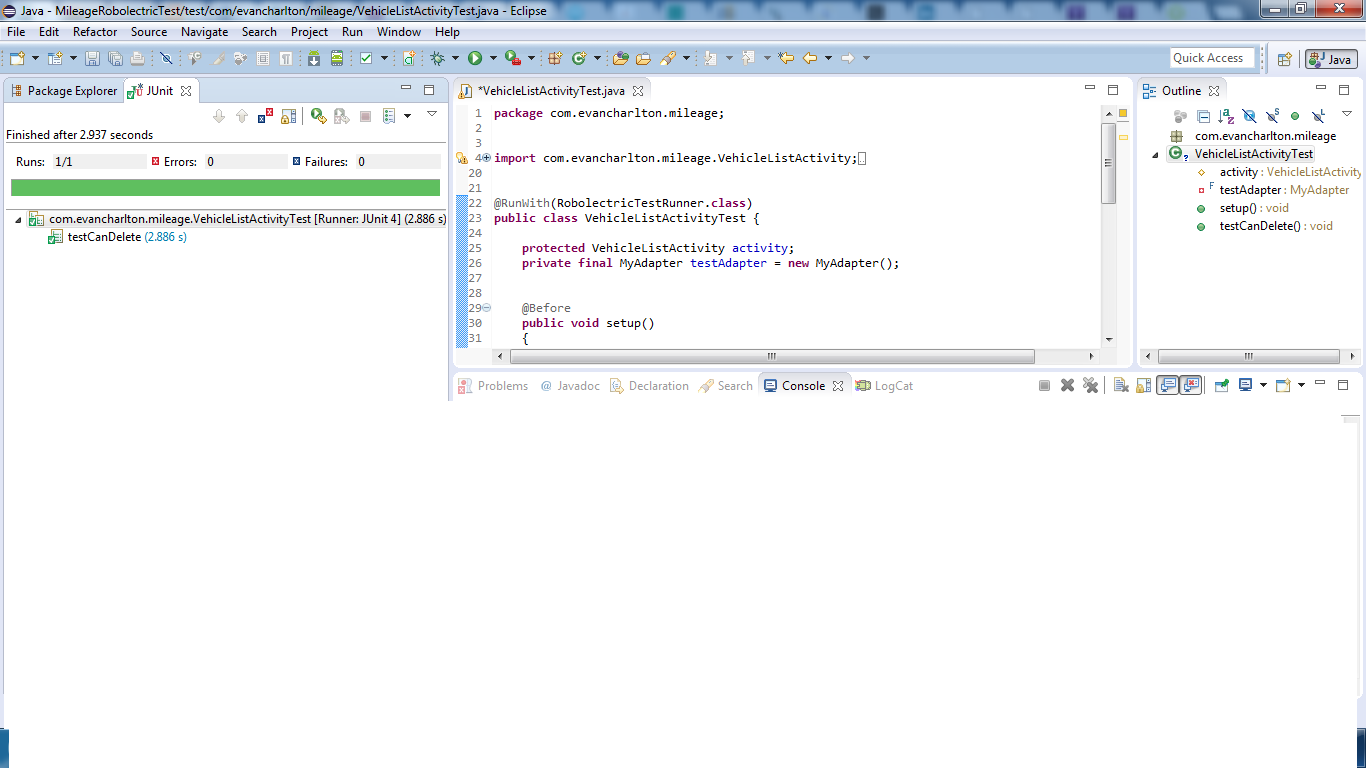
There you go. Android unit testing is not rocket science.

I am a dedicated quality assurance professional with a true passion for ensuring product quality and driving efficient testing processes. Throughout my career, I have gained extensive expertise in various testing domains, showcasing my versatility in testing diverse applications such as CRM, Web, Mobile, Database, and Machine Learning-based applications. What sets me apart is my ability to develop robust test scripts, ensure comprehensive test coverage, and efficiently report defects. With experience in managing teams and leading testing-related activities, I foster collaboration and drive efficiency within projects. Proficient in tools like Selenium, Appium, Mechanize, Requests, Postman, Runscope, Gatling, Locust, Jenkins, CircleCI, Docker, and Grafana, I stay up-to-date with the latest advancements in the field to deliver exceptional software products. Outside of work, I find joy and inspiration in sports, maintaining a balanced lifestyle.


One thought on “%1$s”